
User Manual
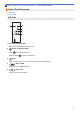
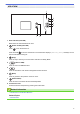
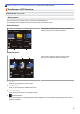
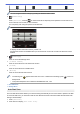
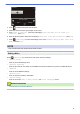


Table Of Contents
- Online User's Guide ADS-2200/ADS-2700W
- Table of Contents
- Before You Use Your Brother Machine
- Introduction to Your Brother Machine
- Paper Handling
- Scan
- Before Scanning
- Scan Using the Scan Button on Your Brother Machine
- Save Scanned Documents on Your Computer
- Save Scanned Documents to a USB Flash Drive
- Send Scanned Data to an Email Server
- Set Up the Address Book
- Scan to FTP
- Scan to SFTP
- Scan to Network
- Web Services for Scanning on Your Network (Windows 7, Windows 8 and Windows 10)
- Scan Options Using the Touchscreen
- Restrict Scan Functions from External Devices
- Scan from Your Computer (Windows)
- Scan from Your Computer (Mac)
- Network
- Supported Basic Network Features
- Network Management Software and Utilities
- Additional Methods of Configuring Your Brother Machine for a Wireless Network
- Before Configuring Your Brother Machine for a Wireless Network
- Configure Your Machine for a Wireless Network Using the One-Push Method of Wi-Fi Protected Setup™ (WPS)
- Configure Your Machine for a Wireless Network Using the PIN Method of Wi-Fi Protected Setup™ (WPS)
- Configure Your Machine for a Wireless Network Using the Machine's Control Panel Setup Wizard
- Use Wi-Fi Direct®
- Scan from Your Mobile Device Using Wi-Fi Direct
- Configure Your Wi-Fi Direct Network
- Wi-Fi Direct Network Configuration Overview
- Configure Your Wi-Fi Direct Network Using the One-Push Method
- Configure Your Wi-Fi Direct Network Using the One-Push Method of Wi-Fi Protected Setup™ (WPS)
- Configure Your Wi-Fi Direct Network Using the PIN Method
- Configure Your Wi-Fi Direct Network Using the PIN Method of Wi-Fi Protected Setup™ (WPS)
- Configure Your Wi-Fi Direct Network Manually
- Advanced Network Features
- Technical Information for Advanced Users
- Security
- Troubleshooting
- Routine Maintenance
- Machine Settings
- Appendix

0 1 2 Max
You can configure wireless settings by pressing the Wireless Status button.
5. ([Shortcuts])
Press [Shortcuts] and then , to create Shortcuts for frequently-used operations such as Scan to PC,
Scan to E-mail, Scan to USB, or other functions.
You can quickly scan using the options set as Shortcuts.
-1/5-
SettingsScan
Shortcuts
To display the other Shortcuts screens, press d or c.
Five Shortcut screens are available with up to four Shortcuts on each tab. A total of 20 Shortcuts can be
created.
6. ([Settings])
Press to access the Settings menu.
7. [to Email Server]
Press to access the Scan to E-mail Server function.
8. [to USB]
Press to access the Scan to USB function.
9. [WS Scan]
Press to access the WS Scan function.
• The warning icon appears when there is an error or maintenance message; press to return to
Ready Mode.
• This product adopts the font of ARPHIC TECHNOLOGY CO., LTD.
>> Auto Start Scan
>> Settings Menu
Auto Start Scan
The Auto Start Scan feature allows you to start scanning automatically as soon a document is placed in the ADF.
To use Auto Start Scan, you must first create an Auto Start Scan Shortcut and then enable the Auto Start Scan
setting in General Setup:
1. Press [Shortcuts].
2. Press d once to display [Auto Start Scan].
11