
User Manual
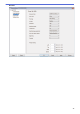


Table Of Contents
- Online User's Guide ADS-2200/ADS-2700W
- Table of Contents
- Before You Use Your Brother Machine
- Introduction to Your Brother Machine
- Paper Handling
- Scan
- Before Scanning
- Scan Using the Scan Button on Your Brother Machine
- Save Scanned Documents on Your Computer
- Save Scanned Documents to a USB Flash Drive
- Send Scanned Data to an Email Server
- Set Up the Address Book
- Scan to FTP
- Scan to SFTP
- Scan to Network
- Web Services for Scanning on Your Network (Windows 7, Windows 8 and Windows 10)
- Scan Options Using the Touchscreen
- Restrict Scan Functions from External Devices
- Scan from Your Computer (Windows)
- Scan from Your Computer (Mac)
- Network
- Supported Basic Network Features
- Network Management Software and Utilities
- Additional Methods of Configuring Your Brother Machine for a Wireless Network
- Before Configuring Your Brother Machine for a Wireless Network
- Configure Your Machine for a Wireless Network Using the One-Push Method of Wi-Fi Protected Setup™ (WPS)
- Configure Your Machine for a Wireless Network Using the PIN Method of Wi-Fi Protected Setup™ (WPS)
- Configure Your Machine for a Wireless Network Using the Machine's Control Panel Setup Wizard
- Use Wi-Fi Direct®
- Scan from Your Mobile Device Using Wi-Fi Direct
- Configure Your Wi-Fi Direct Network
- Wi-Fi Direct Network Configuration Overview
- Configure Your Wi-Fi Direct Network Using the One-Push Method
- Configure Your Wi-Fi Direct Network Using the One-Push Method of Wi-Fi Protected Setup™ (WPS)
- Configure Your Wi-Fi Direct Network Using the PIN Method
- Configure Your Wi-Fi Direct Network Using the PIN Method of Wi-Fi Protected Setup™ (WPS)
- Configure Your Wi-Fi Direct Network Manually
- Advanced Network Features
- Technical Information for Advanced Users
- Security
- Troubleshooting
- Routine Maintenance
- Machine Settings
- Appendix

• [Advanced Settings]
• [Set New Default]
• [Factory Reset]
• To configure other settings, press [Advanced Settings].
• To save the settings as a shortcut, press [Save as Shortcut].
• To select [Long Paper (Narrow)] or [Long Paper (Normal)] for [Document Size], use the
following settings: [Scan Type]: [Color] or [Black and White].
• If signed PDF was selected from the [File Type] drop-down list, you must configure the certificate
settings using Web Based Management.
4. Press [Start].
The machine starts scanning, and then the scanned data is saved on the USB flash drive.
Related Information
• Scan Using the Scan Button on Your Brother Machine
41