
User's Manual

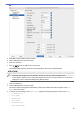
Table Of Contents
- Online User's Guide ADS-2200/ADS-2700W
- Table of Contents
- Before You Use Your Brother Machine
- Introduction to Your Brother Machine
- Paper Handling
- Scan
- Before Scanning
- Scan Using the Scan Button on Your Brother Machine
- Save Scanned Documents on Your Computer
- Save Scanned Documents to a USB Flash Drive
- Send Scanned Data to an Email Server
- Set Up the Address Book
- Scan to FTP
- Scan to SFTP
- Scan to Network
- Web Services for Scanning on Your Network (Windows 7, Windows 8 and Windows 10)
- Scan Options Using the Touchscreen
- Restrict Scan Functions from External Devices
- Scan from Your Computer (Windows)
- Scan from Your Computer (Mac)
- Network
- Supported Basic Network Features
- Network Management Software and Utilities
- Additional Methods of Configuring Your Brother Machine for a Wireless Network
- Before Configuring Your Brother Machine for a Wireless Network
- Configure Your Machine for a Wireless Network Using the One-Push Method of Wi-Fi Protected Setup™ (WPS)
- Configure Your Machine for a Wireless Network Using the PIN Method of Wi-Fi Protected Setup™ (WPS)
- Configure Your Machine for a Wireless Network Using the Machine's Control Panel Setup Wizard
- Use Wi-Fi Direct®
- Scan from Your Mobile Device Using Wi-Fi Direct
- Configure Your Wi-Fi Direct Network
- Wi-Fi Direct Network Configuration Overview
- Configure Your Wi-Fi Direct Network Using the One-Push Method
- Configure Your Wi-Fi Direct Network Using the One-Push Method of Wi-Fi Protected Setup™ (WPS)
- Configure Your Wi-Fi Direct Network Using the PIN Method
- Configure Your Wi-Fi Direct Network Using the PIN Method of Wi-Fi Protected Setup™ (WPS)
- Configure Your Wi-Fi Direct Network Manually
- Advanced Network Features
- Technical Information for Advanced Users
- Security
- Troubleshooting
- Routine Maintenance
- Machine Settings
- Appendix

Home > Scan > Scan Using the Scan Button on Y
our Brother Machine > Send Scanned Data to an Email
Server > Use TX Verification Mail
Use TX Verification Mail
Related Models: ADS-2700W
Use TX Verification Mail to request notification from the destination computer that your email was received and
processed. Use W
eb Based Management to turn on the verification feature. When Request Delivery
Notification is On, your email contains an additional field that is automatically populated with the email’s arrival
date and time.
1. Start your web browser.
2. Type "http://machine's IP address" in your browser's address bar (where "machine's IP address" is the
machine's IP address).
For example:
http://192.168.1.2
3. By default, no password is required. If you have previously set a password, type it, and then click
.
4.
Click the E-mail tab.
5. Click E-mail Send.
6. In the Request Delivery Notification field, click On.
7. Click Submit.
• Message Disposition Notification (MDN)
This field requests the status of the email message after delivery through the Simple Mail T
ransfer
Protocol (SMTP) transport system. After the recipient has received the message, this data is used when
the machine or user reads the received email. For example, if the message is opened and read, the
receiver sends back a notification to the original sending machine or user.
The recipient must activate the MDN field to be able to send a notification report; otherwise the request
will be ignored.
• This Brother machine cannot receive email messages. To use the TX Verification feature, you must
redirect the return notification to a different email address. Configure the email address using Web
Based Management. Access Web Based Management, click the E-mail tab, click SMTP and confirm
Device E-mail Address. Enter the email address that you want to receive the notification.
Related Information
• Send Scanned Data to an Email Server
43