
User's Manual


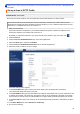

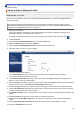
Table Of Contents
- Online User's Guide ADS-2200/ADS-2700W
- Table of Contents
- Before You Use Your Brother Machine
- Introduction to Your Brother Machine
- Paper Handling
- Scan
- Before Scanning
- Scan Using the Scan Button on Your Brother Machine
- Save Scanned Documents on Your Computer
- Save Scanned Documents to a USB Flash Drive
- Send Scanned Data to an Email Server
- Set Up the Address Book
- Scan to FTP
- Scan to SFTP
- Scan to Network
- Web Services for Scanning on Your Network (Windows 7, Windows 8 and Windows 10)
- Scan Options Using the Touchscreen
- Restrict Scan Functions from External Devices
- Scan from Your Computer (Windows)
- Scan from Your Computer (Mac)
- Network
- Supported Basic Network Features
- Network Management Software and Utilities
- Additional Methods of Configuring Your Brother Machine for a Wireless Network
- Before Configuring Your Brother Machine for a Wireless Network
- Configure Your Machine for a Wireless Network Using the One-Push Method of Wi-Fi Protected Setup™ (WPS)
- Configure Your Machine for a Wireless Network Using the PIN Method of Wi-Fi Protected Setup™ (WPS)
- Configure Your Machine for a Wireless Network Using the Machine's Control Panel Setup Wizard
- Use Wi-Fi Direct®
- Scan from Your Mobile Device Using Wi-Fi Direct
- Configure Your Wi-Fi Direct Network
- Wi-Fi Direct Network Configuration Overview
- Configure Your Wi-Fi Direct Network Using the One-Push Method
- Configure Your Wi-Fi Direct Network Using the One-Push Method of Wi-Fi Protected Setup™ (WPS)
- Configure Your Wi-Fi Direct Network Using the PIN Method
- Configure Your Wi-Fi Direct Network Using the PIN Method of Wi-Fi Protected Setup™ (WPS)
- Configure Your Wi-Fi Direct Network Manually
- Advanced Network Features
- Technical Information for Advanced Users
- Security
- Troubleshooting
- Routine Maintenance
- Machine Settings
- Appendix

Home > Scan > Scan Using the Scan Button on Y
our Brother Machine > Scan to FTP > Set up a Scan to
FTP Profile
Set up a Scan to FTP Profile
Related Models:
ADS-2700W
Set up a Scan to FTP Profile to scan and upload the scanned data directly to an FTP location.
W
e recommend Microsoft Internet Explorer 8/10/11 for Windows, and Safari 8.0 for Mac. Make sure that
JavaScript and Cookies are always enabled in whichever browser you use. If a different web browser is used,
make sure it is compatible with HTTP 1.0 and HTTP 1.1.
1. Start your web browser.
T
ype "http://machine's IP address" in your browser's address bar (where "machine's IP address" is the
machine's IP address). For example: http://192.168.1.2
By default, no password is required. If you have previously set a password, type it, and then click
.
2.
Click the Scan tab.
3. Click the Scan to FTP/SFTP/Network menu in the left navigation bar.
4. Select the FTP option, and then click Submit.
5. Click the Scan to FTP/SFTP/Network Profile menu in the left navigation bar.
6. Select the profile you want to set up or change.
The Profile setting screen appears.
7.
In the Profile Name field, type a name for this server profile (up to 14 alphanumeric characters).
The machine will display this name on the LCD.
8. In the Host Address field, type the Host Address (for example: ftp.example.com; up to 64 characters) or the
IP address (for example: 192.23.56.189), and type the path (up to 255 characters) to the folder on the FTP
server where you want to send your scanned data. Do not type a slash symbol at the beginning of the path.
9. In the Username field, type a user name (up to 32 characters) that has permission to write data to the FTP
server.
10. In the Password field, type the password (up to 33 characters) associated with the user name you entered in
the Username field. Type the password again in the Retype password field.
11. In the Store Directory field, type the path (up to 255 characters) to the folder on the FTP server where you
want to send your scanned data. Do not type a slash symbol at the beginning of the path.
12. Click the Quality drop-down list, and then select a quality setting. When Auto is selected, you can adjust the
detection level of color from the Auto Color detect adjust drop-down list.
48