
User Manual
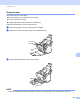

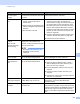
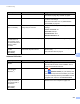
Table Of Contents
- User’s Guide ADS-2400N / ADS-2800W / ADS-3000N / ADS-3600W
- Brother Numbers
- User’s Guides and Where Do I Find Them?
- Getting Started
- You Can Use the Following Features
- Table of Contents
- 1 General Information
- Using the Guide
- About This Machine
- Control Panel Overview (ADS-2400N / ADS-3000N)
- Control Panel Overview (ADS-2800W / ADS-3600W)
- Shortcut Settings (ADS-2800W / ADS-3600W)
- Accessing Brother Utilities (Windows®)
- General Setup (ADS-2400N / ADS-3000N)
- General Setup (ADS-2800W / ADS-3600W)
- Setting Lock (ADS-2800W / ADS-3600W)
- Secure Function Lock 3.0 (ADS-2800W / ADS-3600W)
- Active Directory Authentication (ADS-2800W / ADS-3600W)
- LDAP Authentication (ADS-2800W / ADS-3600W)
- 2 Document Specifications
- 3 Scan Preparation
- 4 Prepare Your Network for Scanning with Your Computer
- 5 Before scanning
- 6 Scan Using Your Computer
- Change the ControlCenter4 User Interface (Windows®)
- Scan Using ControlCenter4 in Home Mode (Windows®)
- Scan Using ControlCenter4 in Advanced Mode (Windows®)
- Create a Custom Tab (ControlCenter4 Advanced Mode) (Windows®)
- Change Scan Settings (ControlCenter4) (Windows®)
- Scan Using Brother iPrint&Scan (Mac)
- Scan Using Nuance™ PaperPort™ 14SE or Other Windows® Applications
- Use ABBYY FineReader
- Scan Using TWAIN Applications (Macintosh)
- Scan Using Apple Image Capture (ICA Driver)
- 7 Scan Using the Control Panel
- Save Scanned Documents on Your Computer in Home Mode
- Save Scanned Documents on Your Computer in Advanced Mode
- Save Scanned Documents on a USB Flash Drive
- Scan Documents to an FTP Server
- Scan Documents to an SFTP Server
- Scan Documents to a Shared Folder / Network Location (Windows®)
- Scan Documents to SharePoint
- Scan Using Web Services (Windows Vista®, Windows® 7, Windows® 8, Windows® 8.1 and Windows® 10)
- Send Scanned Documents Directly to an Email Address (ADS-2800W / ADS-3600W)
- Set Up the Address Book (ADS-2800W / ADS-3600W)
- Upload Scanned Documents to the Web (ADS-2800W / ADS-3600W)
- Change Scan to PC Settings (Windows®)
- Scan Options Using the Touchscreen (ADS-2800W / ADS-3600W)
- 8 Managing the Machine from Your Computer
- 9 Routine Maintenance
- 10 Troubleshooting
- A Specifications
- B Appendix
- C Index

Troubleshooting
227
10
Document Jam/
Too Long
The Paper Guides are not set to
the correct document size.
The settings are not suitable for
your document.
Paper dust has accumulated on
the surface of the pick-up roller or
reverse roller.
Clear the document jam (see Document Jam
on page 229), and then do the following:
Adjust the Paper Guides to fit the width of the
document. If Scan Size is set to Auto and you are
scanning a document that contains multiple
page sizes, insert narrow pages straight and as
close to the centre of the machine as possible.
If you are not feeding the document straight,
use Continuous Scanning.
Confirm the settings. See Important in Document
Jam on page 229.
Clean the pick-up roller and reverse roller. See
Clean the Scanner and Rollers on page 205.
Multifeed
detection
Multiple pages were fed at the same
time.
Clear the multifeed. See Document Jam
on page 229.
Unusable Device An unusable device is inserted in the
USB port.
Disconnect the device. Turn the machine off and then
on by unplugging the machine from the AC electrical
socket, and then plugging the machine in again.
Unusable
USB Device
An unsupported USB device is
inserted in the USB port.
Remove the unsupported USB device, such as a
mouse or mobile device that does not support USB
flash drive mode, from the USB port.
USB Hub
Not Supported
A hub or USB flash drive with a hub is
inserted in the USB port.
Remove the unsupported device, such as a USB hub
or USB flash drive with a hub, from the USB port.
Insufficient USB
Storage
The inserted USB flash drive is full. Press any button (ADS-2400N / ADS-3000N) or
Close (ADS-2800W / ADS-3600W), and then do one
of the following:
Delete unused files or folders from the USB flash
drive, and then try again.
Use a USB flash drive that has available space.
USB Access Error The USB flash drive was removed
while it was being accessed.
Press any button (ADS-2400N / ADS-3000N) or
Close (ADS-2800W / ADS-3600W).
USB Write-protected The inserted USB flash drive is
write-protected.
Remove the write-protected USB flash drive, press
any button (ADS-2400N / ADS-3000N) or
Close (ADS-2800W / ADS-3600W), and then do
one of the following:
Turn the USB flash drive’s write-protection off,
and then try again.
Use a USB flash drive that is not write-protected.
Too Many Files on
USB
Your machine cannot save to a USB
flash drive if it contains too many files.
Remove the USB flash drive, press any button
(ADS-2400N / ADS-3000N) or (ADS-2800W /
ADS-3600W). Delete unused files or folders from
the root folder of the USB flash drive, and then try
again.
Error message Cause Action