
User Manual
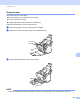

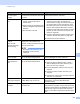
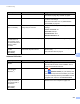
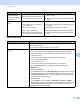
Table Of Contents
- User’s Guide ADS-2400N / ADS-2800W / ADS-3000N / ADS-3600W
- Brother Numbers
- User’s Guides and Where Do I Find Them?
- Getting Started
- You Can Use the Following Features
- Table of Contents
- 1 General Information
- Using the Guide
- About This Machine
- Control Panel Overview (ADS-2400N / ADS-3000N)
- Control Panel Overview (ADS-2800W / ADS-3600W)
- Shortcut Settings (ADS-2800W / ADS-3600W)
- Accessing Brother Utilities (Windows®)
- General Setup (ADS-2400N / ADS-3000N)
- General Setup (ADS-2800W / ADS-3600W)
- Setting Lock (ADS-2800W / ADS-3600W)
- Secure Function Lock 3.0 (ADS-2800W / ADS-3600W)
- Active Directory Authentication (ADS-2800W / ADS-3600W)
- LDAP Authentication (ADS-2800W / ADS-3600W)
- 2 Document Specifications
- 3 Scan Preparation
- 4 Prepare Your Network for Scanning with Your Computer
- 5 Before scanning
- 6 Scan Using Your Computer
- Change the ControlCenter4 User Interface (Windows®)
- Scan Using ControlCenter4 in Home Mode (Windows®)
- Scan Using ControlCenter4 in Advanced Mode (Windows®)
- Create a Custom Tab (ControlCenter4 Advanced Mode) (Windows®)
- Change Scan Settings (ControlCenter4) (Windows®)
- Scan Using Brother iPrint&Scan (Mac)
- Scan Using Nuance™ PaperPort™ 14SE or Other Windows® Applications
- Use ABBYY FineReader
- Scan Using TWAIN Applications (Macintosh)
- Scan Using Apple Image Capture (ICA Driver)
- 7 Scan Using the Control Panel
- Save Scanned Documents on Your Computer in Home Mode
- Save Scanned Documents on Your Computer in Advanced Mode
- Save Scanned Documents on a USB Flash Drive
- Scan Documents to an FTP Server
- Scan Documents to an SFTP Server
- Scan Documents to a Shared Folder / Network Location (Windows®)
- Scan Documents to SharePoint
- Scan Using Web Services (Windows Vista®, Windows® 7, Windows® 8, Windows® 8.1 and Windows® 10)
- Send Scanned Documents Directly to an Email Address (ADS-2800W / ADS-3600W)
- Set Up the Address Book (ADS-2800W / ADS-3600W)
- Upload Scanned Documents to the Web (ADS-2800W / ADS-3600W)
- Change Scan to PC Settings (Windows®)
- Scan Options Using the Touchscreen (ADS-2800W / ADS-3600W)
- 8 Managing the Machine from Your Computer
- 9 Routine Maintenance
- 10 Troubleshooting
- A Specifications
- B Appendix
- C Index

Troubleshooting
231
10
Operational and Software Difficulties 10
IMPORTANT
For technical help, you must contact Brother customer support.
If you think there is a problem with your machine, check the table below and follow the troubleshooting tips.
You can resolve most problems yourself. If you need additional help, the Brother Solutions Center offers the
latest FAQs and troubleshooting tips, visit support.brother.com
Using non-Brother supplies may affect the scan quality, hardware performance, and machine reliability.
Scanning Difficulties 10
Difficulty Cause Suggestions
TWAIN or WIA errors
appear when starting
to scan. (Windows
®
)
The TWAIN or WIA driver has not been
selected as the primary source in your
scanning application.
Make sure the Brother TWAIN or WIA driver is
selected as the primary source in your scanning
application. For example, in Nuance™
PaperPort™ 14SE, click Scan Settings, and then
Select to select the Brother TWAIN/WIA driver.
TWAIN errors appear
when starting to scan.
(Macintosh)
The TWAIN driver has not been
selected as the primary source in your
scanning application.
Make sure the Brother TWAIN driver is selected as
the primary source in your application.
You can also scan documents using the
ICA Scanner Driver.
OCR does not work. The scanner resolution is too low. Increase the scanner resolution.
Vertical lines are seen
in the scanned image.
Paper dust has accumulated on the
surface of the glass strips.
Clean the glass strips inside the machine.
See Clean the Scanner and Rollers on page 205.
The scanned image is
missing.
The Paper Guides are not adjusted
to fit the width of the document.
The Auto Deskew feature was set to
On when the document was
scanned.
The settings are not suitable for your
document. For example, a Letter/A4
size document was fed when
Executive/A5 was selected as
document size.
Adjust the Paper Guides to fit the width of the
document. When Scan Size is set to Auto and
you are scanning a document that contains
multiple page sizes, insert narrow pages straight
and as close to the centre of the machine as
possible. If the document does not stay straight
while feeding, use Continuous Scanning.
Set Auto Deskew to Off.
Make sure the document size settings are
suitable for your document.
Configure the margin settings and adjust the
scanning position. For more information, see
Split and Save a Scanned File on page 194.