
User Manual
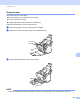
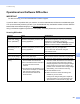

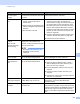
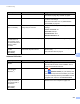
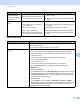
Table Of Contents
- User’s Guide ADS-2400N / ADS-2800W / ADS-3000N / ADS-3600W
- Brother Numbers
- User’s Guides and Where Do I Find Them?
- Getting Started
- You Can Use the Following Features
- Table of Contents
- 1 General Information
- Using the Guide
- About This Machine
- Control Panel Overview (ADS-2400N / ADS-3000N)
- Control Panel Overview (ADS-2800W / ADS-3600W)
- Shortcut Settings (ADS-2800W / ADS-3600W)
- Accessing Brother Utilities (Windows®)
- General Setup (ADS-2400N / ADS-3000N)
- General Setup (ADS-2800W / ADS-3600W)
- Setting Lock (ADS-2800W / ADS-3600W)
- Secure Function Lock 3.0 (ADS-2800W / ADS-3600W)
- Active Directory Authentication (ADS-2800W / ADS-3600W)
- LDAP Authentication (ADS-2800W / ADS-3600W)
- 2 Document Specifications
- 3 Scan Preparation
- 4 Prepare Your Network for Scanning with Your Computer
- 5 Before scanning
- 6 Scan Using Your Computer
- Change the ControlCenter4 User Interface (Windows®)
- Scan Using ControlCenter4 in Home Mode (Windows®)
- Scan Using ControlCenter4 in Advanced Mode (Windows®)
- Create a Custom Tab (ControlCenter4 Advanced Mode) (Windows®)
- Change Scan Settings (ControlCenter4) (Windows®)
- Scan Using Brother iPrint&Scan (Mac)
- Scan Using Nuance™ PaperPort™ 14SE or Other Windows® Applications
- Use ABBYY FineReader
- Scan Using TWAIN Applications (Macintosh)
- Scan Using Apple Image Capture (ICA Driver)
- 7 Scan Using the Control Panel
- Save Scanned Documents on Your Computer in Home Mode
- Save Scanned Documents on Your Computer in Advanced Mode
- Save Scanned Documents on a USB Flash Drive
- Scan Documents to an FTP Server
- Scan Documents to an SFTP Server
- Scan Documents to a Shared Folder / Network Location (Windows®)
- Scan Documents to SharePoint
- Scan Using Web Services (Windows Vista®, Windows® 7, Windows® 8, Windows® 8.1 and Windows® 10)
- Send Scanned Documents Directly to an Email Address (ADS-2800W / ADS-3600W)
- Set Up the Address Book (ADS-2800W / ADS-3600W)
- Upload Scanned Documents to the Web (ADS-2800W / ADS-3600W)
- Change Scan to PC Settings (Windows®)
- Scan Options Using the Touchscreen (ADS-2800W / ADS-3600W)
- 8 Managing the Machine from Your Computer
- 9 Routine Maintenance
- 10 Troubleshooting
- A Specifications
- B Appendix
- C Index

Troubleshooting
233
10
The order of the output
document pages
changes.
The Output Tray has been positioned
so that it does not match the size of the
document.
Carefully position the Output Tray so that it
matches the size of the document.
The scan quality is
poor.
Paper dust has accumulated on the
surface of the pick-up roller or
reverse roller.
Paper dust has accumulated on the
surface of the glass strips inside the
machine.
The resolution is too low.
Clean the reverse roller and pick-up roller. To
clean the reverse roller, see Replace the
Reverse Roller on page 217 to learn how to pull
the reverse roller out from the machine, clean
the rubber side of the reverse roller with a soft,
lint-free cloth moistened with water, and then
install the reverse roller in the machine. To clean
the pick-up roller, see Clean the Scanner and
Rollers on page 205.
Clean the glass strips inside the machine. See
Clean the Scanner and Rollers on page 205.
Increase the scanner resolution.
The machine pauses
for about
three seconds
between each page
when scanning.
If you scan continuously, the internal
temperature of the machine may
increase, causing the machine to enter
the motor save mode.
NOTE
The length of the pause may vary
depending on the scanning
conditions.
This is normal and you may continue to scan.
Bleed-through is seen
in the scan data.
The settings are not appropriate for the
type of document being scanned.
Select the Remove Bleed-through / Pattern /
Remove Background Colour check box.
Colours in the
scanned data are
dark.
The settings are not appropriate for the
type of document being scanned.
Do one of the following:
Select the Remove Bleed-through / Pattern /
Remove Background Colour check box, and
then scan from your computer.
Increase brightness, and then scan from your
computer.
Increase contrast, and then scan from your
computer.
Change Scan Type to Grey or Colour, and then
scan from your computer.
A page that is not a
blank page is skipped.
The document is too light.
Skip Blank Page is set to On.
Set Skip Blank Page to Off.
Alternatively, use a lower Skip Blank Page
sensitivity setting.
Cannot scan a long
document.
Long Paper is not selected for the
document size.
Select Long Paper for the document size. If you
cannot select Long Paper, when scanning from the
machine’s Control Panel, set Skip Blank Page to off
and set Scan Type to an option other than Auto.
Then, you can select Long Paper for the document
size.
Difficulty Cause Suggestions