
Barcode Utility User's Guide


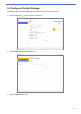
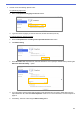
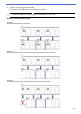
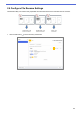

Table Of Contents
- Barcode Utility User’s Guide
- Definitions of Notes
- Copyright
- Trademarks
- Table of Contents
- 1. Introduction
- 2. Monitor Folders and Process Files
- 2.1 Requirements
- 2.2 Add a Folder to Be Monitored (Hot Folder)
- 2.3 Create a File Processing Rule
- 2.4 Assign Barcodes to File Processing Rules
- 2.5 Configure File Split Settings
- 2.6 Configure File Rename Settings
- 2.7 Configure File Save Settings
- 2.8 Configure Common Settings
- 2.9 Start Folder Monitoring and File Processing
- 3. Additional Features
- 4. Check the Application Log
- 5. Troubleshooting
- Appendix A: Barcode Recognition Requirements
- Appendix B: Custom Naming Rules
- Appendix C: Supported Barcode Types and Options
- Appendix D: XML Specification for Barcodes

9
9. The Define Barcode Search Area dialog box appears. Click Browse…, select the scanned file that contains
the barcode you want to use, and then click Open.
10. The scanned file’s name and a preview appears.
Do one of the following:
If the document has only one page
Move and resize the selection rectangle in the preview field to select the barcode you want. When the barcode
is highlighted in red, click OK to save the selection.
If the document has multiple pages
Select the page where you want to specify the barcode area. Move and resize the selection rectangle in the
preview field to select the barcode you want. When the barcode is highlighted in red, click OK to save the
selection. This will be applied to all pages.