
Barcode Utility User's Guide
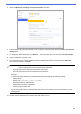
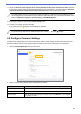

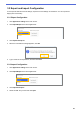
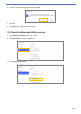
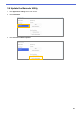

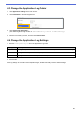
Table Of Contents
- Barcode Utility User’s Guide
- Definitions of Notes
- Copyright
- Trademarks
- Table of Contents
- 1. Introduction
- 2. Monitor Folders and Process Files
- 2.1 Requirements
- 2.2 Add a Folder to Be Monitored (Hot Folder)
- 2.3 Create a File Processing Rule
- 2.4 Assign Barcodes to File Processing Rules
- 2.5 Configure File Split Settings
- 2.6 Configure File Rename Settings
- 2.7 Configure File Save Settings
- 2.8 Configure Common Settings
- 2.9 Start Folder Monitoring and File Processing
- 3. Additional Features
- 4. Check the Application Log
- 5. Troubleshooting
- Appendix A: Barcode Recognition Requirements
- Appendix B: Custom Naming Rules
- Appendix C: Supported Barcode Types and Options
- Appendix D: XML Specification for Barcodes

18
5. Select the Move files according to a specific barcode check box.
6. In the drop-down list, select the barcode to use or specify a new barcode by clicking the Add a new barcode
setting option.
7. To change the default destination, click Browse…, select the folder you want, and then click Select Folder.
8. Type the folder path you want to use.
9. To customize the path, or add subfolders, select the additional information you want from the Input info.
drop-down list, and then click Input.
・ The static path cannot be left blank.
・ Only an existing folder can be selected as the static path.
・ The static path cannot share the same path as a hot folder.
・ The static path name cannot be longer than 247 characters.
Example
To define the output destination “C:\Statement001\2017\003\” specify the following settings:
・ Static path: C:\
・ Naming rule: [BARCODE]\[YEAR]\[COUNTER]
・ Barcode information: Statement001
・ System date information: 15/06/2017
・ Current counter number: 003
For more information about combining static paths with custom naming rules, see Appendix B: Custom
Naming Rules.
10. Confirm that the path listed in the sample folder path field is correct.