
Network User's Guide

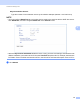
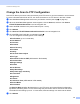


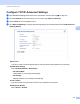
Table Of Contents
- Network User’s Guide
- Table of Contents
- 1 Introduction
- 2 Changing Your Network Settings
- 3 Configuring Your Machine for a Wireless Network (ADS-2800W / ADS-3600W)
- Overview
- Confirm Your Network Environment
- Configuration
- Configuration in Ad-hoc Mode
- Configure Your Machine for a Wireless Network Using the Machine’s Control Panel Setup Wizard
- Use Wi-Fi Direct®
- Scan from Your Mobile Device Using Wi-Fi Direct®
- Configure Your Wi-Fi Direct® Network
- Wi-Fi Direct® Network Configuration Overview
- Configure Your Wi-Fi Direct® Network Using the One-Push Method
- Configure Your Wi-Fi Direct® Network Using the One-Push Method of Wi-Fi Protected Setup™ (WPS)
- Configure Your Wi-Fi Direct® Network Using the PIN Method
- Configure Your Wi-Fi Direct® Network Using the PIN Method of Wi-Fi Protected Setup™ (WPS)
- Configure Your Wi-Fi Direct® Network Manually
- 4 Web Based Management
- Overview
- Configure Your Machine Settings
- Set a Login Password
- Use LDAP Authentication
- Restrict Users
- Synchronize with the SNTP Server
- Change the Scan to FTP Configuration
- Change the Scan to SFTP Configuration
- Change the Scan to Network Configuration (Windows®)
- Change the Scan to SharePoint Configuration (Windows®)
- Configure TCP/IP Advanced Settings
- Address Book Import/Export (ADS-2800W / ADS-3600W)
- 5 Scan to E-mail Server (ADS-2800W / ADS-3600W)
- 6 Security Features
- 7 Troubleshooting
- 8 Additional Network Settings (Windows®)
- A Appendix
- B Index

Web Based Management
47
4
Synchronize with the SNTP Server 4
Simple Network Time Protocol (SNTP) is used to synchronize the time used by the machine for authentication
with the SNTP time server (this is not the time displayed on the machine’s LCD). You can regularly
synchronize the machine’s time with the Coordinated Universal Time (UTC) provided by the SNTP time
server.
NOTE
• This function is not available in some countries.
• Except for Date&Time, the SNTP functionality will work without changing any initial settings.
1 Start Web Based Management and access your Brother machine (see step 1 on page 39).
2 When the Web Based Management screen appears, click Network, and then click the Protocol menu
in the left navigation bar.
3 Select the SNTP check box.
4 Click Advanced Setting.
Status
Displays whether the SNTP server settings are enabled or disabled.
Synchronization Status
Confirm the latest synchronization status.
SNTP Server Method
Select AUTO or STATIC.
• AUTO
If you have a DHCP server on your network, the SNTP server automatically obtains the address
from that server.
• STATIC
Type the address you want to use.
Primary SNTP Server Address, Secondary SNTP Server Address
Type the server address (up to 64 characters).
The Secondary SNTP server address is used as a backup to the Primary SNTP server address. If the
Primary server is unavailable, the machine will contact the Secondary SNTP server.
Primary SNTP Server Port, Secondary SNTP Server Port
Type the Port number (between 1 and 65535).
The Secondary SNTP server port is used as a backup to the Primary SNTP server port. If the Primary
port is unavailable, the machine will contact the Secondary SNTP port.