
User Manual

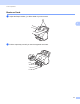
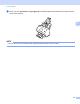
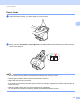
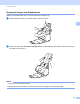
Table Of Contents
- User’s Guide ADS-2400N / ADS-2800W / ADS-3000N / ADS-3600W
- Brother Numbers
- User’s Guides and Where Do I Find Them?
- Getting Started
- You Can Use the Following Features
- Table of Contents
- 1 General Information
- Using the Guide
- About This Machine
- Control Panel Overview (ADS-2400N / ADS-3000N)
- Control Panel Overview (ADS-2800W / ADS-3600W)
- Shortcut Settings (ADS-2800W / ADS-3600W)
- Accessing Brother Utilities (Windows®)
- General Setup (ADS-2400N / ADS-3000N)
- General Setup (ADS-2800W / ADS-3600W)
- Setting Lock (ADS-2800W / ADS-3600W)
- Secure Function Lock 3.0 (ADS-2800W / ADS-3600W)
- Active Directory Authentication (ADS-2800W / ADS-3600W)
- LDAP Authentication (ADS-2800W / ADS-3600W)
- 2 Document Specifications
- 3 Scan Preparation
- 4 Prepare Your Network for Scanning with Your Computer
- 5 Before scanning
- 6 Scan Using Your Computer
- Change the ControlCenter4 User Interface (Windows®)
- Scan Using ControlCenter4 in Home Mode (Windows®)
- Scan Using ControlCenter4 in Advanced Mode (Windows®)
- Create a Custom Tab (ControlCenter4 Advanced Mode) (Windows®)
- Change Scan Settings (ControlCenter4) (Windows®)
- Scan Using Brother iPrint&Scan (Mac)
- Scan Using Nuance™ PaperPort™ 14SE or Other Windows® Applications
- Use ABBYY FineReader
- Scan Using TWAIN Applications (Macintosh)
- Scan Using Apple Image Capture (ICA Driver)
- 7 Scan Using the Control Panel
- Save Scanned Documents on Your Computer in Home Mode
- Save Scanned Documents on Your Computer in Advanced Mode
- Save Scanned Documents on a USB Flash Drive
- Scan Documents to an FTP Server
- Scan Documents to an SFTP Server
- Scan Documents to a Shared Folder / Network Location (Windows®)
- Scan Documents to SharePoint
- Scan Using Web Services (Windows Vista®, Windows® 7, Windows® 8, Windows® 8.1 and Windows® 10)
- Send Scanned Documents Directly to an Email Address (ADS-2800W / ADS-3600W)
- Set Up the Address Book (ADS-2800W / ADS-3600W)
- Upload Scanned Documents to the Web (ADS-2800W / ADS-3600W)
- Change Scan to PC Settings (Windows®)
- Scan Options Using the Touchscreen (ADS-2800W / ADS-3600W)
- 8 Managing the Machine from Your Computer
- 9 Routine Maintenance
- 10 Troubleshooting
- A Specifications
- B Appendix
- C Index

Document Specifications
57
2
Carrier Sheet Recommendations 2
Documents with a carbon sheet attached
Documents written in pencil
Documents narrower than 51 mm
Documents shorter than 70 mm
Pages thinner than 0.08 mm
Documents of uneven thickness, such as envelopes
Documents with large wrinkles or curls
Bent or damaged documents
Documents that use tracing paper
Documents that use coated paper
Photographs (photographic paper)
Documents printed on perforated paper
Documents printed on unusually-shaped paper (not square or rectangular)
Documents with photos, notes, or stickers attached to them
Documents that use carbonless paper
Documents that use loose-leaf paper or any paper with holes in it
CAUTION
To avoid cutting yourself, do not slide or scrape your hand or fingers along the edge of the Carrier Sheet.
IMPORTANT
• To avoid warping the Carrier Sheet, do not place the Carrier Sheet in direct sunlight or in an area subject
to high temperatures and high humidity.
• To avoid damaging the Carrier Sheet, do not bend or pull it. Do not use a damaged Carrier Sheet as it may
produce incorrect scan results.
IMPORTANT
• To avoid document jams, do not load the Carrier Sheet upside down. For more information, refer to the
instructions printed on the Carrier Sheet itself or see Load Documents on page 59.
• To avoid document jams, do not put several small documents into the Carrier Sheet at the same time.
Insert only one document into the Carrier Sheet at a time.
• Do not write on the Carrier Sheet as the writing may be seen in scanned documents. If the Carrier Sheet
becomes dirty, wipe it with a dry cloth.
• Do not leave documents in the Carrier Sheet for extended periods of time, as the printing on the documents
may bleed through onto the Carrier Sheet.
The damage caused by using any unacceptable document with your Brother machine may not be covered
under warranty.