
User's Manual
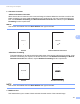
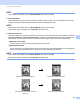

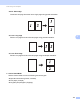
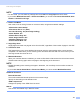
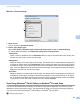
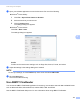

Table Of Contents
- User’s Guide ADS-2400N / ADS-2800W / ADS-3000N / ADS-3600W
- Brother Numbers
- User’s Guides and Where Do I Find Them?
- Getting Started
- You Can Use the Following Features
- Table of Contents
- 1 General Information
- Using the Documentation
- About This Machine
- Control Panel Overview (ADS-2400N / ADS-3000N)
- Control Panel Overview (ADS-2800W / ADS-3600W)
- Shortcut Settings (ADS-2800W / ADS-3600W)
- Accessing Brother Utilities (Windows®)
- General Setup (ADS-2400N / ADS-3000N)
- General Setup (ADS-2800W / ADS-3600W)
- Setting Lock (ADS-2800W / ADS-3600W)
- Secure Function Lock 3.0 (ADS-2800W / ADS-3600W)
- Active Directory Authentication (ADS-2800W / ADS-3600W)
- LDAP Authentication (ADS-2800W / ADS-3600W)
- 2 Document Specifications
- 3 Scan Preparation
- 4 Prepare Your Network for Scanning with Your Computer
- 5 Before Scanning
- 6 Scan Using Your Computer
- Change the ControlCenter4 User Interface (Windows®)
- Scan Using ControlCenter4 in Home Mode (Windows®)
- Scan Using ControlCenter4 in Advanced Mode (Windows®)
- Create a Custom Tab (ControlCenter4 Advanced Mode) (Windows®)
- Change Scan Settings (ControlCenter4) (Windows®)
- Scan Using Brother iPrint&Scan (Mac)
- Scan Using Nuance™ PaperPort™ 14SE or Other Windows® Applications
- Use ABBYY FineReader
- Scan Using TWAIN Applications (Macintosh)
- Scan Using Apple Image Capture (ICA Driver)
- 7 Scan Using the Control Panel
- Save Scanned Documents on Your Computer in Home Mode
- Save Scanned Documents on Your Computer in Advanced Mode
- Save Scanned Documents on a USB Flash Drive
- Scan Documents to an FTP Server
- Scan Documents to an SFTP Server
- Scan Documents to a Shared Folder / Network Location (Windows®)
- Scan Documents to SharePoint
- Scan Using Web Services (Windows Vista®, Windows® 7, Windows® 8, Windows® 8.1 and Windows® 10)
- Send Scanned Documents Directly to an Email Address (ADS-2800W / ADS-3600W)
- Set Up the Address Book (ADS-2800W / ADS-3600W)
- Upload Scanned Documents to the Web (ADS-2800W / ADS-3600W)
- Change Scan to PC Settings (Windows®)
- Scan Options Using the Touchscreen (ADS-2800W / ADS-3600W)
- 8 Managing the Machine from Your Computer
- 9 Routine Maintenance
- 10 Troubleshooting
- A Specifications
- B Appendix
- C Index

Scan Using Your Computer
123
6
2 Open your software application to scan the document. Do one of the following:
Windows
®
Photo Gallery
1 Click File > Import from Camera or Scanner.
2 Select the scanner you want to use.
3 Click the Import button.
The settings dialog box appears.
Windows
®
Fax and Scan
Click File > New > Scan.
The settings dialog box appears.
Profile
Profiles can be used to save settings, such as Page Size, Source, Format, and others.
3 Adjust the settings in the settings dialog box if needed.
NOTE
To save your settings, click the Profile drop-down arrow and select Add Profile.
4 Click the Scan button.
The machine starts scanning.
Use ABBYY FineReader 6
You can use the ABBYY FineReader application for scanning. It converts the scanned data to editable format
such as Microsoft
®
Word, Microsoft
®
Excel, Adobe
®
PDF, HTML and EPUB.
See the ABBYY FineReader Help menu for more information about using ABBYY FineReader.