
Network User's Guide
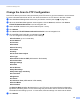
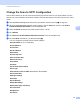

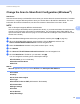
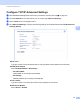
Table Of Contents
- Network User’s Guide
- Table of Contents
- 1 Introduction
- 2 Changing Your Network Settings
- 3 Configuring Your Machine for a Wireless Network (ADS-2800W / ADS-3600W)
- Overview
- Confirm Your Network Environment
- Configuration
- Configuration in Ad-hoc Mode
- Configure Your Machine for a Wireless Network Using the Machine’s Control Panel Setup Wizard
- Use Wi-Fi Direct®
- Scan from Your Mobile Device Using Wi-Fi Direct®
- Configure Your Wi-Fi Direct® Network
- Wi-Fi Direct® Network Configuration Overview
- Configure Your Wi-Fi Direct® Network Using the One-Push Method
- Configure Your Wi-Fi Direct® Network Using the One-Push Method of Wi-Fi Protected Setup™ (WPS)
- Configure Your Wi-Fi Direct® Network Using the PIN Method
- Configure Your Wi-Fi Direct® Network Using the PIN Method of Wi-Fi Protected Setup™ (WPS)
- Configure Your Wi-Fi Direct® Network Manually
- 4 Web Based Management
- Overview
- Configure Your Machine Settings
- Set a Login Password
- Use LDAP Authentication
- Restrict Users
- Synchronize with the SNTP Server
- Change the Scan to FTP Configuration
- Change the Scan to SFTP Configuration
- Change the Scan to Network Configuration (Windows®)
- Change the Scan to SharePoint Configuration (Windows®)
- Configure TCP/IP Advanced Settings
- Address Book Import/Export (ADS-2800W / ADS-3600W)
- 5 Scan to E-mail Server (ADS-2800W / ADS-3600W)
- 6 Security Features
- 7 Troubleshooting
- 8 Additional Network Settings (Windows®)
- A Appendix
- B Index

Web Based Management
50
4
Change the Scan to SFTP Configuration 4
Scan to SFTP allows you to scan a document directly to an SFTP server on your local network or on the
Internet. For more information about Scan to SFTP, see Scan Documents to an SFTP Server in the User’s
Guide.
1 Start Web Based Management and access your Brother machine (see step 1 on page 39).
2 When the Web Based Management screen appears, click the Scan tab, and then click Scan to
FTP/SFTP/Network/SharePoint in the left navigation bar.
3 Select the SFTP checkbox in the profile numbers (from 1 to 25).
4 Click Submit.
5 Click Scan to FTP/SFTP/Network/SharePoint Profile in the left navigation bar.
6 Click the SFTP of Profile No. you selected in step 3
You can configure the following Scan to SFTP settings:
Profile Name (up to 15 characters)
Host Address
Username
Auth. Method
Password
Client Key Pair
Server Public Key
Store Directory
File Name
Quality
Auto Color detect adjust
File Type
Password for Secure PDF (ADS-2400N / ADS-3000N)
Document Size
Margin Settings
File Size
Auto Deskew
Skip Blank Page
Skip blank page sensitivity
2-sided Scan
Brightness
Contrast