
User manual
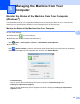

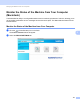
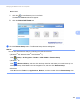
Table Of Contents
- User’s Guide ADS-1100W/ADS-1600W
- User’s Guides and where to find them?
- Getting Started
- Table of Contents
- 1 General Information
- Using the Documentation
- About This Machine
- Control Panel Overview (ADS-1100W)
- Control Panel Overview (ADS-1600W)
- Memory Storage
- Beep Volume
- Select Your Language (if needed)
- Set the Date and Time (ADS-1600W only)
- Automatic Daylight Saving Time
- Set the Time Zone
- Sleep Mode
- Auto Power Off
- Acceptable Document
- Loading Documents
- 2 Before Scanning
- 3 Scan from Your Computer
- Change the User Interface of ControlCenter4 (Windows®)
- Scan Using ControlCenter4 in Home Mode (Windows®)
- Scan Using ControlCenter4 in Advanced Mode (Windows®)
- Create a Custom Tab (ControlCenter4 Advanced Mode) (Windows®)
- Change Scan Settings (ControlCenter4) (Windows®)
- Scan Using ControlCenter2 (Macintosh)
- Register your Favourite Scan Settings Using ControlCenter2 (CUSTOM SCAN) (Macintosh)
- Change Scan Settings (ControlCenter2) (Macintosh)
- Scan Receipts Using BR-Receipts (Windows®)
- Scan Using Nuance™ PaperPort™ 12SE or Other Windows® Applications
- Use Nuance PDF Converter Professional 8 (Windows®) (ADS-1600W only)
- Use NewSoft Presto! BizCard 6 (Windows®)
- Scan Receipts Using BR-Receipts (Macintosh)
- Scan Using Presto! PageManager or TWAIN Applications (Macintosh)
- Scan Using Apple Image Capture (ICA Driver)
- Use NewSoft Presto! BizCard 6 (Macintosh)
- Scan Using Captiva® QuickScan™ Pro or ISIS® Applications (Windows®)
- 4 Scan from the Control Panel of the Machine
- Scan from the Control Panel of the Machine
- Scan Documents Directly to an FTP Server
- Scan Documents Directly to a CIFS Server (Windows®) (ADS-1600W only)
- Save Scanned Documents on Your Computer
- Scan Using Web Services (Windows Vista® SP2 or Later, Windows® 7 and Windows® 8)
- Save Scanned Documents on a USB Flash Memory Drive
- Send Scanned Documents Directly to an Email Address (ADS-1600W only)
- Scan Plastic Cards
- Upload Scanned Documents to the Web (ADS-1600W only)
- Change Scan to PC Settings (Windows®)
- Change Scan to PC Settings (Macintosh)
- Set Up the Address Book (ADS-1600W only)
- Set Up the Shortcuts (ADS-1600W only)
- Scan from the Control Panel of the Machine
- 5 Managing the Machine from Your Computer
- 6 Routine Maintenance
- 7 Troubleshooting
- A Specifications
- B Appendix
- C Index

Managing the Machine from Your Computer
164
5
Set Up the Brother Machine from Your Computer 5
The Remote Setup application lets you configure many machine settings from your computer. When you start
the Remote Setup application, the settings on your Brother machine will be downloaded automatically to your
computer and displayed on the screen. If you change the settings, you can upload them directly to the
machine.
NOTE
• If an error occurs, Remote Setup will not start. Correct the error and then try to start Remote Setup again.
• Windows
®
• If your computer is protected by a firewall, and is unable to use Remote Setup, you may need to
configure the firewall settings to allow communication through port number 137 and 161.
• If you are using Windows
®
Firewall and you installed MFL-Pro Suite from the DVD-ROM, the necessary
Firewall settings have already been made.
1 Start the ControlCenter application.
Windows
®
1 Click the (ControlCenter4) icon in the task tray and then select Open from the menu.
The ControlCenter4 window will appear.
2 Click the Device Settings tab (the example below uses Home Mode).