
User manual
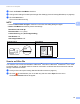
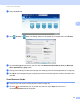
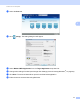
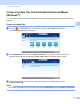
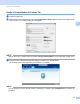
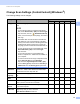
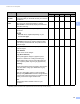
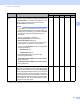
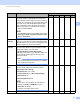

Table Of Contents
- User’s Guide ADS-1100W/ADS-1600W
- User’s Guides and where to find them?
- Getting Started
- Table of Contents
- 1 General Information
- Using the Documentation
- About This Machine
- Control Panel Overview (ADS-1100W)
- Control Panel Overview (ADS-1600W)
- Memory Storage
- Beep Volume
- Select Your Language (if needed)
- Set the Date and Time (ADS-1600W only)
- Automatic Daylight Saving Time
- Set the Time Zone
- Sleep Mode
- Auto Power Off
- Acceptable Document
- Loading Documents
- 2 Before Scanning
- 3 Scan from Your Computer
- Change the User Interface of ControlCenter4 (Windows®)
- Scan Using ControlCenter4 in Home Mode (Windows®)
- Scan Using ControlCenter4 in Advanced Mode (Windows®)
- Create a Custom Tab (ControlCenter4 Advanced Mode) (Windows®)
- Change Scan Settings (ControlCenter4) (Windows®)
- Scan Using ControlCenter2 (Macintosh)
- Register your Favourite Scan Settings Using ControlCenter2 (CUSTOM SCAN) (Macintosh)
- Change Scan Settings (ControlCenter2) (Macintosh)
- Scan Receipts Using BR-Receipts (Windows®)
- Scan Using Nuance™ PaperPort™ 12SE or Other Windows® Applications
- Use Nuance PDF Converter Professional 8 (Windows®) (ADS-1600W only)
- Use NewSoft Presto! BizCard 6 (Windows®)
- Scan Receipts Using BR-Receipts (Macintosh)
- Scan Using Presto! PageManager or TWAIN Applications (Macintosh)
- Scan Using Apple Image Capture (ICA Driver)
- Use NewSoft Presto! BizCard 6 (Macintosh)
- Scan Using Captiva® QuickScan™ Pro or ISIS® Applications (Windows®)
- 4 Scan from the Control Panel of the Machine
- Scan from the Control Panel of the Machine
- Scan Documents Directly to an FTP Server
- Scan Documents Directly to a CIFS Server (Windows®) (ADS-1600W only)
- Save Scanned Documents on Your Computer
- Scan Using Web Services (Windows Vista® SP2 or Later, Windows® 7 and Windows® 8)
- Save Scanned Documents on a USB Flash Memory Drive
- Send Scanned Documents Directly to an Email Address (ADS-1600W only)
- Scan Plastic Cards
- Upload Scanned Documents to the Web (ADS-1600W only)
- Change Scan to PC Settings (Windows®)
- Change Scan to PC Settings (Macintosh)
- Set Up the Address Book (ADS-1600W only)
- Set Up the Shortcuts (ADS-1600W only)
- Scan from the Control Panel of the Machine
- 5 Managing the Machine from Your Computer
- 6 Routine Maintenance
- 7 Troubleshooting
- A Specifications
- B Appendix
- C Index

Scan from Your Computer
67
3
Setting Description Applicable Feature
Image OCR E-mail File Print
Contrast Adjust the setting (-50 to 50) to get the best image.
The
default value of 0 represents an average and is
usually suitable for most images. You can increase or
decrease the contrast level by moving the slider to the
right or left. An increase emphasizes dark and light
areas of the image, while a decrease reveals more
details in grey areas. You can also enter a value in
the
box to set the Contrast.
NOTE
The Contrast setting is only available when setting
Scan Type to Auto, Grey (Error Diffusion), True
Grey or 24bit Colour.
Yes Yes Yes Yes Yes
Continuous
Scanning
Lets you scan multiple pages. After the page is
scanned, you can select to continue scanning or finish.
Using this method, you can scan more pages than the
maximum capacity of the document feeder.
Yes Yes Yes Yes Yes
2-sided
Scanning
If you check this box, the machine scans both sides
of
the document. When using the automatic 2-sided
(duplex) scan feature, you must select
Long-edge
binding or Short-edge binding
depending on the layout of your original to make sure
that the data file created appears correctly in the
scanned document.
NOTE
The 2-sided (duplex) scanning feature is available
with lengths up to Legal size.
Yes Yes Yes Yes Yes
Plastic Card
Mode
Lets you scan cards, such as driver’s licenses or
insurance cards, using these automatic settings:
Resolution: 600 x 600 dpi
Document Size: 2 in 1 (Auto)
2-sided Scanning: On (Short-edge binding)
Auto Deskew: On
Auto Image Rotation: Off
NOTE
• If you want to scan a plastic card with different
settings, set Plastic
Card Mode to off and
Resolution to 600
dpi.
• Load only one plastic card at a time.
Yes Yes Yes Yes Yes
Default Restore all settings to their factory default values. Yes Yes Yes Yes Yes