
user manual
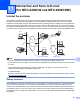
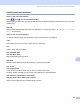
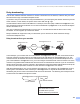
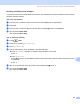
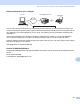

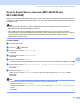
Table Of Contents
- NETWORK USER’S GUIDE
- Table of Contents
- 1 Introduction
- 2 Configuring your machine for a network with an Ethernet cable connection
- Overview
- IP addresses, subnet masks and gateways
- Step by step chart
- Setting up the IP address and subnet mask
- Changing the print server settings
- Using the BRAdmin Light utility to change the print server settings
- Using the BRAdmin Professional utility to change the wireless settings (For Windows®)
- Using the Remote Setup to change the print server settings (Not available for DCP models)
- Using the control panel to change the print server settings
- 3 Configuring your machine for a wireless network (Not available for MFC-5490CN and MFC-5890CN)
- Overview
- Wireless network terms and concepts
- Step by step chart for wireless network configuration
- Confirm your network environment
- Confirm your wireless network setup method
- Configuration using the machine’s control panel Setup Wizard to configure your wireless network machine
- Configuration using the SES/WPS/AOSS control panel menu (Infrastructure mode only)
- Configuration using the PIN Method of Wi-Fi Protected Setup™ (Infrastructure mode only)
- Configuration using the Brother installer application on the CD-ROM to configure your wireless network machine
- Configuring your machine for a wireless network
- 4 Wireless configuration for Windows® using the Brother installer application (Not available for MFC-5490CN and MFC-5890CN)
- 5 Wireless Configuration for Macintosh® using the Brother installer application (Not available for MFC-5490CN and MFC-5890CN)
- 6 Control panel setup
- Network menu
- TCP/IP
- Setup Misc. (MFC-5490CN only)
- Setup Wizard (wireless network only)
- SES/WPS/AOSS (wireless network only)
- WPS w/PIN code (wireless network only)
- WLAN Status (wireless network only)
- Ethernet (wired network only)
- E-mail/I-FAX (For MFC-6490CW and MFC-6890CDW)
- Scan to FTP (For MFC-5890CN and MFC-6490CW)
- Scan to FTP (For MFC-6890CDW)
- Time Zone (For MFC-6490CW and MFC-6890CDW)
- Network I/F (Not available for MFC-5490CN and MFC-5890CN)
- LDAP (For MFC-6890CDW)
- Restoring the network settings to factory default
- Printing the Network Configuration List
- Network menu
- 7 Driver Deployment Wizard (Windows® only)
- 8 Network printing from Windows® basic TCP/IP Peer-to-Peer printing
- 9 Network printing from a Macintosh®
- 10 LDAP operation (For MFC-6890CDW)
- 11 Internet fax and Scan to E-mail (For MFC-6490CW and MFC-6890CDW)
- Internet fax overview
- Getting connected
- Control panel key functions
- Sending an Internet fax
- Manually entering text
- Receiving E-mail or Internet fax
- Receiving an Internet fax to your computer
- Forwarding received E-mail and fax messages
- Relay broadcasting
- TX Verification Mail
- Setup Mail TX
- Setup Mail RX
- Error mail
- Important information on Internet fax
- Scan to E-mail Server overview (MFC-6490CW and MFC-6890CDW)
- Internet fax overview
- 12 Security features (For MFC-6490CW and MFC-6890CDW)
- 13 Troubleshooting
- Appendix A
- Appendix B
- Appendix C
- Index

Internet fax and Scan to E-mail (For MFC-6490CW and MFC-6890CDW)
145
11
Relay broadcasting 11
This function allows the Brother machine to receive a document over the Internet, and then relay it to other
fax machines through conventional telephone lines.
If you wish to use your machine as a relay broadcast device, you must specify the domain name that you trust
at the machine, in other words, the portion of the name after the “@” sign.
A trusted domain refers to the E-mail address. For example, if the other party’s address is bob@brother.com,
then we identify the domain as brother.com. If the E-mail address is jack@brother.co.uk, then we identify the
domain as brother.co.uk.
Use care in selecting a trusted domain since any user on a trusted domain will be able to send a relay
broadcast. You can register up to 5 domain names.
Relay broadcast can support the relay of a document up to a maximum of 48 fax machines through
conventional telephone lines.
Relay broadcast from your machine 11
In this example, your machine has an E-mail address of FAX@brother.com, you wish to send a document
from this machine to another machine in England with an E-mail address of UKFAX@brother.co.uk, this
machine will then forward the document to a standard fax machine using a conventional telephone line. If
your E-mail address is FAX@brother.com, you must configure a trusted domain name of brother.com on the
machine in England that will broadcast the document to the conventional fax machine. If you do not enter the
domain name information, then the machine in the middle (the machine that will broadcast the document) will
not trust any internet jobs that it receives from the machine in the @brother.com domain.
After the trusted domain is set, you can send the document from your machine [I.E. FAX@brother.com] by
entering the E-mail address of the machine [I.E. UKFAX@brother.co.uk] that will forward the document
followed by the phone number of the fax that will receive the document. The following is an example of how
to enter the E-mail address and phone number.
Internet
FAX@brother.com
UKFAX@brother.co.uk
123456789
UKFAX@brother.co.uk(fax#123456789)
UKFAX@brother.co.uk(fax#123456789)
E-mail address
Fax Phone Number
The word "fax#" must be
included with the phone
number inside the parenthesis.