
Owner's Manual


LK3-B438E Mark II
21
7. CORRECT USE
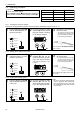
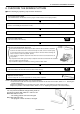
7-1 . Selecting the needle and thread
TQ × 1 #11
TQ × 1 #12
TQ × 1 #14
Thread
#60
#50
Button hole diameter
1.5mm or greater
1.6mm or greater
1.7mm or greater
Needle
q
w
q
w
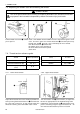
Approx. 40mm
[When using the liquid cooling tank]
Turn off the power switch before threading the thread, otherwise the machine may operate if the
foot switch is depressed by mistake and serious injury could result.
Turn off the power switch before installing
the needle, otherwise the machine may
operate of the foot switch is depressed by
mistake and serious injury could result.
Refer to the table at right for details on which needle
and thread to select.
NOTE: Use buttons which have a hole diameter that is
greater than the value given in the table, to ensure
that the needle does not touch the button.
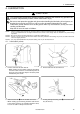
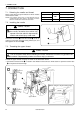
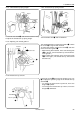
7-2 . Installing the needle
CAUTION
CAUTION
Loosen the set screw q, insert the needle w as far as
it will go so that the groove is facing toward you, and
then tighten the set screw q.
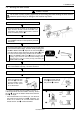
7-3 . Threading the upper thread
Thread the upper thread correctly as shown in the illustration below.
* If the tension release lever q is raised in the direction of the arrow, it will be easier to open the tension disc
w and pull the thread through.
7. CORRECT USE