
Digital Color Laser Printer Manual
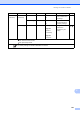
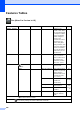
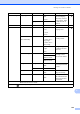
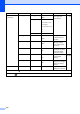
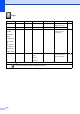
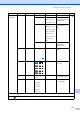
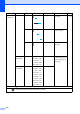

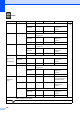
Table Of Contents
- Basic User’s Guide MFC-9130CW/MFC-9330CDW/MFC-9340CDW
- Brother numbers
- Ordering accessories and supplies
- Notice - Disclaimer of Warranties (USA and Canada)
- Compilation and Publication Notice
- User’s Guides and where do I find them?
- Table of Contents
- 1 General information
- Using the documentation
- Accessing Brother Utilities (Windows® 8)
- Accessing the Advanced User’s Guide, Software User’s Guide and Network User’s Guide
- How to access Guides for Advanced Features
- Accessing Brother Support (Windows®)
- Accessing Brother Support (Macintosh)
- Control panel overview
- Shortcut Settings
- 2 Loading paper
- 3 Loading documents
- 4 Sending a fax
- 5 Receiving a fax
- 6 Using PC-FAX
- 7 Telephone services and external devices
- 8 Dialing and storing numbers
- 9 Making copies
- 10 Printing data from a USB Flash memory drive or digital camera supporting mass storage (For MFC-9330CDW and MFC-9340CDW)
- 11 How to print from a computer
- 12 How to scan to a computer
- A Routine maintenance
- B Troubleshooting
- C Settings and features tables
- D Specifications
- Index

176
Scan C
Level 1 Level 2 Level 3 Level 4 Options Descriptions
See Page
to OCR (PC Select) Options See Options (to OCR) on page 178.
See .
Save as
Shortcut
— — Add the current
settings as a
shortcut.
Start — — Start scanning.
to File (PC Select) Options See Options (to File, to Image and to E-mail)
on page 179.
Save as
Shortcut
— — Add the current
settings as a
shortcut.
Start — — Start scanning.
to Image (PC Select) Options See Options (to File, to Image and to E-mail)
on page 179.
Save as
Shortcut
— — Add the current
settings as a
shortcut.
Start — — Start scanning.
to USB
(MFC-9330CDW
and
MFC-9340CDW)
Options See Options (to USB) on page 180.
Save as
Shortcut
— — — Add the current
settings as a
shortcut.
Start — — — Start scanning.
to E-mail (PC Select) Options See Options (to File, to Image and to E-mail)
on page 179.
Save as
Shortcut
— — Add the current
settings as a
shortcut.
Start — — Start scanning.
to E-mail Server
(Download
only)
Address Book — — — Choose the address
of the recipient from
the address book.
Manual — — — Manually enter the
address of the
recipient.
OK Options See Options (to E-mail Server) on page 182.
Save as
Shortcut
— — Add the current
settings as a
shortcut.
Start — — Start scanning.
See Software User's Guide.
The factory settings are shown in Bold with an asterisk.
Scan