
User's Manual
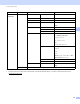

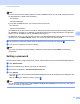
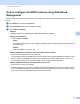


Table Of Contents
- Network User’s Guide
- Applicable models
- Definitions of notes
- IMPORTANT NOTE
- Table of Contents
- Section I: Network Operation
- 1 Introduction
- 2 Changing your machine’s network settings
- 3 Configuring your machine for a wireless network (For HL-5470DW(T) and HL-6180DW(T))
- Overview
- Confirm your network environment
- Wireless configuration temporarily using a USB cable (Recommended for Windows®)
- Configuration using the machine’s control panel Setup Wizard
- One push configuration using WPS (Wi-Fi Protected Setup) or AOSS™
- Configuration using the PIN Method of WPS (Wi-Fi Protected Setup)
- Configuration in Ad-hoc mode (For IEEE 802.11b)
- 4 Control panel setup
- Overview
- Network menu (For HL-5470DW(T) and HL-6180DW(T))
- Reset the network settings to the factory default
- Printing the Printer Settings Page (For HL-5450DN(T))
- Printing the Network Configuration Report (For HL-5470DW(T) and HL-6180DW(T))
- Printing the WLAN report (For HL-5470DW(T) and HL-6180DW(T))
- Function table and default factory settings
- 5 Web Based Management
- 6 Security features
- Overview
- Managing your network machine securely using SSL/TLS
- Secure Management using BRAdmin Professional 3 (Windows®)
- Printing documents securely using SSL/TLS
- Sending an E-mail securely
- Using IEEE 802.1x authentication
- Using Certificates for device security
- Managing multiple certificates
- 7 Troubleshooting
- Section II: Network Glossary
- 8 Types of network connections and protocols
- 9 Configuring your machine for a network
- 10 Wireless network terms and concepts (For HL-5470DW(T) and HL-6180DW(T))
- 11 Additional network settings from Windows®
- Types of additional network settings
- Installing drivers used for printing via Web Services (Windows Vista® and Windows® 7)
- Uninstalling drivers used for printing via Web Services (Windows Vista® and Windows® 7)
- Network printing installation for Infrastructure mode when using Vertical Pairing (Windows® 7)
- 12 Security terms and concepts
- Section III: Appendixes
- Index

49
Web Based Management
5
Secure Function Lock 2.0 5
Secure Function Lock 2.0 from Brother helps you to save money and increase security by restricting the
functions available on your Brother machine.
Secure Function Lock allows you to configure passwords for selected users, granting them access to some,
or all, of these functions, or limiting them to a page limit. This means that only authorized people can use
them.
You can configure and change the following Secure Function Lock 2.0 settings using Web Based
Management, or BRAdmin Professional 3 (Windows
®
only) .
Print
12
Page Limit
Page Counter
1
Print includes print jobs sent via Google Cloud Print and Brother iPrint&Scan.
2
If you register the PC user login names, you can restrict PC print without the user entering a password. For more detail, see Restricting PC print
by PC user login name uu page 50.
How to configure the Secure Function Lock 2.0 settings using Web Based
Management (web browser) 5
Basic configuration 5
a Click Administrator on the machine’s web page, and then click Secure Function Lock.
b Choose On from Function Lock.
c Enter an up to 15 digit alphanumeric group name or user name in the ID Number/Name box and then
enter a four-digit password in the PIN box.
d Uncheck the functions that you want to restrict in the Print box. If you want to configure the maximum
page count, check the On box in Page Limit, and then enter the number in the Max. box. Then click
Submit.
Note
If you want to restrict the PC printing by PC user login name, click PC Print Restriction by Login Name
and configure the settings. (See Restricting PC print by PC user login name uu page 50.)