Operation Manual KNOWING YOUR SEWING MACHINE Sewing Machine Product Code: 888-E30/E31/E37/E38/E39/V61/V63/V65/V67 SEWING BASICS UTILITY STITCHES APPENDIX Be sure to read this document before using the machine. We recommend that you keep this document nearby for future reference.
IMPORTANT SAFETY INSTRUCTIONS Please read these safety instructions before attempting to use the machine. DANGER - To reduce the risk of electric shock: 1 Always unplug the machine from the electrical outlet immediately after using, when cleaning, when making any user servicing adjustments mentioned in this manual, or if you are leaving the machine unattended. WARNING - To reduce the risk of burns, fire, electric shock, or injury to persons.
7 This machine is not a toy: • Your close attention is necessary when the machine is used by or near children. • The plastic bag that this machine was supplied in should be kept out of the reach of children or disposed of. Never allow children to play with the bag due to the danger of suffocation. • Do not use outdoors. 8 For a longer service life: • When storing this machine, avoid direct sunlight and high humidity locations.
CONTENTS IMPORTANT SAFETY INSTRUCTIONS ............... 1 CONTENTS ......................................................... 3 1. KNOWING YOUR SEWING MACHINE ..... 4 Using zigzag foot .................................................... 29 Using overcasting foot ............................................ 29 BASIC STITCHING ........................................... 30 Basic stitching ........................................................ 30 BLIND HEM STITCHING ..................................
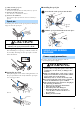
KNOWING YOUR SEWING MACHINE 1 KNOWING YOUR SEWING MACHINE Included accessories After opening the box, check that the following accessories are included. If any item is missing or damaged, contact your dealer. Note (For U.S.A. only) ● Foot controller: Model T This foot controller can be used on the machine with product code 888-E30/E31/E37/E38/E39/V61/ V63/V65/V67. The product code is mentioned on the machine rating plate. ● The screw of the presser foot holder is available through your authorized dealer.
No. Part Name 1 Walking Foot 2 Quilting Foot 3 1/4-Inch Quilting Foot 4 Quilting guide 5 Eyelet punch Part Code Americas Others F033N: SA140 XG6623-001 F005N: SA129 XC1948-052 F001N: SA125 XC1944-052 F016N: SA132 XC2215-052 XZ5051-001 1 Accessory compartment The accessories are stored in a compartment inside the flat bed attachment. Slide the flat bed attachment to the left to open it.
KNOWING YOUR SEWING MACHINE Needle and presser foot section Press the reverse/reinforcement stitch button to sew reverse stitches. Reverse stitches are sewn by keeping the button pressed down to sew in the opposite direction. For details, refer to “Sewing reinforcement stitches” (page 26). ■ Buttons provided on some models b Start/stop button Press the start/stop button to start or stop sewing. The machine sews at a slow speed at the beginning of sewing while the button is depressed.
e Utility stitch key (page 24) f Utility stitch indicator This indicator lights up when the utility stitch key is pressed. g Character stitch key (page 46) Press this key to sew character stitches. h Character stitch indicator This indicator lights up when the character stitch key is pressed. ■ Installing the spool pin a Insert the tab on the spool pin into the hole. 1 Spool pin As shown, press down on the spool pin lever with your finger to raise the spool pin.
KNOWING YOUR SEWING MACHINE CAUTION ● Use only the power cord included with this machine. ● Do not use extension cords or multi-plug adapters with many other appliances plugged in to them. Fire or electric shock may result. ● Do not touch the plug with wet hands. Electric shock may result. ● When unplugging the machine, always turn off the main power first. Always grasp the plug to remove it from the outlet. Pulling on the cord may damage the cord, or lead to fire or electric shock.
Note ● When the foot controller is plugged in, the start/ stop button cannot be used to start sewing (only for models equipped with the start/stop button). Sewing speed controller (for models equipped with the start/stop button) Slide the sewing speed controller to select the a desired sewing speed. Changing the initial needle position Normally, the straight stitch (left needle position) is automatically selected when the sewing machine is turned on.
KNOWING YOUR SEWING MACHINE CAUTION THREADING THE MACHINE Winding the bobbin This section describes how to wind the thread onto the bobbin. • For details on the fast bobbin winding, see page 12. ● Do not grab the bar to raise the spool pin, otherwise, the spool pin may bend or break. ● Be sure to raise the spool pin when winding the bobbin. The thread may become tangled if the bobbin winder is used without raising the spool pin. b and then slide the spool cap onto the spool pin.
c Pass the thread as illustrated bellow. Note ● Make sure that the thread is pulled as far as possible into the pretension disk, otherwise the bobbin may not be wound cleanly. Put the bobbin onto the bobbin winder shaft and d slide the bobbin winder shaft to the right. Turn the bobbin clockwise, by hand, until the spring on the shaft slides into the notch in the bobbin. • Make sure to pull out 7 to 10 cm (3 to 4 inches) of thread from the hole on the bobbin.
KNOWING YOUR SEWING MACHINE CAUTION ● Make sure you follow the instructions carefully. If you do not cut the thread completely, and the bobbin is wound, when the thread runs low it may tangle around the bobbin and cause the needle to break. ■ For models equipped with the fast bobbin winding system a that the spring on the shaft fits into the notch in Place the bobbin on the bobbin winder shaft so the bobbin. Then slide the shaft to the right. g set the speed to fast).
f Turn on the sewing machine. Press the foot controller or press (start/stop g button) (for models equipped with the start/stop button) to start. Note CAUTION ● Winding the bobbin improperly may cause the thread tension to loosen, breaking the needle and resulting in injury. ● If the sewing machine is to be operated using the foot controller, connect the foot controller before turning on the machine.
KNOWING YOUR SEWING MACHINE CAUTION ● Make sure you set the bobbin so the thread unrolls in the right direction. If the thread unrolls in the wrong direction, it may cause the thread tension to be incorrect or break the needle. Hold the end of the thread, push the bobbin e down with your finger, and then pass the thread through the slit, as shown. • If the thread is not correctly inserted, it may cause incorrect thread tension (page 26). b Turn off the sewing machine.
f Replace the bobbin cover. Memo ● You can begin sewing immediately without drawing up the bobbin thread. If you want to draw up the bobbin thread before you start to sew, follow to the procedure in “Drawing up the lower thread” (page 18). c toward you (counterclockwise) so that the mark Raise the needle by turning the handwheel on the wheel points up, or press (needle position button) (for models equipped with the needle position button) once or twice to raise the needle.
KNOWING YOUR SEWING MACHINE CAUTION g Feed the upper thread as illustrated below. ● If the spool or the spool cap is not positioned correctly, the thread may become tangled around the spool pin or the needle may break. ● Three spool cap sizes are available, allowing you to choose a spool cap that best fits the size of spool being used. If the spool cap is too small for the spool being used, the thread may catch on the slit in the spool or the needle may break.
j c the thread onto the guide. Turn off the sewing machine. While lowering the needle threader lever, hook CAUTION ● Make sure you turn the power off while threading the machine without using the needle threader (for models equipped with the needle threader). If you accidentally step on the foot controller and the machine starts to sew, you could be injured. 1 a Needle holder b Needle threader lever c Guide Thread the needle from front to back and pull k out about 5 cm (2 inches) of thread.
KNOWING YOUR SEWING MACHINE f c thread. Raise the presser foot lever. Pull on the upper thread to draw up the lower a Presser foot lever g a Upper thread b Lower thread Pass the end of the thread as illustrated bellow. d and pull them toward the back of the machine Pull out about 10 cm (4 inches) of both threads under the presser foot. a 5 cm (2 inches) Note ● If you incorrectly feed the thread you may cause sewing problems. Drawing up the lower thread a Lightly hold the end of the upper thread.
CAUTION ● Only use home sewing machine needles. Use of any other needle may bend the needle or damage the machine. ● Never use bent needles. Bent needles can easily break, possibly resulting in injury. Needle types and their uses The sewing machine needle that should be used depends on the fabric and thread thickness.
KNOWING YOUR SEWING MACHINE Note Replacing the needle Raise the needle by turning the handwheel a toward you (counterclockwise) so that the mark on the wheel points up. (With models equipped with (needle position button), raise the needle by pressing once or twice.) ● If the needle clamp screw is loosened too much, the needle clamp (which holds the needle) may fall off. Therefore, do not loosen the needle clamp screw too much.
Sewing with the twin needle d bobbin winder shaft. Insert the extra spool pin onto the end of the You can sew with this needle and two top threads. You can use the same color or two different colors of thread for making decorative stitches. a Bobbin winder shaft b Extra spool pin c Thread spool 1 a Twin needle b Extra spool pin CAUTION ● Use twin needles that have been made for this machine (part code: 131096-121). ● Do not sew with bent needles. The needle could break and injure you.
KNOWING YOUR SEWING MACHINE j • For details on selecting a stitch, refer to Select a stitch. “Selecting a stitch” (page 24). • For details on the stitches that can be sewn with the twin needle, refer to “STITCH SETTINGS” (page 50). CAUTION ● After adjusting the stitch width, slowly turn the handwheel toward you (counterclockwise) and check that the needle does not touch the presser foot. If the needle hits the presser foot, the needle may bend or break. Start sewing.
d foot. Press the black button to release the presser Removing the presser foot holder Remove the presser foot holder when cleaning the sewing machine or when installing a presser foot that does not use the presser foot holder, such as the quilting foot. Use the disc-shaped screwdriver to remove the presser foot holder. a Black button Place a different presser foot below the presser e foot holder so that the presser foot pin is aligned with the shank in the holder.
SEWING BASICS 2 SEWING BASICS SEWING Basic sewing operations are described below. Before operating the sewing machine, read the following precautions. a Turn on the sewing machine. b Confirm that the utility stitch indicator is lit. If it (For models equipped with the character stitch key) is not lit, press the utility stitch key. CAUTION ● While the machine is in operation, pay special attention to the needle location.
b adjustment key) to increase or reduce the stitch Press the “+” or “–” side of (stitch length b Raise the presser foot lever. length. a Presser foot lever a b c d Stitch length Stitch length adjustment key Short Long c under the presser foot, and then pull out about 5 cm (2 Place the fabric under the presser foot, pass the thread inches) of thread toward the rear of the machine. Press the “+” or “–” side of (stitch width c adjustment key) to increase or reduce the stitch width.
SEWING BASICS h Take your foot off the foot controller, or press (start/stop button) once (if the machine was started by pressing (start/stop button)) (for models equipped with the start/stop button). The machine stops sewing. Raise the needle by turning the handwheel i toward you (counterclockwise) so that the mark on the wheel points up. (With models equipped with (needle position button), raise the needle by pressing once or twice.
■ Upper tension is too loose Loops appear on the wrong side of the fabric. c Lower the presser foot lever and continue sewing. Sewing curves Note ● If the upper thread was incorrectly threaded, the upper thread may be too loose. In this case, refer to “Upper threading” (page 15) and rethread the upper thread. Stop sewing, and then slightly change the sewing direction to sew around the curve.
SEWING BASICS d The presser foot remains level, allowing the Release the presser foot locking pin (black button). fabric to be fed. • After the seam is sewn, the presser foot will return to its original angle. CAUTION a Stabilizer material or paper Sewing stretch fabrics First, baste the pieces of fabric together, and then sew without stretching the fabric. ● If fabric more than 6 mm (15/64 inch) thick is sewn or if the fabric is pushed with too much force, the needle may bend or break.
3 UTILITY STITCHES OVERCASTING STITCHES Using overcasting foot You can use the overcasting stitches to join together seams and finish them in one operation. They are also useful for sewing stretch materials. 80/90 stitches model 60/70 stitches model 50 stitches model 40 stitches model 30 stitches model 20 stitches model Presser Foot 100 stitches model Pattern Pattern No.
UTILITY STITCHES With the straight stitch (left needle position) and the triple stretch stitch, the needle position can be adjusted. Pressing the “+” side of the stitch width adjustment key moves the needle to the right; pressing the “–” side of the stitch width adjustment key moves the needle to the left. BASIC STITCHING Straight stitches are used for sewing plain seams.
a e fabric with the wrong side facing up. Reverse the skirt or pants. Unfold the edge of fabric, and position the a Wrong side of fabric 2 b Right side of fabric c Edge of fabric 4 d Bottom side 1 4 3 1 Fold the fabric along the desired edge of the b hem, and press. a b c 4 d 2 1 1 3 1 5 2 g Select a stitch. h arm sewing possible.
UTILITY STITCHES k catches the fold of the hem. Adjust the stitch width until the needle slightly a Needle drop point When you change the needle drop point, raise the needle, and then change the stitch width. Stitch width a Wrong side of fabric b Right side of fabric • For details on changing the stitch width, refer to “Selecting a stitch” (page 24). Sew with the fold of the hem against the presser l foot guide. Remove the basting stitching and turn the fabric m right side up.
CAUTION b foot “A”, and then insert the button that will be Pull out the button guide plate of buttonhole put through the buttonhole. A ● Be sure to turn off the main power before replacing the presser foot. Otherwise, injuries may occur if the foot controller or (start/ stop button) is accidentally pressed and the machine starts sewing. The maximum buttonhole length is about 28 mm (1-1/ 8 inches) (diameter + thickness of the button).
UTILITY STITCHES f buttonhole mark aligned with the red marks on Position the fabric with the front end of the the sides of the buttonhole foot, and then lower the presser foot lever. 1 i remove the fabric, and cut the thread. Raise the needle and the presser foot lever, j position. Raise the buttonhole lever to its original k stitching to prevent the stitching from being cut, Insert a pin at the end of the buttonhole 2 and then use a seam ripper to cut towards the pin and open the buttonhole.
■ Sewing buttonholes on stretch fabrics When sewing buttonholes on stretch fabrics, use a gimp thread. Hook the gimp thread onto the part of a buttonhole foot “A” shown in the illustration so that it fits into the grooves, and then loosely tie it. Button sewing Buttons can be sewn on with the sewing machine. Buttons with 2 or with 4 holes can be attached. a Measure the distance between the holes. Raise the presser foot lever, and then slide the .
UTILITY STITCHES Turn the handwheel toward you correctly goes into the two holes of the button. Adjust the stitch width to the distance between the button holes. Straight stitch (center) I 20 stitches model h (counterclockwise) to check that the needle Stitch Name 30 stitches model Set the stitch length to the shortest setting by Pattern No. 40 stitches model g pressing the stitch length adjustment key.
e of the pin on zipper foot “I”. Attach the presser foot holder to the right side I a Pin on the right side b Needle drop point f Select stitch Memo ● If the presser foot contacts the zipper slider, leave the needle lowered (in the fabric) and raise the presser foot. After moving the slider so it will not contact the presser foot, lower the presser foot and continue sewing.
UTILITY STITCHES APPLIQUÉ, PATCHWORK AND QUILT STITCHING Stretch stitching a Attach zigzag foot “J”. b Select stitch c Sew the fabric without stretching it. The stitches that can be used for sewing appliqués, patchwork and quilts are described below.
Appliqués Piecing You can create an appliqué by cutting a different piece of fabric into a shape and using it as a decoration. a Baste the cut design to the fabric. CAUTION ● If glue is used to hold the cut design in place on the fabric, do not apply glue to areas that will be sewn with the machine. If glue is attached to the needle or race, the machine may be damaged. b Attach zigzag foot “J”. c Select stitch Sewing together two pieces of fabric is called “piecing”.
UTILITY STITCHES a Baste the fabric to be quilted. Remove the presser foot and the presser foot b holder. a hole at the rear of the walking foot or presser Insert the stem of the quilting guide into the foot holder. Walking foot Presser foot holder • For details, refer to “Removing the presser foot holder” (page 23).
c hand, and then tighten the presser foot holder Hold the quilting foot in place with your right g position lever to After sewing is finished, slide the feed dog and turn the handwheel to raise the dogs. screw using the disc-shaped screwdriver in your left hand. • Normally, the feed dog position lever is positioned at .
UTILITY STITCHES a Set the button guide plate on buttonhole foot “A” Determine the desired length of the bar tack. e possible. Pull down the buttonhole lever as far as to the desired length. (The distance between the markings on the presser foot scale is 5 mm (3/16 inch).) a Presser foot scale b Length of bar tack c 5 mm (3/16 inch) • A bar tack with a maximum length of about 28 mm (1-1/8 inches) can be sewn. b Attach buttonhole foot “A”.
14 14 14 - J 16 16 15 15 15 15 14 J 17 17 16 16 16 16 - Shell tuck stitch J 13 13 12 12 12 12 12 Smocking stitch J 18 18 - - - - - Joining stitch Satin scallop stitch 20 stitches model 14 30 stitches model 50 stitches model 15 40 stitches model 60/70 stitches model 15 100 stitches model J Stitch Name Pattern 80/90 stitches model Presser Foot Pattern No.
UTILITY STITCHES Scallop stitching c (3/8 inch). Sew parallel stitching at intervals of 10 mm 1 The wave-shaped repeating pattern that looks like shells is called “scalloping”. It is used on the collars of blouses and to decorate the edges of handkerchiefs. a Attach monogramming foot “N”. b Select stitch . a 10 mm (3/8 inch) • Do not sew reverse/reinforcement stitches or cut the thread. Stitch along the edge of the fabric, making sure c not to sew directly on the edge of the fabric.
Shell tuck stitching b fabric, and then open up the seam allowances. Sew together the right sides of the two pieces of The gathers that look like shells are called “shell tucks”. They are used to decorate trims, the front of blouses or cuffs made of thin fabrics. a Fold the fabric along the bias. a Wrong side of fabric b 6.5 mm (1/4 inch) seam allowance c Straight stitch c b Attach zigzag foot “J”. Select stitch , or .
UTILITY STITCHES CAUTION ● Select a stitch width of 6.0 mm (15/64 inch) or less, otherwise the needle may bend or break. ● After adjusting the stitch width, slowly turn the handwheel toward you (counterclockwise) and check that the needle does not touch the presser foot. If the needle hits the presser foot, the needle may bend or break. d • For details, refer to step c of “Selecting a stitch” (page 24). Press the “+” side of (stitch width d adjustment key) to enter the selected character.
c adjustment key) to enter the selected character. Press the “+” side of (stitch width a Press the utility stitch key. N a Utility stitch key Repeat steps b and c to add “M” (No. 13) d and “E” (No. 05). b Press the character stitch key. N a Character stitch key c Add new characters by following the procedure described in “Combining characters” (page 46). Memo 3 N ● To enter a space, select “_” (No. 30).
UTILITY STITCHES Checking characters You can check the characters in a combination with following method. Press the “+” or “-” side of (stitch length a adjustment key) repeatedly. This will display the characters that have been entered one by one on the LCD. You can check the pattern No. and position of each character. b Attach monogramming foot “N”. • For details, refer to “Replacing the presser foot” (page 22). c Start sewing.
ADJUSTING STITCHES (For models equipped with character stitches) Your stitch pattern may sometimes turn out poorly, depending on the type or thickness of fabric, the stabilizer material used, sewing speed, etc. If your sewing does not turn out well, sew trial stitches using the same conditions as the real sewing, and adjust the stitch pattern as shown below. Memo d Select No. 59 (for making adjustments). The LCD goes into the stitch adjustment mode.
APPENDIX 4 APPENDIX STITCH SETTINGS Applications, stitch lengths and widths and whether the twin needle can be used are listed for utility stitches in the following table. CAUTION ● When using the twin needle, select a stitch width of 5.0 mm (3/16 inch) or less, otherwise the needle may break or the machine may be damaged. ● When using the twin needle, be sure to attach zigzag foot “J”, otherwise the needle may break or the machine may be damaged.
100 stitches model 90 stitches model 80 stitches model 70 stitches model 60 stitches model 50 stitches model 40 stitches model 30 stitches model 20 stitches model Twin Needle Walking Foot Reverse (Rev.)/ Reinforcement (Rfc.) Stitching 10 10 10 09 09 09 09 09 09 Blind hem stitch Blind hem stitching on medium weight fabrics 0 (0) -3 3 2.0 (1/16) 1.0–3.5 (1/16–1/8) No No Rfc.
Auto Manual Twin Needle Walking Foot Reverse (Rev.)/ Reinforcement (Rfc.) Stitching 20 stitches model 30 stitches model 40 stitches model 50 stitches model 60 stitches model 70 stitches model 80 stitches model 90 stitches model Stitch Name/ Application Decorative stitch Decorative hemming on thin, medium weight and plain weave fabrics, heirloom stitching, etc. Decorative stitch Decorative hemming on thin, medium weight and plain weave fabrics, heirloom stitching, etc.
100 stitches model 90 stitches model 80 stitches model 70 stitches model 60 stitches model 50 stitches model 40 stitches model 30 stitches model 20 stitches model Twin Needle Walking Foot Reverse (Rev.)/ Reinforcement (Rfc.) Stitching 45 45 45 39 39 35 31 - - Hand-look quilting Straight stitch quilting that looks hand-sewn 0.0 (0) 0.0–7.0 (0–1/4) 2.5 (3/32) 1.0–4.0 (1/16–3/16) No No Rfc.
100 stitches model 90 stitches model 80 stitches model 70 stitches model 60 stitches model 50 stitches model 40 stitches model 30 stitches model 20 stitches model Twin Needle Walking Foot Reverse (Rev.)/ Reinforcement (Rfc.) Stitching N 63 59 55 47 - - - - - Decorative stitch For decoration, etc. 7.0 (1/4) 0.0–7.0 (0–1/4) 2.5 (3/32) 0.2–4.0 (1/64–3/16) No No Rfc. N 64 60 - - - - - - - Decorative stitch For decoration, etc. 7.0 (1/4) 0.0–7.0 (0–1/4) 1.6 (1/16) 0.2–4.
100 stitches model 90 stitches model 80 stitches model 70 stitches model 60 stitches model 50 stitches model 40 stitches model 30 stitches model 20 stitches model Twin Needle Walking Foot Reverse (Rev.)/ Reinforcement (Rfc.) Stitching 80 75 68 59 53 43 35 - - Satin stitches For decoration, etc. 7.0 (1/4) 0.0–7.0 (0–1/4) 0.4 (1/64) 0.1–1.0 (1/64–1/16) ** Yes (J) No Rfc. N 81 - - - - - - - - Satin stitches For decoration, etc. 7.0 (1/4) 0.0–7.0 (0–1/4) 0.4 (1/64) 0.1–1.
100 stitches model 90 stitches model 80 stitches model 70 stitches model 60 stitches model 50 stitches model 40 stitches model 30 stitches model 20 stitches model Twin Needle Walking Foot Reverse (Rev.)/ Reinforcement (Rfc.) Stitching N 93 83 - - - - - - - Cross-stitches For decoration, etc. 6.0 (15/64) 0.0–7.0 (0–1/4) 1.4 (1/16) 0.2–4.0 (1/64–3/16) No No Rfc. N 94 84 75 65 - - - - - Cross-stitches For decoration, etc. 7.0 (1/4) 0.0–7.0 (0–1/4) 1.6 (1/16) 0.2–4.
CAUTION MAINTENANCE Simple sewing machine maintenance operations are described below. Restrictions on oiling In order to prevent damaging this machine, it must not be oiled by the user. This machine was manufactured with the necessary amount of oil applied to ensure correct operation, making periodic oiling unnecessary. ● Make sure you unplug the machine before you clean it. Otherwise, you may get an electric shock or be injured. b Raise the needle and the presser foot.
APPENDIX Insert the bobbin case so that the mark on the g bobbin case aligns with the ● mark on the machine. i into position. From the front, slide the needle plate cover back a Needle plate cover CAUTION ● If the needle plate cover is not flush with the surface of the machine as shown below, remove the needle plate cover (step d), and then install it again (steps h and i).
• Looking under the fabric, there is tangled thread in the bobbin case. Upper thread tightened up ■ Symptom • The upper thread appears as a single continuous line. • The lower thread is visible from the upper side of the fabric. (Refer to the illustration below.) • The upper thread has tightened up, and comes out when pulled. • The upper thread has tightened up, and wrinkles appear in the fabric. • The upper thread tension is tight, and the results do not change even after the thread tension is adjusted.
APPENDIX a b c d e f Lower side of fabric Lower thread visible from upper side of fabric Upper thread Upper side of fabric Lower thread Upper thread visible from lower side of fabric ■ Cause/remedy/check details Cause 1 The machine is not correctly threaded. The lower threading is incorrect. Return the upper tension-control dial to “4”, and then refer to “Upper thread tightened up” (page 59) to correct the threading.
h If threads remain in the bobbin case, remove Remove the bobbin case. k threads, and then remove the needle plate. Slightly lift up the needle plate, cut any tangled them. Remove the fabric and threads from the needle plate. If the fabric cannot be removed, even after completing these steps, contact your nearest authorized service center. a Bobbin case Use the cleaning brush or a vacuum cleaner to i remove any dust from the race and its surrounding area.
APPENDIX Insert the bobbin case by following step g in p “Cleaning the race” (page 58). q c (counterclockwise), and look from all sides to Slowly turn the handwheel toward you check that the needle falls at the center of the hole in the needle plate. If the needle contacts the needle plate, remove the needle plate, and then install it again, starting with step m in “Removing the fabric from the machine” (page 61).
List of symptoms ■ Before sewing Symptom The needle threader can not be used. (For models equipped with the needle threader lever.) Possible cause How to put it right Reference You have not moved the needle holder to its highest position. Raise the needle either by turning the handwheel toward you (counterclockwise) so that the mark on the wheel points up or by pressing (needle position button) once or twice. page 15 The needle is incorrectly installed. Correctly install the needle.
APPENDIX ■ While sewing Symptom The sewing machine does not work. Fabric being sewn with the machine cannot be removed. The needle breaks. 64 Possible cause How to put it right Reference The machine is not plugged in. Plug the machine in. page 8 The main power switch is turned off. Turn on the main power switch. page 8 The bobbin winder shaft is pushed to the right. Move the bobbin winder shaft to the left. You have not used the foot controller properly. Use the foot controller properly.
Symptom The upper thread breaks. The lower thread is tangled or breaks. The fabric is wrinkled. Possible cause How to put it right Reference The upper thread was not threaded correctly (for example, the spool is not installed correctly, the spool cap is too big for the spool being used, or the thread has come out of the needle bar thread guide.) Correct the upper threading. Use the spool cap that best fits the size of the spool being used. There are knots or tangles in the thread.
APPENDIX Symptom The fabric is wrinkled. Stitches are skipped. There is a highpitched noise while sewing. The fabric does not feed. The fabric feeds in the opposite direction. 66 Possible cause How to put it right Reference If thin fabrics are being sewn, the stitch is too coarse. Shorten the stitch length, or sew with stabilizer material under the fabric. page 24, 28 The presser foot you are using is not appropriate for the type of stitch that you want to sew.
■ After sewing Symptom The upper thread has tightened up. The thread tension is incorrect. The thread is tangled on the wrong side of the fabric. The stitch is not sewn correctly. Possible cause How to put it right Reference The bobbin thread is incorrectly installed. Correctly install the bobbin thread. You have not threaded the upper thread properly. Correct the upper threading. page 15 You have not wound the bobbin thread properly. Wind the bobbin thread properly.
APPENDIX ERROR MESSAGES If an operation is performed incorrectly before the sewing machine is set up, an error message appears on the operation panel. Follow the instructions indicated in the table. If you press the stitch selection key or do the operation correctly while the error message is displayed, the message disappears.
INDEX Numerics P 3-point zigzag stitch .......................................................29 patchwork stitching ........................................................ 39 piecing ........................................................................... 39 pocket corners................................................................ 41 presser foot....................................................................... 6 presser foot holder.....................................................
Please visit us at http://support.brother.com/ where you can get product support and answers to frequently asked questions (FAQs).