
Full Product Manual


KNOWING YOUR SEWING MACHINE
9
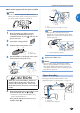
1
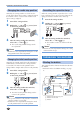
Power supply
1
Insert the plug into a wall outlet.
2
1
1
Main power
switch
2
Jack/socket
connector
2
Set the main power switch to “I”.
X
The sewing light comes on when the
machine is turned on.
Mem
o
•When the machine is turned on, the needle
and the feed dogs will make sound when
they move; this is not a malfunction.
3
To turn off the machine, set the main power
switch to “”.
X
The sewing light goes off when the machine
is turned off.
Note
•If a power outage occurs while the sewing
machine is being operated, turn off the sewing
machine and unplug the power supply cord.
(For U.S.A. only)
•This appliance has a polarized plug (one blade
wider than the other). To reduce the risk of
electric shock, this plug is intended to fit in a
polarized outlet only one way. If the plug does
not fit fully in the outlet, reverse the plug.
If it still does not fit, contact a qualified
electrician. Do not modify the plug in any way.
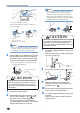
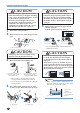
Foot controller
Insert the foot controller plug into its jack/socket.
1
Foot controller jack/socket
CAUTION
• When connecting the foot controller, be sure
to turn off the sewing machine in order to
prevent the machine from accidentally being
started.
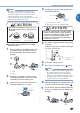
Depress the foot controller to start sewing, and
adjust the sewing speed by changing the pressing
force.
Slower
Faster
You should make sure that nothing is placed on the
foot controller when the machine is not in use.
CAUTION
• Do not allow pieces of cloth and dust to build
up on the foot controller. Doing so could cause
a fire or an electric shock.
Note
•When the foot controller is plugged in, the start/
stop button is disabled (only for models equipped
with the start/stop button).
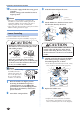
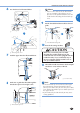
Sewing speed controller (for
models equipped with the start/
stop button)
1
Slide the sewing speed controller to select
the desired sewing speed.
Slower Faster
1
Sewing speed controller
• Thespeedsetusingthesewingspeed
controller is the foot controller’s maximum
sewing speed.