
Operation Manual

KNOWING YOUR SEWING MACHINE
16
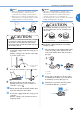
1
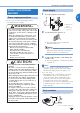
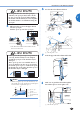
Slit
2
Cutter(Cutthethreadwiththecutter.)
Note
•If the thread is not correctly inserted
through the tension-adjusting spring of the
bobbin case, it may cause incorrect thread
tension(page27).
1
1
Tension-adjusting spring
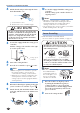
6
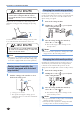
Replace the bobbin cover.
Mem
o
•Youcanbeginsewingimmediatelywithout
drawing up the bobbin thread. If you want to
draw up the bobbin thread before you start to
sew, follow to the procedure in “Drawing up the
lowerthread”(page19).
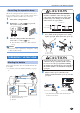
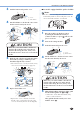
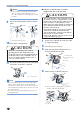
Upper threading
Set the upper thread and thread the needle.
•For details on the needle threader, see page 18.
1
Spool pin
2
Mark on the handwheel
CAUTION
• When threading the upper thread, carefully
follow the instructions. If the upper threading
is not correct, the thread may become tangled
or the needle may bend or break.
• Never use a thread weight of 20 or lower.
• Use the needle and the thread in the correct
combination. For details on the correct
combination of needles and threads, refer to
“Needle types and their uses” (page 20).
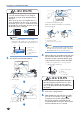
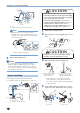
1
Turn on the sewing machine.
2
Raise the presser foot, using the presser foot
lever.
1
Presserfootlever
CAUTION
• If the presser foot is not raised, the sewing
machine cannot be threaded correctly.
3
Raise the needle in the following way.
or
1 Turn the handwheel so
that the mark on the
wheel points up.
2 PresstheNeedleposition
button(forthemodels
equippedwiththisbutton).
•If the needle is not correctly raised, the
sewing machine cannot be threaded. Be
sure to raise the needle before threading the
sewing machine.
4
Press down on the spool pin lever to swing
up the spool pin. Then remove the spool cap.
1
Spool pin
2
Spool cap