
Operation Manual


UTILITY STITCHES
49
3
2
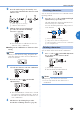
Press the stitch category selection key once
or more and confirm that the character stitch
indicator is lit.
1
Stitch category selection key
2
Characterstitchindicator
3
Add new characters by following the
procedure described in “Combining
characters” (page 48).
X
New characters are added next to the last
character of the combination.
■
Making a new combination of characters after
sewing
Mem
o
•Whenyouhavefinishedsewing,thepatternNo.
of the first character in the current combination is
shownontheLCD.
1
Select the first character of the new combination.
2
Press the “+” side of (stitch width
adjustment key).
X
The old combination of characters is cleared
from memory, and the pattern No. shown in
theLCDisenteredasthefirstcharacterofa
new combination.
3
Add characters by following the procedure
described in “Combining characters” (page 48).
Checking characters
Youcancheckthecharactersinacombinationwith
following method.
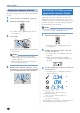
1
Press the “+” or “-” side of (stitch length
adjustment key) repeatedly.
This will display the characters that have been
enteredonebyoneontheLCD.
YoucancheckthepatternNo.andpositionof
each character.
1
Stitch length adjustment key
2
The position of the selected pattern No.
3
The total number of characters in the combination
4
Selected pattern No.
Deleting characters
Youcandeletecharactersfromthecombination.
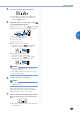
1
Press “-” side of (stitch width adjustment
key) to delete the last character in the
combination.
1
Stitch width adjustment key
X
The last character will be deleted.
Mem
o
•Repeat step
1
to delete more characters.
•Youcanonlydeletethelastcharacterina
combination.