
Operation Manual


UTILITY STITCHES
50
Sewing the character stitches
All character stitches are sewn with monogramming
foot “N”.
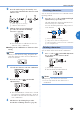
1
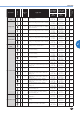
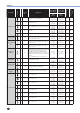
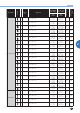
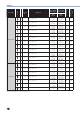
Select a character stitch. (Refer to page 47.)
2
Attach monogramming foot “N”.
•For details, refer to “Replacing the presser
foot”(page23).
3
Start sewing.
X
The stitch is sewn in the direction indicated
by the arrow.
Mem
o
•Whensewingcharacters,themachine
automatically sews reinforcement stitches
for each character.
•Whilesewing,theLCDshowsthepattern
No. currently being sewn.
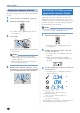
4
When you have finished sewing, use scissors
to trim off any excess threads at the beginning
of the stitching and between the characters.
ADJUSTING STITCHES (for models
equipped with character stitches)
Yourstitchpatternmaysometimesturnoutpoorly,
depending on the type or thickness of fabric, the
stabilizer material used, sewing speed, etc. If your
sewing does not turn out well, sew trial stitches using
the same conditions as the real sewing, and adjust
the stitch pattern as shown below.
Mem
o
•Thecharacterstitches“034”(No.31+No.34+
No.35)areusedformakingadjustments.
1
Attach monogramming foot “N”.
•For details, refer to “Replacing the presser
foot”(page23).
2
Combine the character stitches “034” (No.
31 + No. 34 + No. 35).
•Fordetails,referto“Combiningcharacters”
(page48).
X
Whenyouhavefinishedcreatingthe
combination, the following is displayed on
theLCD.
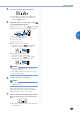
3
Sew the combination of characters and check
how it turns out.
•For details, refer to “Sewing the character
stitches”(page50).
A
B
C
A: Correctlysewn
(withproperspacesbetweencharacters)
B: Bunched or shapeless
(Thereisnospacebetweencharacters.)
C: Overstretched
(Thestitch“0”hasagap.)
If the pattern you sewed does not look like A, use
the following steps to adjust the stitches.