
User Manual

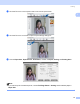

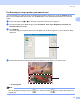
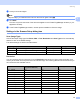
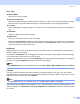
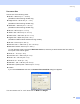
Table Of Contents
- SOFTWARE USER’S GUIDE
- Table of Contents
- Windows®
- 1 Printing
- 2 Scanning
- 3 ControlCenter3
- 4 Network Scanning (For models with built-in network support)
- 5 Remote Setup (Not available for DCP models, MFC-250C and MFC-290C)
- 6 Brother PC-FAX Software (MFC models only)
- 7 PhotoCapture Center™
- 8 Firewall settings (For Network users)
- Apple® Macintosh®
- 9 Printing and Faxing
- 10 Scanning
- 11 ControlCenter2
- 12 Network Scanning (For models with built-in network support)
- 13 Remote Setup & PhotoCapture Center™
- Index
- brother CHN-ENG

Scanning
40
2
e Load your document again.
Note
Skip this step if you loaded the document on the scanner glass in step a.
f Click Start.
This time only the chosen area of the document appears in the Presto! PageManager window (or your
application window).
g In the Presto! PageManager window, use the options available to refine the image.
Settings in the Scanner Setup dialog box 2
Scan (Image Type) 2
Choose the output image type from Photo, Web or Text. Resolution and Scan Type will be automatically
altered for each of the default settings.
The default settings are listed in the table below:
Resolution 2
You can choose a scanning resolution from the Resolution drop-down list. Higher resolutions take more
memory and transfer time, but produce a finer scanned image. The following table shows the resolutions you
can choose and the available colours.
Scan (Image Type) Resolution Scan Type
Photo Use for scanning photo images 300 × 300 dpi 24 bit colour
Web Use for attaching the scanned image to web pages 100 × 100 dpi 24 bit colour
Text Use for scanning text documents 200 × 200 dpi Black & White
Resolution Black & White/
Grey (Error Diffusion)
256 colour True Grey/24 bit colour
100 × 100 dpi Yes Yes Yes
150 × 150 dpi Yes Yes Yes
200 × 200 dpi Yes Yes Yes
300 × 300 dpi Yes Yes Yes
400 × 400 dpi Yes Yes Yes
600 × 600 dpi Yes Yes Yes
1200 × 1200 dpi Yes No Yes
2400 × 2400 dpi Yes No Yes
4800 × 4800 dpi Yes No Yes
9600 × 9600 dpi Yes No Yes
19200 × 19200 dpi Yes No Yes