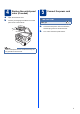
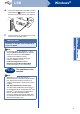
Quick Setup Guide Start Here DCP-7055 / DCP-7060D DCP-7065DN Please read the Safety and Legal booklet first before you set up your machine. Then, please read this Quick Setup Guide for the correct setup and installation. To view the Quick Setup Guide in other languages, please visit http://solutions.brother.com/. WARNING WARNING indicates a potentially hazardous situation which, if not avoided, could result in death or serious injuries.
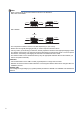
Note • Keep a minimum gap around the machine as shown in the illustration. DCP-7055 / DCP-7060D 350 mm 100 mm 100 mm 90 mm DCP-7065DN 250 mm 100 mm 100 mm 90 mm • The components included in the box may differ depending on your country. • Please save the original packaging should you need to ship the machine in future. • If for any reason you must ship your machine, carefully repack the machine in the original packaging to avoid any damage during transit.
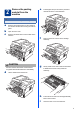
2 Remove the packing material from the machine e Pull the paper strip to remove the protective material as shown in the illustration. IMPORTANT DO NOT connect the AC power cord yet. a b c Remove the packing tape from the outside of the machine and the film covering the scanner glass. Open the front cover. Remove the Silica Pack from the inside of the machine. CAUTION CAUTION DO NOT eat the Silica Pack. Please discard. If ingested seek medical attention immediately.
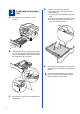
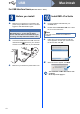
a 3 Load paper in the paper tray d Pull the paper tray completely out of the machine. Put paper in the tray and make sure: The paper is below the maximum paper mark (b b b) a. Over filling the paper tray will cause paper jams. The side to be printed on must be face down. The paper guides touch the sides of the paper so it will feed correctly. 1 b While pressing the green paper-guide release lever a, slide the paper guides to fit the paper size you are loading in the tray.
a b 4 5 Replace the control panel cover (if needed) Open the document cover. Choose your language and attach the control panel cover to the machine. Connect the power cord IMPORTANT DO NOT connect the interface cable yet. a b Connect the AC power cord to the machine, and then plug it into an electrical socket. Turn on the machine’s power switch. Note If the control panel cover is not fitted correctly, the key operations will not work.
a 6 After turning the power switch on, the LCD shows: Press OK. Press a or b to choose your language and press OK. c c Select Language English d Press Menu. Press a or b to choose 1.General Setup. Press OK. Press a or b to choose 3.LCD Contrast. Press OK. Press a to increase the contrast. —OR— If the LCD shows the correct language, press a. Press b to decrease the contrast. —OR— Press OK. Press b to go back to step b to choose the language again.
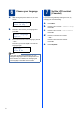
8 Choose your connection type These installation instructions are for Windows® 2000 Professional, Windows® XP Home/Windows® XP Professional, Windows® XP Professional x64 Edition, Windows Vista®, Windows® 7, and Mac OS X (versions 10.4.11, 10.5.x and 10.6.x). Note For Windows Server® 2003/2003 x64 Edition/2008/2008 R2, visit your model page at http://solutions.brother.com/.
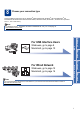
USB Windows® For USB Interface Users (Windows® 2000 Professional/XP/XP Professional x64 Edition/Windows Vista®/Windows® 7) a 9 Before you install Make sure that your computer is ON and you are logged on with Administrator rights. 10 a Note The installation CD-ROM includes ScanSoft™ PaperPort™ 12SE. This software supports Windows® XP (SP3 or greater), XP Professional x64 Edition (SP2 or greater), Windows Vista® (SP2 or greater) and Windows® 7.
USB e Windows® Connect the USB cable to the USB connector marked with the symbol on your machine and then connect the cable to your computer. f Turn the machine on, and follow the on-screen instructions to complete setup. DO NOT cancel any of the screens during the installation. It may take a few seconds for all screens to appear. • For Windows Vista® and Windows® 7 users, when the Windows Security screen appears, select the check box and click Install to complete the installation correctly.
USB Macintosh For USB Interface Users (Mac OS X 10.4.11 - 10.6.x) a 9 Before you install Make sure your machine is connected to the power and your Macintosh is ON. You must be logged on with Administrator rights. IMPORTANT For Mac OS X 10.4.10 users, upgrade to Mac OS X 10.4.11 - 10.6.x. (For the latest drivers and information on the Mac OS X you are using, visit http://solutions.brother.com/.
USB 11 Macintosh Download and install Presto! PageManager When Presto! PageManager is installed OCR capability is added to Brother ControlCenter2. You can easily scan, share and organize photos and documents using Presto! PageManager. On the Brother Support screen, click Presto! PageManager and follow the on-screen instructions. Macintosh 11 Windows® The installation is now complete.
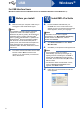
Wired Network Windows® For Wired Network Interface Users (DCP-7065DN only) (Windows® 2000 Professional/XP/XP Professional x64 Edition/Windows Vista®/Windows® 7) a 9 Before you install Make sure that your computer is ON and you are logged on with Administrator rights. 10 a Note • The installation CD-ROM includes ScanSoft™ PaperPort™ 12SE. This software supports Windows® XP (SP3 or greater), XP Professional x64 Edition (SP2 or greater), Windows Vista® (SP2 or greater) and Windows® 7.
Wired Network e Follow the on-screen instructions to complete setup. IMPORTANT DO NOT cancel any of the screens during the installation. It may take a few seconds for all screens to appear. Note • If your machine is not found over the network, confirm your settings by following the on-screen instructions. • For Windows Vista® and Windows® 7 users, when the Windows Security screen appears, select the check box and click Install to complete the installation correctly.
Wired Network Macintosh For Wired Network Interface Users (DCP-7065DN only) (Mac OS X 10.4.11 - 10.6.x) a 9 Before you install Make sure your machine is connected to the power and your Macintosh is ON. You must be logged on with Administrator rights. IMPORTANT For Mac OS X 10.4.10 users, upgrade to Mac OS X 10.4.11 - 10.6.x. (For the latest drivers and information on the Mac OS X you are using, visit http://solutions.brother.com/.
Wired Network Note • If this screen appears click OK. Enter a name for your Macintosh in Display Name up to 15 characters long and click OK. Go to d. Macintosh 11 Download and install Presto! PageManager When Presto! PageManager is installed OCR capability is added to Brother ControlCenter2. You can easily scan, share and organize photos and documents using Presto! PageManager. On the Brother Support screen, click Presto! PageManager and follow the on-screen instructions.
Other Information Brother CreativeCenter Get inspired. If you're using Windows, double-click the Brother CreativeCenter icon on your desktop to access our FREE web site with many ideas and resources for personal and professional use. Mac users can access Brother CreativeCenter at this web address: http://www.brother.
Consumables Consumables When the time comes to replace consumable items, an error will be indicated by the LCD on the control panel. For more information about the consumables for your machine, visit us at http://solutions.brother.com/ or contact your local Brother reseller.
Trademarks The Brother logo is a registered trademark of Brother Industries, Ltd. Brother is a registered trademark of Brother Industries, Ltd. Microsoft, Windows, Windows Server and Internet Explorer are registered trademarks of Microsoft Corporation in the United States and/or other countries. Windows Vista is either a registered trademark or a trademark of Microsoft Corporation in the United States and other countries. Apple, Macintosh, Safari and TrueType are trademarks of Apple Inc.