
All in One Printer - All-in-One Printer User Manual
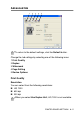
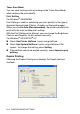
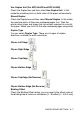
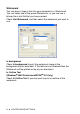
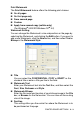
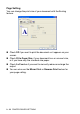
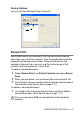
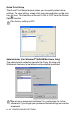
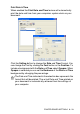
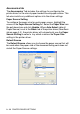
Table Of Contents
- SOFTWARE USER’S GUIDE
- Table of contents
- 1 Using the machine as a printer
- 2 Printer driver settings (Windows® Only)
- 3 How to scan using Windows®
- Scanning a document (For Windows® XP only)
- Scanning a document
- Using the scan key (For USB or Parallel interface cable users)
- Using ScanSoft® PaperPort® 9.0SE and OmniPage® OCR
- 4 Using ControlCenter2.0 (For Windows®)
- 5 Using MFC Remote Setup (For Windows®) (For MFC-8440 and MFC-8840D only)
- 6 Using Brother PC-FAX software (For Windows®) (For MFC-8440 and MFC-8840D only)
- PC-FAX sending
- Speed-Dial setup
- Brother Address Book
- Setting up a Member in the Address Book
- Setting up a Group for Broadcasting
- Editing Member information
- Deleting a Member or Group
- Exporting the Address Book
- Importing to the Address Book
- Setting up a Cover Page
- Entering Cover Page Information
- Sending a file as a PC-FAX using the Facsimile style user interface
- Sending a file as a PC-FAX using the Simple style user interface
- Setting up PC-FAX receiving
- 7 Using your machine with a Macintosh®
- Setting up your USB-equipped Apple® Macintosh®
- Using the Brother printer driver with your Apple® Macintosh® (Mac OS® 8.6 - 9.2)
- Using the Brother Printer Driver with Your Apple® Macintosh® (Mac OS® X)
- Using the PS driver with your Apple® Macintosh®
- Sending a fax from your Macintosh® application (For MFC-8440 and MFC-8840D only)
- Using the Brother TWAIN scanner driver with your Macintosh®
- Using Presto!® PageManager®
- Using ControlCenter2.0 (For Mac OS® X 10.2.1 or greater)
- MFC Remote Setup (Mac OS® X) (For MFC-8440 and MFC-8840D only)
- 8 Network Scanning (Windows® 98/98SE/Me/2000 Professional and XP only)
- 9 Brother Network PC-FAX software (For MFC-8440 and MFC-8840D only)
- Index
- brother UK/IRE/SAF/PAN NORDIC

PRINTER DRIVER SETTINGS 2 - 9
Print Watermark
The Print Watermark feature offers the following print choices:
■
On all pages
■
On first page only
■
From second page
■
Custom
■
Apply from second copy (collate only)
(For Windows
®
2000/XP/Windows NT
®
4.0)
Watermark Setting
You can change the Watermark’s size and position on the page by
selecting the Watermark, and clicking the Edit button. If you want to
add a new Watermark, click the New button, and then select Text or
Bitmap in the Watermark Style.
■
Title
You can select the CONFIDENTIAL, COPY or DRAFT as the
standard title or enter a title you like in the field.
■
Watermark Text
Enter your Watermark text into the Text Box, and then select the
Font, Size, Darkness and Style.
■
Watermark Bitmap
Enter the file name and location of your bitmap image in the File
box, or Browse for the file location. You can also set the scaling
size of the image.
■
Position
This setting offers you the control for where the Watermark is to
be positioned on the page.