
User Manual

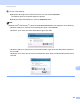
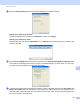

Table Of Contents
- Software User’s Guide
- Applicable models
- Definitions of notes
- Compilation and publication notice
- IMPORTANT NOTE
- Table of Contents
- Section I: Machine operation keys
- Section II: Windows®
- 2 Printing
- Using the Brother printer driver
- Printing a document
- Duplex (two-sided) printing
- Simultaneous scanning, printing and faxing
- Printer driver settings
- Accessing the printer driver settings
- Basic tab
- Advanced tab
- Print Profiles tab
- Support
- Accessories tab
- Ports tab
- Features in the BR-Script3 printer driver (PostScript® 3™ language emulation)
- Status Monitor
- 3 Scanning
- 4 ControlCenter4
- Overview
- Using ControlCenter4 in Home Mode
- Scan tab
- PC-FAX tab (For MFC models)
- Device Settings tab
- Support tab
- Using ControlCenter4 in Advanced Mode
- Scan tab
- PC-Copy tab
- PC-FAX tab (For MFC models)
- Device Settings tab
- Support tab
- Custom tab
- Quick reference for scanning operation
- Changing the Scan key settings for Scan to PC menu
- 5 Remote Setup (For MFC models)
- 6 Brother PC-FAX Software (For MFC models)
- 7 Firewall settings
- 2 Printing
- Section III: Apple Macintosh
- 8 Printing and Faxing
- 9 Scanning
- 10 ControlCenter2
- 11 Remote Setup (For MFC models)
- Section IV: Using the Scan key
- 12 Scanning (For USB cable users)
- 13 Network Scanning
- Before using Network Scanning
- Using the Scan key on your network
- Scan to E-mail
- Scan to E-mail (E-mail Server, available as a download)
- Scan to Image
- Scan to OCR
- Scan to File
- Scan to FTP
- Scan to Network (Windows®)
- How to set a new default for the file size (Scan to E-mail (E-mail server), FTP and Network)
- Using Web Services for scanning on your network (Windows Vista® SP2 or greater and Windows® 7)
- Index

205
13
13
To use the machine as a network scanner, the machine must be configured with a TCP/IP address. You can
set or change the address settings from the control panel (see uu Network User's Guide: Printing the
Network Configuration Report) or by using the BRAdmin Professional software. If you installed the machine
following the instructions for a network user (uu Quick Setup Guide) then the machine should already be
configured for your network.
Note
• For network scanning, a maximum of 25 clients can be connected to one machine on a network. For
example, if 30 clients try to connect at a time, 5 of those clients will not be shown on the LCD.
• (For Windows
®
) If your PC is protected by a firewall and is unable to network scan, you may need to
configure the firewall settings to allow communication through port number 54925 and 137. (See Before
using the Brother software uu page 116.)
Before using Network Scanning 13
Configuring Network Scanning (Windows
®
) 13
If you are using a different machine than the one that was originally registered to your PC during the
installation of MFL-Pro Suite software (see uu Quick Setup Guide), follow the steps below.
a (Windows
®
XP)
Click the Start button, Control Panel, Printers and Other Hardware, then Scanners and Cameras (or
Control Panel, Scanners and Cameras).
(Windows Vista
®
)
Click the button, Control Panel, Hardware and Sound, then Scanners and Cameras.
(Windows
®
7)
Click the button, All Programs, Brother, MFC-xxxx LAN, Scanner Settings, then Scanners and
Cameras.
Network Scanning 13