
User Manual
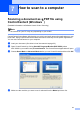
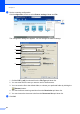
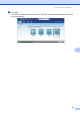
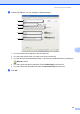
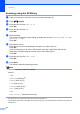
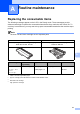
Table Of Contents
- Basic User’s Guide DCP-8110DN/DCP-8150DN/DCP-8155DN
- Brother numbers
- Ordering accessories and supplies
- Notice - Disclaimer of Warranties (USA and Canada)
- Compilation and Publication Notice
- User's Guides and where do I find them?
- Table of Contents
- 1 General information
- 2 Loading paper
- Loading paper and print media
- Paper settings
- Acceptable paper and other print media
- 3 Loading documents
- 4 Making copies
- 5 Printing data from a USB Flash memory drive or digital camera supporting mass storage
- 6 How to print from a computer
- 7 How to scan to a computer
- A Routine maintenance
- B Troubleshooting
- C Menu and features
- D Specifications
- Index

Chapter 7
36
Scanning using the SCAN key 7
a Load your document. (See How to load documents uu page 23.)
b Press (SCAN).
c Press a or b to choose Scan to PC.
Press OK.
d Press a or b to choose File.
Press OK.
e (DCP-8155DN)
If you want to change the duplex setting, press a or b to choose 1sided, 2sided (L)edge
or 2sided (S)edge.
Press OK.
f (For Network users)
Press a or b to choose the destination computer you want to send to.
Press OK.
If the LCD prompts you to enter a PIN number, enter the 4-digit PIN number for the
destination computer using the numeric keys on the control panel.
Press OK.
g Press a or b to choose Start Scan.
Press OK.
h Press Start.
The machine starts the scanning process.
Note
The following scan modes are available:
Scan to:
• USB
• Network (Windows
®
)
• Image (Scan to PC)
• OCR (Scan to PC)
• E-mail (Scan to PC)
• File (Scan to PC)
• FTP
• Web Service
1
(Web Services Scan)
1
Windows
®
users only. (Windows Vista
®
SP2 or later and Windows
®
7)
(See Software User's Guide: Using Web Services for scanning on your network (Windows Vista
®
SP2 or greater and
Windows
®
7).)