
User Manual
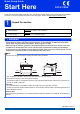
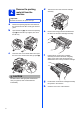
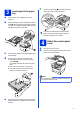
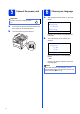

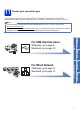
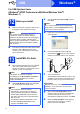
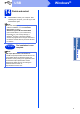
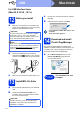
Table Of Contents
- Quick Setup Guide DCP-8110DN
- Start Here
- 1 Unpack the machine
- 2 Remove the packing material from the machine
- 3 Load paper in the paper tray
- 4 Attach the control panel cover
- 5 Connect the power cord
- 6 Choose your language
- 7 Set the LCD contrast (if needed)
- 8 Set the date and time
- 9 Automatic Daylight Saving Time
- 10 Set the Time Zone
- 11 Choose your connection type
- For USB Interface Users (Windows® XP/XP Professional x64 Edition/Windows Vista®/Windows® 7)
- For USB Interface Users (Mac OS X 10.5.8 - 10.7.x)
- For Wired Network Interface Users (Windows® XP/XP Professional x64 Edition/Windows Vista®/Windows® 7)
- For Wired Network Interface Users (Mac OS X 10.5.8 - 10.7.x)
- Options and Consumables
- Start Here

1
Start Here
DCP-8110DN
Quick Setup Guide
CEE-ENG Version 0
Please read the Product Safety Guide first, then read this Quick Setup Guide for the correct setup and installation
procedure. To view the Quick Setup Guide in other languages, please visit http://solutions.brother.com/
.
1
Unpack the machine
WARNING
• Plastic bags are used in the packing of your machine. To avoid danger of suffocation, keep these
plastic bags away from babies and children. Plastic bags are not toys.
• When moving the machine, grasp the side handholds firmly from the front of the machine. The side
handholds are located under the scanner. DO NOT carry the machine by holding it at the bottom.
• If you use a Lower Tray, DO NOT carry the machine with the Lower Tray as you may be injured or cause
damage to the machine because it is not attached to the Lower Tray.
WARNING
indicates a potentially hazardous situation which, if not avoided,
could result in death or serious injuries.
CAUTION
indicates a potentially hazardous situation which, if not avoided, may
result in minor or moderate injuries.
Note
• Keep a minimum gap around the machine as shown in the illustration.
• The components included in the box may differ depending on your country.
• We recommend that you save the original packaging.
• The interface cable is not a standard accessory. Buy the appropriate interface cable for the connection you
want to use (USB or Network).
USB cable
• It is recommended to use a USB 2.0 cable (Type A/B) that is no longer than 2 metres.
• DO NOT connect the interface cable at this time. Connecting the interface cable is done during the MFL-Pro
Suite installation process.
Network cable
Use a straight-through Category 5 (or greater) twisted-pair cable for 10BASE-T or 100BASE-TX Fast Ethernet
Network.
WARNING
CAUTION
150 mm
400 mm
150 mm
150 mm