
User Manual
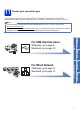
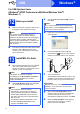
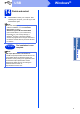
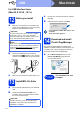
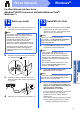
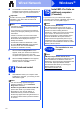
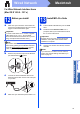
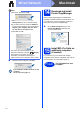
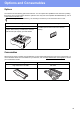
Table Of Contents
- Quick Setup Guide DCP-8110DN
- Start Here
- 1 Unpack the machine
- 2 Remove the packing material from the machine
- 3 Load paper in the paper tray
- 4 Attach the control panel cover
- 5 Connect the power cord
- 6 Choose your language
- 7 Set the LCD contrast (if needed)
- 8 Set the date and time
- 9 Automatic Daylight Saving Time
- 10 Set the Time Zone
- 11 Choose your connection type
- For USB Interface Users (Windows® XP/XP Professional x64 Edition/Windows Vista®/Windows® 7)
- For USB Interface Users (Mac OS X 10.5.8 - 10.7.x)
- For Wired Network Interface Users (Windows® XP/XP Professional x64 Edition/Windows Vista®/Windows® 7)
- For Wired Network Interface Users (Mac OS X 10.5.8 - 10.7.x)
- Options and Consumables
- Start Here

11
Windows
®
Wired Network
Windows
®
Macintosh
Wired Network
For Wired Network Interface Users
(Windows
®
XP/XP Professional x64 Edition/Windows Vista
®
/
Windows
®
7)
12
Before you install
a Make sure that your computer is ON and you
are logged on with Administrator rights.
b Remove the protective cap from the Ethernet
port marked with a symbol.
c Connect the network interface cable to the
Ethernet port and then connect it to a free port
on your hub.
d Make sure your machine's power switch is on.
13
Install MFL-Pro Suite
a Put the installer CD-ROM into your CD-ROM
drive. If the model name screen appears,
choose your machine. If the language screen
appears, choose your language.
b Click Install MFL-Pro Suite, and click Yes if
you accept the license agreements.
c Choose Wired Network Connection
(Ethernet) and then click Next.
d When the Firewall/AntiVirus detected screen
appears, choose Change the Firewall port
settings to enable network connection and
continue with the installation.
(Recommended) and click Next.
If you are not using the Windows
®
Firewall, see
the user’s guide for your software for
information on how to add the following
network ports.
For network scanning, add UDP port 54925.
If you still have trouble with your network
connection, add UDP port 161 and 137.
Note
• The installer CD-ROM includes Nuance™
PaperPort™ 12SE. This software supports
Windows
®
XP (SP3 or greater), XP
Professional x64 Edition (SP2 or greater),
Windows Vista
®
(SP2 or greater) and
Windows
®
7. Update to the latest Windows
®
Service Pack before installing MFL-Pro Suite.
• Disable all personal firewall software (other
than Windows
®
Firewall), anti-spyware or
antivirus applications for the duration of the
installation.
Note
If the Brother screen does not appear
automatically, go to My Computer (Computer),
double-click the CD-ROM icon, and then
double-click start.exe.
Note
• If the installation does not continue
automatically, open the top menu again by
ejecting and then reinserting the CD-ROM or
double-click the start.exe program from the
root folder, and continue from step b to install
MFL-Pro Suite.
• For Windows Vista
®
and Windows
®
7 users,
when the User Account Control screen
appears, click Allow or Yes.
Note
If you want to install the PS driver (BR-Script3
printer driver), choose Custom Install and then
follow the on-screen instructions.