Advanced User’s Guide DCP-J100 DCP-J105 MFC-J200 Version 0 CEE-ENG
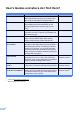
User's Guides and where do I find them? Which Guide? What's in it? Product Safety Guide Read this Guide first. Please read the Safety Instructions before you set up your machine. See this Guide for trademarks and legal limitations. Printed / In the box Quick Setup Guide Follow the instructions for setting up your machine and installing the drivers and software for the operating system and connection type you are using.
Table of Contents 1 General setup 1 IMPORTANT NOTE...............................................................................................1 Memory Storage ....................................................................................................1 Automatic Daylight Saving Time (MFC models only) ............................................1 Sleep Mode ...........................................................................................................2 Auto Power Off (DCP models)...
5 Dialling and storing numbers (MFC models only) 16 Voice operations ..................................................................................................16 Additional dialling operations ...............................................................................16 Combining Speed Dial numbers ....................................................................16 Additional ways to store numbers ........................................................................
1 General setup 1 1 IMPORTANT NOTE 1 Most of the illustrations in this User's Guide show the MFC-J200. Memory Storage Even if there is a power failure, you will not lose your menu settings because they are stored permanently. Temporary settings (such as Contrast, Overseas mode, and so on) will be lost. You may have to reset the date and time. 1 Automatic Daylight Saving Time (MFC models only) 1 You can set the machine to change automatically for daylight saving time.
Chapter 1 Sleep Mode 1 You can choose how long the machine will remain idle before it goes into Sleep Mode (up to 60 minutes). The timer will restart if any operation is carried out on the machine. (MFC-J200) a b c Press Menu, 2, 6. c d e 2 The Auto Power Off feature will turn off the machine after it has been in Sleep Mode for the number of hours you set. When this feature is Off, the machine will remain in Sleep Mode and not turn itself off. The default setting is 1hour.
General setup LCD Changing the LCD language (depending on your country) 1 a b c 1 a b 1 1 (MFC-J200) a b Press Menu, 0, 0. c Press a or b to choose your language. Press OK. 1 Press Menu, 2, 5. Press a or b to choose Light or Dark. Press OK. Press Stop/Exit. (DCP-J100 and DCP-J105) Press Stop/Exit. (DCP-J100 and DCP-J105) 1 If you are having difficulty reading the LCD, try changing the contrast setting. You can change the LCD language. (MFC-J200) LCD Contrast 1 a b Press Menu.
Chapter 1 Mode Timer (MFC models only) The machine’s control panel has three temporary mode keys: FAX, SCAN and COPY. You can change the amount of time the machine takes after the last SCAN or COPY operation before it returns to FAX mode. If you choose Off, the machine stays in the mode you used last. a b c 4 Press Menu, 2, 1. Press a or b to choose 0 Sec, 30 Secs, 1 Min, 2 Mins, 5 Mins or Off. Press OK. Press Stop/Exit.
2 Security features (MFC models only) TX Lock TX Lock lets you prevent unauthorized access to the machine. While TX Lock is On, the following operations are available: 2 2 Setting and changing the TX Lock password 2 NOTE If you have already set the password, you will not need to set it again. Receiving faxes PC-Fax Receive 1 (If PC-Fax Receive was already On) 1 While the TX Lock feature is turned on, your machine will receive faxes and store them in its memory.
Chapter 2 Turning TX Lock on/off Turning TX Lock on 2 2 a b Press Menu, 3, 0, 1. c Enter the registered four-digit password. Press OK. The machine goes offline and the LCD shows TX Lock Mode. Press a or b to choose Set TX Lock. Press OK. Turning TX Lock off a b Press Menu. Enter the registered four-digit password. Press OK. TX Lock is turned off. NOTE If you enter the wrong password, the screen shows Wrong Password and stays offline.
3 Sending a fax (MFC models only) Additional sending options Sending faxes using multiple settings 3 Stop faxing 3 3 To stop faxing, press Stop/Exit. Contrast 3 Some settings are only available when sending mono faxes. If your document is very light or very dark, you may want to change the contrast. For most documents, the factory setting Auto can be used. Auto chooses the suitable contrast for your document. Choose Light when sending a light document. Choose Dark when sending a dark document.
Chapter 3 Changing the fax resolution 3 You can choose four different resolution settings for monochrome faxes and two for colour. The quality of a fax can be improved by changing the fax resolution. Resolution can be changed for the next fax or for all faxes. To change the fax resolution for the next fax a Load your document. b Press c Press Fax Resolution then a or b to choose the resolution. Press OK. d e NOTE Monochrome Standard Suitable for most typed documents.
Sending a fax (MFC models only) Additional sending operations Sending a fax manually e Replace the handset of the external phone. 3 3 Manual transmission lets you hear the dialling, ringing and fax-receiving tones while sending a fax. Dual Access (Monochrome only) 3 You can dial a number and start scanning the fax into memory—even when the machine is sending from memory, receiving faxes or printing PC data. The LCD shows the new job number. NOTE To send a multi-page fax, use the ADF.
Chapter 3 How to broadcast a fax 3 NOTE • If you did not use up any of the numbers for Groups, you can “broadcast” faxes to as many as 90 different numbers. a Load your document. b Press c Enter a number. Press OK. You can use either a Speed Dial, a Group or a manually entered number using the dial pad. • The machine’s available memory will vary depending on the types of jobs in the memory and the numbers used for broadcasting.
Sending a fax (MFC models only) Real Time Transmission 3 When you are sending a fax, the machine will scan the documents into the memory before sending. Then, as soon as the telephone line is free, the machine will start dialling and sending. a Press b c Press Menu, 3, 2, 3. 3 e f g Load your document. Press b c Press Menu, 3, 2, 3. (FAX). Press a or b to choose Next Fax Only. Press OK. d Press a or b to choose Next Fax:Off or Next Fax:On. e f Press OK.
Chapter 3 Checking and cancelling waiting jobs You can check which jobs are still waiting in the memory to be sent, or cancel a job. (If there are no jobs, the LCD shows No Jobs Waiting.) a Press Menu, 3, 5. Any waiting jobs appear on the LCD. b Press a or b to scroll through the jobs and choose the job you want to cancel. Press OK. c Do one of the following: Press 1 to cancel it. Press 2 to exit without cancelling. d Repeat steps b and c for each job you want to cancel.
4 Receiving a fax (MFC models only) Memory Receive (Monochrome only) PC-Fax Receive (Windows®) If you turn on the PC-Fax Receive feature, your machine will store received faxes in the memory and send them to your PC. You can then use your PC to view and store these faxes. You can only use one Memory Receive operation at a time: Even if you have turned off your PC (for example, at night or at the weekend), your machine will receive and store your faxes in its memory.
Chapter 4 Changing Memory Receive operations NOTE • PC-Fax Receive is not supported by Mac OS. If there are received faxes in your machine’s memory when you change the Memory Receive operation, the LCD will ask you one of the following questions: • Before you can set up PC-Fax Receive, you must install the MFL-Pro Suite software on your PC. Make sure your PC is connected and turned on. (See Software and Network User’s Guide.
Receiving a fax (MFC models only) Additional receiving operations Out of Paper Reception Receiving a fax at the end of a conversation 4 As soon as the paper tray becomes empty during fax reception, the LCD shows No Paper Fed. Put some paper in the paper tray. (See Basic User’s Guide: Loading paper and other print media.) If you don't put paper in the paper tray, the machine will continue receiving the fax. The remaining pages will be stored in the memory, if enough memory is available.
5 Dialling and storing numbers (MFC models only) Voice operations g 5 To temporarily change a number, you can use the dial pad to manually substitute part of the number. For example, to change the number to ‘01632-960556’, you could enter the number (#03 ‘01632’) using You can use your extension or external telephone to dial voice calls. Additional dialling operations Combining Speed Dial numbers 5 You can even include manual dialling using the dial pad.
Dialling and storing numbers (MFC models only) Additional ways to store numbers Setting up Groups for Broadcasting A Group, which is stored in a Speed Dial location, allows you to send the same fax message to many fax numbers by pressing (FAX), (Address Book), Search, OK, #, the two-digit location number and Mono Start. e 5 (Address Book), 05, (Address Book), 09. The LCD shows: 5 G01:#05#09 f Press OK when you have finished adding numbers.
Chapter 5 e Add or delete the Speed Dial numbers in the Group. To add Speed Dial numbers, press d or c to position the cursor under a blank space. Press (Address Book) and enter the Speed Dial number you want to add to the Group using the dial pad. To delete Speed Dial numbers, press d or c to position the cursor under the Speed Dial number you want to delete, and then press Clear. f Press OK when you have finished adding or deleting Speed Dial numbers.
6 Printing reports Fax reports (MFC models only) b 6 You can use the Menu keys to set up the Transmission Verification Report and the Journal Period. 6 Press a or b to choose an interval. Press OK. (If you choose 7 days, the LCD will ask you to choose the first day for the 7-day countdown.) If you choose Every 50 Faxes, go to step d. 6, 12, 24 hours, 2 or 7 days Transmission Verification Report The machine will print the report at the chosen time and then erase all jobs from its memory.
Chapter 6 Reports The following reports are available: XMIT Verify (MFC models only) Prints a Transmission Verification Report for your last transmission. 6 How to print a report (MFC-J200) a b Fax Journal (MFC models only) Prints a list of information about the last incoming and outgoing faxes. (TX: Transmit.) (RX: Receive.) User Settings c d Prints a WLAN connection report. 20 Do one of the following: Press Mono Start. Press Stop/Exit. (DCP-J100 and DCP-J105) a b Press Menu.
7 Making copies Copy options 7 You can change the copy settings temporarily for the next copy. 7 c d Enter the number of copies you want. Press Copy Options and a or b to choose Quality. Press OK. The machine returns to its default settings after being idle for 1 minute. e Press Copy Options and then press a or b to choose the copy settings you want. Press OK. Press a or b to choose Normal or Best. Press OK. f If you do not want to change additional settings, press Mono Start or Colour Start.
Chapter 7 Enlarging or reducing copies 7 You can choose an enlargement or reduction ratio. If you choose Fit to Page, your machine will adjust to the size you set in Paper Size. (MFC-J200) a b c d e c d Press Enlarge/Reduce. Press a or b to choose the enlargement or reduction ratio you want. Press OK. NOTE If you chose Custom(25-400%), press a or b repeatedly to enter an enlargement or reduction ratio from 25% to 400%. 7 Load your document. Press 198% 10x15cmiA4 (COPY).
Making copies Making N in 1 copies or a poster (Page Layout) f 7 The N in 1 copy feature can help you save paper by letting you copy two or four pages onto one printed page. You can also produce a poster. When you use the poster feature, your machine divides your document into sections, then enlarges the sections so you can assemble them into a poster. If you want to print a poster, use the scanner glass. 1 a b g (MFC-J200) After the machine has scanned the page, press 1 to scan the next page.
Chapter 7 Place the document face down in the direction shown below: 2in1(P) 2in1(L) 4in1(P) 2 in 1 ID copy (Page Layout) You can copy both sides of your identification card onto one page, keeping the original card size. Make sure the paper size is set to A4 or Letter. NOTE You can copy an identification card to the extent permitted under applicable laws. (See Product Safety Guide: Unlawful use of copying equipment.
Making copies f Press Mono Start or Colour Start. The machine starts scanning one side of the identification card. g (MFC-J200) After the machine has scanned one side, press 1. Turn over the identification card and press OK to scan the other side. (DCP-J100 and DCP-J105) After the machine has scanned one side, press a. Turn over the identification card and press OK to scan the other side. f 1 • Sort, Enlarge/Reduce - MFC-J200 (Enlarge/Reduce - DCP-J100 and DCP-J105) and Remove Bkg.
Chapter 7 Adjusting Density 7 You can adjust the copy density to make copies darker or lighter. a b c d e f Remove Background Colour Removes the background colour of the document when copying. This can save ink and help you read the document clearly. Load your document. (MFC models only) As you select a higher setting, the white background will become more apparent. Press NOTE (COPY). This function is for use only when making colour copies.
A Routine maintenance Cleaning and checking the machine Cleaning the outside of the machine Clean the LCD screen as follows: IMPORTANT DO NOT use any type of liquid cleaners (including ethanol). a Press and hold down to turn the Clean the outside of the machine as follows: A A IMPORTANT • Use neutral detergents. Cleaning with volatile liquids, such as thinner or benzine, will damage the outside surface of the machine. • DO NOT use cleaning materials that contain ammonia.
d e WARNING Be sure to unplug the machine from the electrical socket before cleaning the printer platen to avoid an electrical shock. 28 Clean the machine’s printer platen (1) and the area around it, wiping off any scattered ink with a dry, soft lint-free cloth. 1 Close the output paper tray cover and put the paper tray firmly back in the machine. Cleaning the machine’s printer platen a b Wipe the inside and outside of the paper tray with a dry, soft lint-free cloth to remove dust.
Routine maintenance Cleaning the paper feed rollers Put the paper tray firmly back in the machine. d Re-connect the power cord. A If the paper feed rollers are stained with ink, it may cause paper feed problems. a c Unplug the machine from the electrical socket. Pull the paper tray (1) completely out of the machine. NOTE Do not use the machine again until the rollers are completely dry. Using the machine before the rollers are dry may cause paper feed problems.
Cleaning the paper pick-up rollers a Unplug the machine from the electrical socket. b Pull the paper tray completely out of the machine. d A Clean the Paper Pick-up Rollers (1) with a soft lint-free cloth slightly moistened with water. Slowly turn the rollers so that the whole surface is cleaned. After cleaning, wipe the rollers with a dry, soft lint-free cloth to remove all moisture.
Routine maintenance Checking the ink volume A You can check the amount of ink that is left in the cartridge. (MFC-J200) a b c d A Press Menu, 1, 3. The LCD shows the ink volume. c A When you transport the machine, use the packing materials that came with your machine. Follow the instructions below to correctly package your machine. Damage caused to your machine during transit may not be covered by your warranty. Press a or b to choose the colour you want to check.
d Lift the scanner cover (1) to release the lock. Gently push the scanner cover support down (2) and close the scanner cover (3) using both hands. g Install the orange protective part, and then close the ink cartridge cover. 1 3 2 CAUTION Be careful not to pinch your fingers when you close the scanner cover. e f IMPORTANT • Make sure the plastic tab on the left side of the orange protective part (1) locks securely into place (2). Open the ink cartridge cover. Remove all four ink cartridges.
Routine maintenance h Wrap the machine in the bag. i Pack the machine and the printed materials in the original carton with the original packing material as shown in the illustration. Do not pack the used ink cartridges in the carton. j Close the carton and tape it shut.
B Glossary B This is a comprehensive list of features and terms that appear in Brother manuals. Availability of these features depends on the model you purchased. Address Book Your list of Speed Dial and Group names and numbers that you have stored for easy dialling. ADF (automatic document feeder) The document can be placed in the ADF and scanned one page at a time automatically. Auto Reduction Reduces the size of incoming faxes.
Glossary Extension telephone A telephone using the same line as your fax but plugged into a separate wall socket. External telephone A TAD (telephone answering device) or telephone that is connected to your machine. F/T Ring Time The length of time that the Brother machine rings (when the Receive Mode setting is Fax/Tel) to notify you to pick up a voice call that it answered. Fax Detect Enables your machine to respond to CNG tones if you interrupt a fax call by answering it.
Photo resolution (Mono only) A resolution setting that uses varying shades of grey for the best representation of photographs. Settings Tables At-a-glance instructions that show all the settings and options that are available for setting up your machine. Pulse A form of rotary dialling on a telephone line. Speed Dial You can set up names and numbers for easy dialling. Real Time Transmission When the memory is full, you can send faxes in real time. Standard resolution 203 98 dpi (monochrome).
C Index Numerics D 2 in 1 ID Copy ..........................................24 Dialling access codes and credit card numbers ............................................... 16 Groups (Broadcasting) ........................... 9 Dual Access .............................................. 9 A Access codes, storing and dialling ...........16 Address Book Broadcasting (Group dial) .......................9 Cancelling a Broadcast ......................10 changing Groups ...............................
L R LCD (Liquid Crystal Display) Contrast ..................................................3 Language ................................................3 Reducing copies ................................................... 22 incoming faxes ..................................... 15 Remote Setup See Software and Network User’s Guide. Reports .................................................... 19 Address Book ....................................... 20 Fax Journal ...........................................
Visit us on the World Wide Web http://www.brother.com/ These machines are approved for use in the country of purchase only. Local Brother companies or their dealers will only support machines purchased in their own countries. www.brotherearth.