Reference Guide Brief explanations for routine operations DCP-J572DW MFC-J491DW MFC-J497DW Brother recommends keeping this guide next to your Brother machine for quick reference. Online User's Guide For more advanced instructions, information, and product specifications, see the Online User's Guide at support.brother.
User's Guides and Where to Find Them Which Guide? What's in It? Where Is It? Product Safety Guide Read this guide first. Please read the Safety Instructions before you set up your machine. See this guide for trademarks and legal limitations. Printed / In the box Quick Setup Guide Follow the instructions for setting up your machine, and installing the Full Driver & Software Package for the operating system and connection type you are using.
Questions or Problems? Take a Look at our FAQs, Solutions, and Videos Online. Go to your model's FAQs & Troubleshooting page on the Brother Solutions Center at support.brother.com. • Provides several ways to search • Displays related questions for more information • Receives regular updates based on customer feedback Important Note • This documentation is for both MFC and DCP models. Where it says 'MFC' in this User's Guide, read 'MFC-xxxx' as 'DCP-xxxx'. DCP models are not equipped with a fax function.
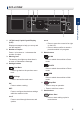
1 General Information Control Panel Overview MFC-J491DW/MFC-J497DW 2 3 4 5 6 1 1 8 General Information 7 1. 1.8"(44.9 mm) Liquid Crystal Display (LCD) Displays messages to help you set up and use the machine. 2. Mode buttons 3. Settings buttons Clear/Back Press to go back to the previous menu level. Settings FAX Press to switch the machine to Fax mode. SCAN Press to switch the machine to Scan mode. COPY Press to access the main menu. OK Press to select a setting.
7. Start buttons Mono Start Press to configure the wireless settings while the machine is idle. • Press to start sending faxes in monochrome. a or b • Press to start making copies in monochrome. Press to scroll through the menus and options. • Press to start scanning documents (in colour or monochrome depending on the scan setting). d or c • Press to move the cursor left or right on the LCD. Colour Start • Press to either confirm or cancel a procedure which is in progress.
DCP-J572DW 1 2 3 5 4 6 8 1 General Information 7 1. 1.8"(44.9 mm) Liquid Crystal Display (LCD) d or c • Press to move the cursor left or right on the LCD. Displays messages to help you set up and use the machine. • Press to either confirm or cancel a procedure which is in progress. 2. Number of Copies Press + to increase or - to decrease the number of copies. 5. Mode buttons SCAN 3. Warning icon Press to switch the machine to Scan mode.
• Press to start scanning documents (in colour or monochrome depending on the scan setting). Colour Start • Press to start making copies in full colour. • Press to start scanning documents (in colour or monochrome depending on the scan setting). 8. Power On/Off Press to turn the machine on. Press and hold down to turn the machine off. The LCD displays [Shutting Down] and stays on for a few seconds before turning itself off.
LCD Overview 3. Displays the approximate available ink volume. MFC-J491DW/MFC-J497DW This screen shows the machine’s status when the machine is idle. When displayed, this indicates that your machine is ready for the next command. [Ink] When an ink cartridge is near the end of its life or having a problem, an error icon is displayed on the ink colour. 1 4. Date and Time Home Screen General Information Displays the date and time set on the machine. 1 2 5.
You can configure wireless settings by pressing WiFi on the control panel.
2 Paper Handling Load Paper 1 Load the paper in the paper tray as follows. Fan the stack of paper well. A5/A6 Printing surface: Face down Adjust the paper guides. Photo 2L Index card Envelopes Photo Printing surface: Face down Adjust the paper guides. Photo Paper Tray (DCP-J572DW) How to Load Paper Photo Slide the whole output paper tray cover.
Manual Feed Slot 1 (DCP-J572DW) How to Load Paper A4/Letter Printing surface: Face up Executive A5/A6 Adjust the manual feed slot paper guides. Photo Photo L/2L Index card Envelopes 1 You can load only one sheet of paper into the manual feed slot at a time. For more detailed information, see the Online User's Guide: Load Paper. 2 Unfold the paper support flap. Change the paper size setting in the machine's menu, if needed.
3 Print Print from Your Computer Before attempting any printing operation, confirm the following: • Make sure you have installed the Brother software and drivers. Various Printing To use the various printing features, click the printing properties or preferences button to change the printer setting. Print on Both Sides of the Paper Automatically 3 • Make sure the USB cable is connected correctly, or that you are connected to the network using your wireless access point/router.
4 Copy Copy a Document 1 Make sure you have loaded the correct size paper in the paper tray. 2 Load your document. 3 (MFC-J491DW/MFC-J497DW) Press Other Copy Options You can use various copy features by changing copy settings. Enlarge or Reduce Copied Images (COPY). The LCD displays: Press Start 01 Quality Normal Paper Type Plain Paper 2-sided Copy 4 Enter the number of copies in one of the following ways: • Press - or + on the control panel. • Enter the number of copies using the dial pad.
5 Scan Before Scanning computer where you want to send data, and then press OK. Before attempting to scan, confirm the following: If the LCD prompts you to enter a PIN, use the control panel to enter the fourdigit PIN for the computer, and then press OK. • Make sure you have installed the Brother software and drivers. • Make sure the USB cable is connected correctly, or that you are connected to the network using your wireless access point/ router.
6 PhotoCapture Center Print Photos Directly from Media Preview and Print Photos from Media Related Models: DCP-J572DW Preview your photos on the LCD before you print them. 1 Open the media slot cover. 7 Repeat the last two steps until you have selected all the photos you want to print. Press Clear/Back to go back to the previous level. 8 Press OK. 9 To change the print settings, press a or b to select the setting you want to change, and then press OK.
7 Fax Before Faxing • VoIP (Voice over IP) is a type of phone system that uses an Internet connection, rather than a traditional phone line. Telephone Line Interference/ VoIP Related Models: MFC-J491DW/MFC-J497DW If you are having problems sending or receiving a fax due to possible interference on the telephone line or if you are using a VoIP system, we recommend changing the modem speed to minimise errors in fax operations. 1 Press Settings.
c. Select the number you want, and then press OK. • If you are using the scanner glass and pressed Mono Start, the machine starts scanning the first page. d. Press c to select [Apply]. • Caller ID (Select a number from the Caller ID history.) Go to the next step. • If you are using the scanner glass and pressed Colour Start, the LCD asks if you want to send a colour fax. Press a or b to select the following: a. Select [Call History]. Press OK. Press c to confirm.
Choose the Correct Receive Mode Related Models: MFC-J491DW/MFC-J497DW You must choose a Receive Mode depending on the external devices and telephone services you have on your line. By default, your machine automatically will receive any faxes that are sent to it. The diagram below will help you select the correct mode.
A Routine Maintenance Check the Print Quality If faded or streaked colours and text appear or if text is missing on your printouts, the print head nozzles may be clogged. Print the Print Quality Check Sheet and look at the nozzle check pattern. 1 Press Settings. 2 Press a or b to select the following: 6 The LCD asks you to check the print quality of each colour. Press d or c to select the pattern (1–4) that most closely matches the printing result, and then press OK. 7 Do one of the following: a.
When a print head nozzle is clogged, the printed sample looks like this. 4 Press c again. The machine starts printing the Alignment Check Sheet. (A) After the print head nozzle is cleaned, the horizontal lines are gone. 5 For pattern (A), press d or c to select the number of the test print that has the fewest visible vertical stripes (1-9), and then press OK. In the example above, row number 6 is the best choice. Repeat this step for the rest of the patterns.
B Troubleshooting Use this section to resolve problems you may encounter when using your Brother machine. Identify the Problem Even if there seems to be a problem with your machine, you can correct most problems yourself. First, check the following: • The machine's power cord is connected correctly and the machine's power is on. • All of the machine's orange protective parts have been removed. • The ink cartridges are installed correctly. • The Scanner Cover and the Jam Clear Cover are fully closed.
Error and Maintenance Messages The most common error and maintenance messages are shown in the table. For more detailed information, see the Online User's Guide. You can correct most errors and perform routine maintenance yourself. If you need more tips, go to your model's FAQs & Troubleshooting page on the Brother Solutions Center at support.brother.com. Error Message Action Absorber NearFull The ink absorber box must be replaced soon. Contact Brother customer service or your local Brother dealer.
Error Message Action Cannot Detect Ink Replace the cartridge with a Brother Original ink cartridge. If the error message remains, contact Brother customer service or your local Brother dealer. Data Remaining Press Stop/Exit. The machine will cancel the job and clear it from the memory. Try to print again. Disconnected Try to send or receive again. If calls are stopped repeatedly and you are using a VoIP (Voice over IP) system, try changing the Compatibility to Basic (for VoIP).
Error Message Action Jam C Rear Remove the jammed paper. For more detailed information, see the Online User's Guide: Printer Jam or Paper Jam. Make sure the paper guides are set to the correct paper size. Clean the paper pick-up rollers. For more detailed information, see the Online User's Guide: Clean the Paper Pick-up Rollers. Low Temperature After warming the room, allow the machine to warm up to room temperature. Try again when the machine has warmed up. Media is Full.
Error Message Action Out of Fax Memory Print the faxes stored in the memory. For more detailed information, see the Online User's Guide: Print a Fax Stored in the Machine's Memory. Out of Memory If a fax-sending or copy operation is in progress: • Press Stop/Exit and wait until the other operations that are in progress finish, and then try again. • Press c to select Partial Print to copy the pages scanned so far. • Print the faxes stored in the memory.
Error Message Action Unable to Clean XX A foreign object, such as a paper clip or a piece of ripped paper, is in the machine. Unable to Init. XX Open the scanner cover and remove any foreign objects and paper scraps from inside the machine. Unable to Print XX If the error message continues: • (MFC-J491DW/MFC-J497DW) Transfer your faxes to another fax machine or your computer before disconnecting the machine so you will not lose any important messages.
C Appendix Enter Text on Your Brother Machine • The characters that are available may differ depending on your country. DCP-J572DW You may need to enter text into the machine, for example, when you set the time and date. ABCA . • Press a, b, d or c to select the number, letter or special character you want to select, and press OK. Repeat for each character until the number or name is complete and then press a, b, d or c to select and then press OK.
Press the appropriate dial pad button the number of times shown in this reference table to access the character you want.
MFC-J497DW 1 Approx. 1.3 W All network ports activated and connected How to enable/disable Wireless LAN • To turn on or off the wireless network connection, press Settings, and then press a or b to select the following: 1. Select [Network]. Press OK. 2. Select [WLAN Enable]. Press OK. 3. Select [On] or [Off]. Press OK. Supply Specifications Ink The machine uses individual Black, Yellow, Cyan and Magenta ink cartridges that are separate from the print head assembly.
If using Windows®, double-click the Brother Creative Center icon on your desktop to access our FREE website designed as a resource to help you easily create and print customised materials for business and home use with photos, text and creativity. Mac users can access Brother CreativeCenter at this web address: www.brother.
Visit us on the World Wide Web www.brother.