
User Manual

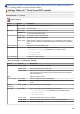

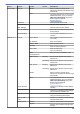
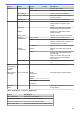
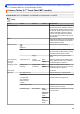

Table Of Contents
- Online User's Guide HL-L2390DW/DCP-L2550DW/HL-L2395DW/MFC-L2690DW/MFC-L2690DWXL/MFC-L2710DW/MFC-L2717DW/MFC-L2730DW/MFC-L2750DW/MFC-L2750DWXL/MFC-L2759DW
- Table of Contents
- Before You Use Your Brother Machine
- Introduction to Your Brother Machine
- Paper Handling
- Scan
- Scan Using the Scan Button on Your Machine
- Scan Photos and Graphics
- Save Scanned Data to a Folder as a PDF File
- Scan to an Editable Text File (OCR)
- Save Scanned Data as an Email Attachment
- Send Scanned Data to an Email Recipient
- Scan to FTP
- Scan to Network (Windows)
- Web Services for Scanning on Your Network (Windows 7, Windows 8 and Windows 10)
- Change Scan Button Settings from ControlCenter4 (Windows)
- Change Scan Button Settings from Brother iPrint&Scan (Mac)
- Configure Certificate for Signed PDF
- Disable Scanning from Your Computer
- Scan from Your Computer (Windows)
- Scan Using ControlCenter4 Home Mode (Windows)
- Scan Using ControlCenter4 Home Mode (Windows)
- Select Document Type Using ControlCenter4 Home Mode (Windows)
- Change Scan Size Using ControlCenter4 Home Mode (Windows)
- Crop a Scanned Image Using ControlCenter4 Home Mode (Windows)
- Print Scanned Data Using ControlCenter4 Home Mode (Windows)
- Scan to an Application Using ControlCenter4 Home Mode (Windows)
- Save Scanned Data to a Folder as a PDF File Using ControlCenter4 Home Mode (Windows)
- Scan Both Sides of a Document Automatically Using ControlCenter4 Home Mode (Windows)
- Scan Settings for ControlCenter4 Home Mode (Windows)
- Scan Using ControlCenter4 Home Mode (Windows)
- Scan Using ControlCenter4 Advanced Mode (Windows)
- Scan Photos and Graphics Using ControlCenter4 Advanced Mode (Windows)
- Save Scanned Data to a Folder as a PDF File Using ControlCenter4 Advanced Mode (Windows)
- Scan Both Sides of a Document Automatically Using ControlCenter4 Advanced Mode (Windows)
- Scan Both Sides of an ID Card Using ControlCenter4 Advanced Mode (Windows)
- Scan to Email Attachment Using ControlCenter4 Advanced Mode (Windows)
- Scan to an Editable Text File (OCR) Using ControlCenter4 Advanced Mode (Windows)
- Scan Settings for ControlCenter4 Advanced Mode (Windows)
- Scan Using Nuance™ PaperPort™ 14SE or Other Windows Applications
- Scan Using Windows Fax and Scan
- Scan Using ControlCenter4 Home Mode (Windows)
- Scan from Your Computer (Mac)
- Configure Scan Settings Using Web Based Management
- Scan Using the Scan Button on Your Machine
- Copy
- Fax
- Send a Fax
- Send a Fax
- Send a 2-sided Fax from the ADF
- Send a Fax Manually
- Send a Fax at the End of a Conversation
- Send the Same Fax to More than One Recipient (Broadcasting)
- Send a Fax in Real Time
- Send a Fax at a Specified Time (Delayed Fax)
- Add a Cover Page to Your Fax
- Cancel a Fax in Progress
- Check and Cancel a Pending Fax
- Fax Options
- Receive a Fax
- Receive Mode Settings
- Receive Modes Overview
- Choose the Correct Receive Mode
- Set the Number of Rings Before the Machine Answers (Ring Delay)
- Set the F/T Ring Time (Pseudo/Double-ring)
- Set Easy Receive
- Shrink Page Size of an Oversized Incoming Fax
- Set the 2-sided Printing for Received Faxes
- Set the Fax Receive Stamp
- Receive a Fax at the End of a Telephone Conversation
- Register a Number in the Blocked List
- Memory Receive Options
- Remote Fax Retrieval
- Receive Mode Settings
- Voice Operations and Fax Numbers
- Telephone Services and External Devices
- Fax Reports
- PC-FAX
- PC-FAX for Windows
- PC-FAX Overview (Windows)
- Configure PC-FAX (Windows)
- Configure your PC-Fax Address Book (Windows)
- Add a Member to your PC-FAX Address Book (Windows)
- Create a Group in your PC-FAX Address Book (Windows)
- Edit Member or Group Information in your PC-FAX Address Book (Windows)
- Delete a Member or Group in your PC-FAX Address Book (Windows)
- Export your PC-FAX Address Book (Windows)
- Import Information to your PC-FAX Address Book (Windows)
- Send a Fax Using PC-FAX (Windows)
- Receive Faxes on Your Computer (Windows)
- PC-FAX Overview (Windows)
- PC-FAX for Mac
- PC-FAX for Windows
- Send a Fax
- Network
- Supported Basic Network Features
- Network Management Software and Utilities
- Additional Methods of Configuring Your Brother Machine for a Wireless Network
- Before Configuring Your Brother Machine for a Wireless Network
- Configure Your Machine for a Wireless Network
- Configure Your Machine for a Wireless Network Using the One Push Method of Wi-Fi Protected Setup™ (WPS)
- Configure Your Machine for a Wireless Network Using the PIN Method of Wi-Fi Protected Setup™ (WPS)
- Configure Your Machine for a Wireless Network Using the Machine's Control Panel Setup Wizard
- Configure Your Machine for a Wireless Network When the SSID Is Not Broadcast
- Use Wi-Fi Direct®
- Print or Scan from Your Mobile Device Using Wi-Fi Direct
- Configure Your Wi-Fi Direct Network
- Wi-Fi Direct Network Configuration Overview
- Configure Your Wi-Fi Direct Network Using the One-Push Method
- Configure Your Wi-Fi Direct Network Using the One-Push Method of Wi-Fi Protected Setup™ (WPS)
- Configure Your Wi-Fi Direct Network Using the PIN Method
- Configure Your Wi-Fi Direct Network Using the PIN Method of Wi-Fi Protected Setup™ (WPS)
- Configure Your Wi-Fi Direct Network Manually
- Advanced Network Features
- Print the Network Configuration Report
- Configure Your Mail Server Settings Using Web Based Management
- Fax Using the Internet (I-Fax)
- Use the Send Fax to Server Feature
- Print the WLAN Report
- Synchronize Time with the SNTP Server Using Web Based Management
- Technical Information for Advanced Users
- Security
- Lock the Machine Settings
- Network Security Features
- Before Using Network Security Features
- Secure Function Lock 3.0
- Manage Your Network Machine Securely Using SSL/TLS
- Introduction to SSL/TLS
- Certificates and Web Based Management
- Supported Security Certificate Features
- Create and Install a Certificate
- Manage Multiple Certificates
- Manage Your Network Machine Securely Using Web Based Management
- Manage Your Network Machine Securely Using BRAdmin Professional (Windows)
- Print Documents Securely Using SSL/TLS
- Send or Receive an Email Securely
- Mobile/Web Connect
- Brother Web Connect
- AirPrint
- Mobile Printing for Windows
- Mopria® Print Service
- Brother iPrint&Scan for Mobile Devices
- Brother Mobile Connect
- Near-Field Communication (NFC)
- ControlCenter
- Brother iPrint&Scan for Windows and Mac
- Troubleshooting
- Error and Maintenance Messages
- Error Messages When Using the Brother Web Connect Feature
- Document Jams
- Paper Jams
- Printing Problems
- Improve the Print Quality
- Telephone and Fax Problems
- Network Problems
- Error Messages for Network Problems
- Where Can I Find My Brother Machine's Network Settings?
- I Cannot Complete the Wireless Network Setup Configuration
- Use the Network Connection Repair Tool (Windows)
- My Brother Machine Cannot Print, Scan, or PC-FAX Receive over the Network
- I Want to Check that My Network Devices are Working Correctly
- AirPrint Problems
- Other Problems
- Transfer Your Faxes or Fax Journal Report
- Machine Information
- Routine Maintenance
- Machine Settings
- Change Machine Settings from the Control Panel
- In the Event of Power Failure (Memory Storage)
- General Settings
- Change the Default Mode
- Set the Mode Timer
- Adjust the Machine's Volume
- Change for Daylight Saving Time Automatically
- Set Sleep Mode Countdown
- About Deep Sleep Mode
- Set Auto Power Off Mode
- Set the Date and Time
- Set the Time Zone
- Adjust the LCD Backlight Brightness
- Change How Long the LCD Backlight Stays On
- Set Your Station ID
- Set Tone or Pulse Dialing Mode (For Canada)
- Reduce Toner Consumption
- Set the Continue Mode
- Learn About Receiving Faxes in Continue Mode
- Add a Prefix to Every Fax Number
- Prevent Dialing a Wrong Number (Dial Restriction)
- Reduce Printing Noise
- Change the Language on the LCD
- Save Your Favorite Settings as a Shortcut
- Print Reports
- Settings and Features Tables
- Change Machine Settings from Your Computer
- Change Machine Settings from the Control Panel
- Appendix

Level 1 Level 2 Level 3 Level 4 Descriptions
E-mail/IFAX
(Available only for
certain models)
Setup Mail RX
server deletes error emails
automatically after you read them.
Notification
- Receive notification messages.
Setup Mail TX Sender Subject
- View the subject.
Size Limit Size Limit
Limit the size of email documents.
Maximum
Size(MB)
Notification
- Send notification messages.
Setup Relay Relay Broadcast
- Relay a document to another fax
machine.
Relay Domain
Relay XX Register the Domain name.
Relay Report
- Print the relay Broadcast Report.
Manual Receive
- - Manually check the POP3 or IMAP4
server for new messages.
Web Connect
Settings
Proxy Settings Proxy
Connection
- Change the Web connection
settings.
Address
-
Port
-
User Name
-
Password
-
Fax to Server
(Available only for
certain models)
Fax to Server
- - Select the network connection type.
Prefix
- -
Suffix
- -
Network Reset
- - - Restore all network settings back to
the factory settings.
[All Settings] > [Print Reports]
Level 1
Level 2 Descriptions
Transmission View on LCD
Display a Transmission Verification Report of your last
transmission.
Print
Report
Print a Transmission Verification Report of your last
transmission.
Address Book
- Print a list of names and numbers stored in the Address Book.
Fax Journal
- Print a list of information about your last 200 incoming and
outgoing faxes.
(TX means Transmit. RX means Receive.)
User Settings
- Print a list of your settings.
Printer Settings
- Print a list of your Printer settings.
Network Configuration
- Print a list of your Network settings.
Print File List
- Print a list of data saved in the machine's memory.
Drum Dot Print
- Print the Drum Dot Check Sheet.
WLAN Report
(For models with wireless network
functionality)
- Print the wireless LAN connection results.
Caller ID History
(Available only for some countries.)
- Print a list of the Caller ID History.
615