Setting Up the DCP Step 1 Windows® Setting Up the DCP Setup is Complete! For the latest driver and to find the best solution for your problem or question, access the Brother Solutions Center directly from the driver or go to http://solutions.brother.com or http://www.brother-uk.com Keep this “Quick Setup Guide”, User’s Guide and supplied CD-ROM in a convenient place for quick and easy reference at all times. Mac® OS 8.6-9.
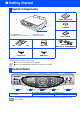
■ Getting Started Carton Components 4 Quick Setup Guide 1 2 CD-ROM 3 1. Control Panel 2. Scanner Cover Release Lever 3. Scanner Cover 4. Document Cover Output Paper Support Paper Tray Power Cord USB Cable User’s Guide Ink Cartridges (Black, Cyan, Yellow, Magenta) Carton components may differ from one country to another. Save all packing materials and the carton. ■ You must use the appropriate USB cable. ■ Use only a USB interface cable that is no longer than 2 meters. Control Panel 1 1.
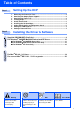
Table of Contents Setting Up the DCP Step 1 1. 2. 3. 4. 5. 6. 7. 8. 9. Step 2 Removing the Protective Parts ......................................................................... 2 Attaching the Output Paper Support................................................................ 2 Attaching the Paper Tray................................................................................... 2 Loading Paper ....................................................................................................
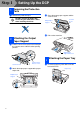
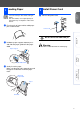
Step 1 1 1 Setting Up the DCP Removing the Protective Parts 3 Remove the protective tape. Do NOT connect the USB cable. Connecting the USB cable is done when installing the driver. Output Paper Support 4 2 1 Close the output paper support and the scanner cover. Scanner Cover Pull out the extension. Attaching the Output Paper Support Pull the scanner cover release lever to open the scanner cover and lift it to the opening position.
Loading Paper 5 You can load up to 100 sheets of 80 g/m2 paper. For more details, see “Paper capacity of the Paper Tray” in Chapter 2 of the User’s Guide. 1 1 Install Power Cord Connect the power cord. Setting Up the DCP 4 Fan the stack of paper well to avoid paper jams and misfeeds. Power Cord 2 Unfold the paper support and then press and slide the paper guide to fit the paper width. Windows® Do not connect the USB cable yet. Warning ■ The DCP must be fitted with an earthed plug. Mac® OS 8.
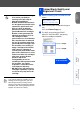
Step 1 6 1 Setting Up the DCP Installing the Ink Cartridges Make sure that the power is turned on. The LCD shows: 5 CHECK CARTRIDGE Open cover, then... 2 Insert the ink cartridges into the slot for each colour until it clicks. Do not peel a film off the cartridge. Pull the scanner cover release lever to open the scanner cover and lift it to the opening position. Scanner Cover Release Lever Ink Cartridge 6 Scanner Cover 3 Lift the output paper support and ink cartridge cover.
1 After the cleaning cycle is finished, the LCD shows; 2 Make sure the paper is loaded in the paper tray. Press the Colour Copy key. 3 The DCP starts printing the PRINT QUALITY CHECK SHEET (only during initial ink cartridge installation). Windows® SET PAPER AND PRESS COLOUR CPY Check in Step A Mac® OS 8.6-9.2 Check in Step B To be continued Mac® OS X 10.1/10.2.1 or greater • DO NOT shake the ink cartridges. If ink stains your body or clothing, wash with soap or detergent immediately.
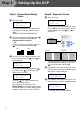
Step 1 Setting Up the DCP Step A: Colour Block Quality Check 1 Step B: Alignment Check 1 The LCD shows: IS STEP "B" OK? 1.YES 2.NO IS STEP "A" OK? 1.YES 2.NO Check the 600 DPI and 1200 DPI test print to see if No.5 most closely matches the OK sample (No.0). Press the key if No.5 matches it. Check the quality of the four colour blocks formed by the short lines printed on the sheet.
Press Menu/Set, , . GENERAL SETUP 4.LCD CONTRAST 2 3 4 Press ---OR--Press Press the key. Press the key. Enter the last two digits of the year. Press Menu/Set. DATE/TIME YEAR:2003 to increase the contrast. (e.g. Enter 0, 3 for 2003.) to decrease the contrast. Press Menu/Set. Press the Menu/Set key. 5 Press Stop/Exit. Enter two digits for the month. Press Menu/Set. DATE/TIME MONTH:09 (e.g. Enter 0, 9 for September.) 6 SELECT - Enter two digits for the day. Press Menu/Set.
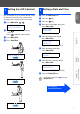
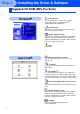
Step 2 Installing the Driver & Software Supplied CD-ROM (MFL-Pro Suite) You can find a variety of information on the CD-ROM. Install Software You can install printer, scanner drivers and the various utility items, including PaperPort®, TextBridge® and PhotoPrinter® 4. Documentation View the User’s Guide and other documentation in PDF format.
Step 2 Installing the Driver & Software Setting Up the DCP Follow the instructions on this page for your operating system. Windows® For Windows® 98/98SE/Me/2000 Professional/XP Users......................................... Go to page 10 Mac® OS X 10.1/10.2.1 or greater Mac® OS 8.6-9.2 For Mac® OS 8.6 to 9.2 Users.............................. Go to page 18 For Mac® OS X 10.1 / 10.2.1 or greater Users ....
Step 2 Installing the Driver & Software For Windows® 98/98SE/Me/2000 Professional/XP Users Make sure that you have completed the instructions from Step 1 “Setting Up the DCP” on pages 2 to 7. If you have previously installed the MFL-Pro Suite, you will first have to uninstall it. From the Start menu, select Programs, Brother, Brother MFL-Pro Suite, Uninstall, and then follow the instructions on the screen. Make sure any media cards are not inserted into the media drive of the DCP.
MFL-Pro Suite includes Printer Driver, Scanner Driver, ScanSoft® PaperPort®, ScanSoft®Text Bridge® and True Type fonts. PaperPort® is a document management application for viewing scanned documents. ScanSoft® TextBridge®, which is integrated into PaperPort®, is an OCR application that converts an image into text and inserts it into your default word processor. 7 8 When the PaperPort® 8.0 SE Setup window is displayed, click Next.
Step 2 Installing the Driver & Software For Windows® 98/98SE/Me/2000 Professional/XP Users B When the Registration screen is displayed, make your selection and follow the on screen instructions. C Click Finish to complete installation. D When the Brother MFL-Pro Suite Installation window appears, click Next. If you have previously installed the MFL-Pro Suite, you will first have to uninstall it.
Step 2 Setting Up the DCP For Windows® 98/98SE/Me Users Only When this screen appears, connect the USB interface to your PC, and then connect it to the DCP. Turn on the DCP by plugging in the power code. I Accept the default Printer name by selecting Yes, and then click Next. J Select Yes (recommended), and then click Finish. A test page will be printed so you can check the print quality. K If the test page is printed correctly, click Yes.
Step 2 Installing the Driver & Software For Windows® 98/98SE/Me/2000 Professional/XP Users M Click Finish to restart your computer. N After the computer restarts, click Yes to have the Control Center loaded each time Windows® is started. The Control Center will appear as an icon in the task tray. If you click No the Scan to key on the DCP will be disabled. Even if you select NO, later you will be able to launch the Brother Control Center to use the Scan to key.
Setting Up the DCP For Windows® 2000 Professional Users Only Make sure that you followed the instructions in 1 to F on pages 10 to 12. When this screen appears, connect the USB interface to your PC, and then connect it to the DCP. Turn on the DCP by plugging in the power code. I The README.WRI file will be displayed. Please read this file for troubleshooting information and then close the file to continue installation. J Click Finish to restart your computer.
Step 2 Installing the Driver & Software For Windows® 98/98SE/Me/2000 Professional/XP Users For Windows® XP Users Only Make sure that you followed the instructions in 1 to F on pages 10 to 12. G When this screen appears, connect the USB interface to your PC, and then connect it to the DCP. Turn on the DCP by plugging in the power code. H The README.WRI file will be displayed. Please read this file for troubleshooting information and then close the file to continue installation.
Insert the supplied CD-ROM into your CD-ROM drive. 2 The CD-ROM main menu will appear. Click Install Software. If this window does not appear, use Windows® Explore to run the setup.exe program from the root directory of the Brother CD-ROM. 3 Click PhotoPrinter® 4 in the Optional Applications menu and follow the on-screen instructions to complete the installation.
Step 2 Installing the Driver & Software For Mac® OS 8.6 - 9.2 Users Make sure that you have completed the instructions from Step 1 “Setting Up the DCP” on pages 2 to 7. 1 Unplug the DCP from the AC outlet and disconnect it from your Macintosh® if you already connected an interface cable. 6 Connect the USB interface cable to your Macintosh®, and then connect it to the DCP. Do not connect the DCP to a USB port on a keyboard or a non powered USB hub. 2 3 Turn on your Macintosh®.
Setting Up the DCP Installing Optional PhotoPrinter® 4 Software 1 Insert the supplied CD-ROM into your CD-ROM drive. 2 Double-click the ArcSoft folder. 3 Double-click the appropriate language folder. 4 Double-click the PhotoPrinter Installer icon and follow the on-screen instructions to complete the installation. The Brother Printer and Scanner drivers have been installed and the installation is now complete. 19 Mac® OS 8.6-9.2 Click the MFL-Pro Color icon you installed.
Step 2 Installing the Driver & Software For users of Mac® OS X 10.1 / 10.2.1 or greater Make sure that you have completed the instructions from Step 1 “Setting Up the DCP” on pages 2 to 7. 1 Unplug the DCP from the AC outlet and disconnect it from your Macintosh® if you already connected an interface cable. 6 Connect the USB interface cable to your Macintosh®, and then connect it to the DCP. Do not connect the DCP to a USB port on a keyboard or a non powered USB hub. 2 3 Turn on your Macintosh®.
B C D Installing Optional PhotoPrinter® 4 Software 1 Insert the supplied CD-ROM into your CD-ROM drive. 2 Double-click the ArcSoft folder. 3 Double-click the appropriate language folder. 4 Double-click the PhotoPrinter Installer icon and follow the on-screen instructions to complete the installation. Click Add Printer.... Select USB. Select DCP-4020C, and then click Add. Mac® OS X 10.1/10.2.1 or greater A Open the Print Center icon.
Trademarks The Brother logo is a registered trademark of Brother Industries, Ltd. Brother is a registered trademark of Brother Industries, Ltd. PhotoCapture Centre is registered trademarks of Brother International Corporation. © Copyright 2003 Brother Industries, Ltd. All rights reserved. Windows and Microsoft are registered trademarks of Microsoft in the U.S. and other countries. Macintosh is a registered trademark of Apple Computer, Inc. PaperPort and TextBridge are registered trademarks of ScanSoft, Inc.
UK