
User manual
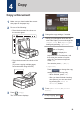
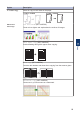
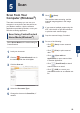


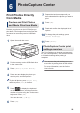
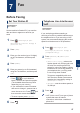
Table Of Contents
- Basic User's Guide DCP-J785DW/MFC-J985DW
- You Can Use the Following Features
- User's Guides and Where to Find Them
- Basic Operations and Where to Find Instructions
- The Online User's Guide Helps You Get the Most Out of Your Machine
- Questions or Problems? Please take a look at our FAQs, solutions, and videos online.
- Definitions of Notes
- For the Latest Driver Updates
- Compilation and Publication Notice
- Important Note
- Table of Contents
- 1 General Information
- 2 Paper Handling
- 3 Print
- 4 Copy
- 5 Scan
- 6 PhotoCapture Center
- 7 Fax
- A Routine Maintenance
- B Troubleshooting
- C Appendix
- D Index

Scan Using the Scan
Button on Your Brother
Machine
Scan Using the Scan Button
on the Machine
Use the Scan button on the machine to
make temporary changes to the scan
settings. To make permanent changes, use
Brother's ControlCenter software.
1
Do one of the following:
• Place the document face down on
the scanner glass.
• Place the document face down in the
ADF.
(If you are scanning multiple pages,
we recommend using the ADF.)
2
Press [Scan] > [to File].
3
If the machine is connected over the
network, press a or b to display the
computer where you want to send data,
and then press the computer name.
If the LCD prompts you to enter a PIN,
use the LCD to enter the four-digit PIN for
the computer, and then press [OK].
4
Do one of the following:
• To change the settings, press
[Options], and then go to the next
step.
• Press [Start] to start scanning
without changing additional settings.
The machine starts scanning. If using
the machine's scanner glass, follow
the LCD instructions to complete the
scanning job.
5
Press the [Scan Settings] option,
and then press [Set at Device].
To use the [Scan Settings] option, a
computer with the ControlCenter software
installed must be connected to the
machine.
6
Select the scan settings you want to
change, and then press [OK].
• [Scan Type]
Select the scan type for your
document.
• [Resolution]
Select the scan resolution for your
document.
• [File Type]
Select the file format for your
document.
• [Scan Size]
Select the scan size for your
document.
• [Remove Background Colour]
Change the amount of background
colour that is removed.
24