
User Guide
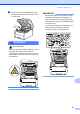
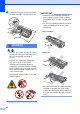


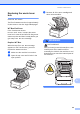

Table Of Contents
- Basic User’s Guide MFC-9130CW/MFC-9330CDW/MFC-9340CDW
- Brother numbers
- Ordering accessories and supplies
- Notice - Disclaimer of Warranties (USA and Canada)
- Compilation and Publication Notice
- User’s Guides and where do I find them?
- Table of Contents
- 1 General information
- Using the documentation
- Accessing Brother Utilities (Windows® 8)
- Accessing the Advanced User’s Guide, Software User’s Guide and Network User’s Guide
- How to access Guides for Advanced Features
- Accessing Brother Support (Windows®)
- Accessing Brother Support (Macintosh)
- Control panel overview
- Shortcut Settings
- 2 Loading paper
- 3 Loading documents
- 4 Sending a fax
- 5 Receiving a fax
- 6 Using PC-FAX
- 7 Telephone services and external devices
- 8 Dialing and storing numbers
- 9 Making copies
- 10 Printing data from a USB Flash memory drive or digital camera supporting mass storage (For MFC-9330CDW and MFC-9340CDW)
- 11 How to print from a computer
- 12 How to scan to a computer
- A Routine maintenance
- B Troubleshooting
- C Settings and features tables
- D Specifications
- Index

94
f Slide each toner cartridge and drum unit
assembly into the machine, making sure
you match the toner cartridge colors to
the same color labels on the machine.
BK = Black, C = Cyan,
M = Magenta, Y= Yellow
g Close the top cover of the machine.
Resetting the belt unit counter A
When you replace a belt unit with a new one,
you will must reset the belt unit counter by
completing the following steps:
a Press to interrupt the error.
b Press .
c Press All Settings.
d Swipe up or down, or press a or b to
display Machine Info..
e Press Machine Info..
f Press Parts Life.
g Touch the dial pad area to light up the
LEDs.
h Press # until the Touchscreen message
changes.
i Press Belt Unit.
j Press Yes.
k Press .
BK
C
M
Y