BR-Receipts User's Guide Version A USENG
Copyright ©2016 Brother Industries, Ltd. All Rights Reserved. PDFlib (C) 1997-2009, PDFlib GmbH and Thomas Merz. JPEGlib (C) 1998 Independent JPEG Group. QuickBooks SDK 13.0 © 2013. The copyright and its proprietary rights reserved by Intuit Inc. Tiff G3 Lib License Copyright (c) 1988-1997 Sam Leffler Copyright (c) 1991-1997 Silicon Graphics, Inc.
OpenCV Copyright OpenCV (Open Source Computer Vision) is a library of programming functions for realtime image processing. OpenCV is released under the liberal BSD license Copyright (c) <2016>, All rights reserved.
Table of Contents 1 General Information 1 Features ......................................................................................................................... 2 System Requirements.................................................................................................... 2 2 Overview 3 3 Getting Started 6 Menu Bar ....................................................................................................................... 6 Command Toolbar .........................
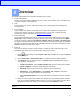
1 General Information BR-Receipts processes receipts by reading the information from scanned images and categorizing it using field recognition. You can edit, view items and track expenses by building and maintaining a database of all the information.
Features Import receipts from files to build and maintain a database of all the information. Export receipt images or data to the cloud from BR-Receipts. Scan receipts to keep detailed records. Apply an existing template or create a new template to batch process receipts when importing or scanning. Read the information and categorize the data by field recognition. Create reports to view and track expenses.
2 Overview The following descriptions and instructions will help you get started: 1. Create a Receipt Box Create a receipt box to build a database of your receipts. You can import, scan, manually create, and paste receipts into the receipt box. 2. Scan Put the receipt in the scanner and begin scanning. The scanning progress bar displays the scanning status. 3.
e. When you select Export to QuickBooks, you must enter Debit Account and Credit Account details to continue. 6. Export to Cloud To export to cloud, do one of the following: Right-click a receipt box or folder and choose Export to Cloud from the context menu. Select a receipt box or folder and click on the toolbar. Choose Export to Cloud from the File menu to open the BOL login dialog box.
. Import a file provided by BR-Receipts into Quicken using the QIF format. a. Specify the QIF file exported from BR-Receipt by selecting Import the .QIF file b. Press Next button to import. c.
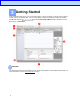
3 Getting Started From the BR-Receipts screen, you can view file folders, a list of all receipts, an image of the selected receipt, and the recognized data. You can control which receipts are displayed in the list by clicking the All drop-down list and selecting Recently Added (receipts updated in the last three days), or Unverified. Menu Bar The Menu bar provides the commands you use to perform program functions within BR-Receipts. For more information, see the Menu Commands section.
Command Toolbar The Command toolbar displays the most commonly used commands. Click an icon to execute the command. Scan Import: Scan receipts to the currently selected folder. NOTE: This feature only applies to folders. File Import: Import receipts to the currently selected folder. NOTE: This feature only applies to folders. Export: Export receipt images to file. Report: Create a data report for the selected receipts.
Folder View Folder view includes a Folder section and a Search section. Click the Folder tab to view the Folder section, where you can create a receipt box, open a file, and create a new folder. Click the Search tab to view the Search section, where you can select a category and fill in the keyword, receipt date, amount, and vendor fields, and then click Start Search to find a specific receipt. Right-click the blank area to view these commands: New Receipt Box... Create a receipt box. Open Receipt Box...
Right-click a folder in the Folder section to view these folder commands: Scan Receipt... Scan receipts to the currently selected folder. Import Receipt Images... Import receipts to the currently selected folder. Manually Create a New Receipt Create a new receipt and save it as a record. Paste Receipt Paste a copied receipt to a folder. Verify All Mark the folders as having been edited and approved. Mark All as Unverified Mark the folders as not having been edited and approved.
List View The List View window displays information about the selected folder. It displays the receipt data in columns as three totals: Total Amount, Reimburse, and Sales Tax. Each receipt will be listed along with the data. To search for a receipt, type a keyword in the search bar , press the Enter key and the best-matched receipts will be listed. Click on a record to select it, or hold down the Shift key while clicking to choose multiple records.
Image View The Image View window displays the selected receipt. You can rotate the image before recognition, if needed. Use the following commands to refine your images and make the OCR process more accurate: Move: Click Crop the image: Click , select a portion of the image, and when the pointer changes to a scissors icon, click it. The image will be cropped.
Edit View To edit the receipt, do one of the following: Click Edit Items from the View menu. Double click a receipt. Click in the bottom of the List View section. The Created Date and Modified Date cannot be edited.
4 Working with BR-Receipts BR- Receipts is designed to help you organize and track your expenses. Once you start scanning and saving your receipts, use these basic functions to keep your database current. Setting Up BR-Receipts Click on the toolbar or click the BR-Receipts menu and select Preferences..., and then enter your BOL account information, user profile and defined field values to personalize your program.
In addition to uploading from your computer, you can add a proxy to upload your receipt images or data. Select Use a proxy server for this connection, and then type the proxy address, user name, password and port to enable the proxy. Click Browse to specify a receipt box path. When you create a receipt box, the receipt box will be placed under the path specified in the Settings.
User Defined Field: Select a receipt box and choose a type of field you want to update. The items under the selected type will be displayed as a list. Click Add to open a dialog box, type the item name, and click OK to add the item to the selected list. Click Edit to change an item name in the selected list. Click Delete to remove an item from the selected list.
You can add an item to a type list and define it as belonging to this type, then similar field content will be categorized to this type when encountered during field categorizing. For example, you can add Credit Card to the Display name of Payment Type list, so that when the keyword Credit Card is recognized during field categorizing, it will be placed under the Display name of Payment Type field. To import a CSV file that contains multiple items, click the File menu and select Import User Defined Field.
Scanning Receipts For the most powerful results when using BR-Receipts, it is important to configure your folders properly. 1. Click the File menu and select Scan Settings.... 2. Choose your preferred scanning style: Select Scan with TWAIN user interface if you want to use the scanner's TWAIN interface for scanning. Select Quick scan (the default setting) to have scanning begin as soon as you click OK.
NOTE: When you select "Carrier Sheet Mode", the software automatically skips scanning the header of the carrier sheet. The width of the header depends on the scanner you are using. If you are scanning a long receipt, fold the receipt to fit to the carrier sheet with title and total amount items shown. Do not skew the paper when folding. NOTE: Carrier sheets may differ depending on your scanner model. Scan Size: The default setting is Auto Detect.
4. Put a receipt into your scanner. If you have several drivers available, click the File menu and select Select Scanner..., and then specify a driver for your scanner from the Select Scanner dialog box. 5. Click the File menu and select Scan Receipt... (or right-click a receipt box in the Folder View section and select Scan Receipt...). 6. The Choose template screen will open. Select a template or create a new template to batch-process your receipts. For more information, see Using Receipt Templates. 7.
The three options above are in the Orientation drop-down list. Automatically crop the receipts: Select to have BR-Receipts crop images automatically during importing. Display the last receipt imported or scanned: Select to display the last receipt imported or scanned. If this option is not selected, the most recently opened receipt will be displayed. Click OK to finish. 3. Click Open, the Choose template screen will open.Select a template or create a new template to batch-process your receipts.
Select Vendor Select a template from the vendor folder in the left pane. apply it to your receipt. Select a template style and click OK to You can also move the orange rectangle or the color window separately to accurately match the correspond units.
New Template Create templates to apply to your receipts. Create a different template for each vendor to help organize your receipts. 1. Click New template. 2. The receipt image will be displayed with a red bar. Click and drag the red bar to separate the top and bottom areas of the receipt. Drag to select an area of the receipt, right-click the selected area, and choose a field type from the pop-up menu to verify this area. 3. Set the expense data attributes this way.
4. When the field verification finished, name the template, add notes to the template, and then click OK to save it. Manual Input Click Manually input later to ignore all the templates. You can manually type your receipt's field information in Edit view. Check Apply to all, and all the receipts will be imported or scanned without applying a template.
Modify Template To edit the template applied to a receipt, select the receipt, click the Receipt menu, and then select Modify template. The Modify template screen appears with a template that has been assigned to the selected receipt. If you have verified an area of this receipt as a field, the field type in the menu list will be unavailable and cannot be applied to another data unit.
Delete Template To delete the template, click the Receipt menu and select Delete template. A dialog box will open. Click Delete to remove the template from your computer. Apply Another Template To give your receipt another template, click the Receipt menu and select Apply another template. A dialog box will open.
Field Categorizing Field categorizing lets you sort receipt information by field. Click in Image View, drag a rectangle to select an area, right-click the selected area and select the field type from Receipt Date, Amount, Sales Tax, Vendor, or Payment Type (or drag the selected area directly to the desired field) to recognize it. A dialog box will ask if you agree with the OCR results, click OK to put the results into the desired field, or click Cancel to discard it.
Editing Receipts In addition to verifying the receipts, you can also make changes and add comments or other information. Click the View menu and select Edit Items, (or double-click a receipt, or click in the bottom of the List View section. In Edit view, if an item is purchased for others, you can select Reimbursable to record the charge that should be reimbursed to you.
2. Type a title for your report in the Title field. Select the Show Subheader check box to display a subheader. 3. The default Reporting Type is Expense. To change to a Spending Report, select Spending. In the Spending by drop-down list, whatever is selected determines how receipt information is summarized.
5 Menu Commands BR-Receipts Menu About BR-Receipts Shows copyright information and software version. Check for Latest Version Check for the latest product. Preferences... , Customizes BR-Receipts features. Services Starts or stops services. Hide BR-Receipts Minimizes BR-Receipts to an icon on the application bar at the bottom of the screen. H Hide Others H Show All Quit BR-Receipts Q Minimizes all open programs to the application bar at the bottom of the screen. Maximizes all open programs.
File Menu New Receipt Box Create a new receipt box whose properties you can determine yourself. New Folder Create an empty folder in the selected receipt box. New Open... O Save As... S Open a receipt box. Save the selected receipt box with a new name. Close Close the selected receipt box. Scan Receipt... Scan receipts to the currently selected folder. Scan Settings... Configure the Scan Settings. Select Scanner...
Edit Menu Cut X Copy C Paste V Cut the selected receipt. (You can choose more than one.) Copy the selected receipt. (You can choose more than one.) Insert any copied or cut information. Receipt Delete Delete either a receipt or a folder. Folder Select All A Select all receipts in the current folder. Unselect All Cancel all the selection in the current folder. Invert Selection Select the unchecked receipts in the current folder. View Menu Edit Items Hide or display Edit View.
Verified Vendor Category Receipt Date Payment Type Sort By Sales Tax Sort the receipts by the selected field. Amount Purpose Created Date Modified Date Reimburse Receipt Menu Manually Create a New Receipt Create a receipt in the current folder. Edit the template applied to this receipt. Modify template NOTE: An error message will appear if the receipt was not applied to any template, or if OCR is being performed on the receipt. Delete template Remove an existing template from the program.
Index Importing Receipts, 15 A Apply Another Template, 27 L List View, 8 B BR-Receipts Menu, 32 C Collecting Receipts, 12 Command Toolbar, 6 Creating Receipts Manually, 16 Creating Reports, 30 M Manual Input, 23 Menu Bar, 5 Menu Commands, 32 Modify Template, 25 N New Template, 20 D Delete Template, 26 O Overview, 3 E Edit Menu, 34 Edit View, 9 Editing Receipts, 30 F Features, 2 Field Categorizing, 28 File Menu, 33 Folder View, 6 G General Information, 1 Getting Started, 5 H Help Menu, 35 I Imag