
User's Guide
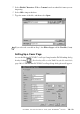
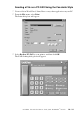
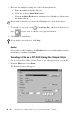
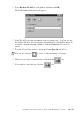
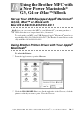
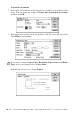
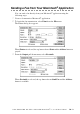

Table Of Contents
- YL4_US.pdf
- Brother Numbers
- Ordering Accessories and Supplies
- Notice – Disclaimer of Warranties (For USA and Canada)
- Compilation and Publication Notice
- BROTHER ONE YEAR LIMITED WARRANTY and EXCHANGE SERVICE (For USA Only)
- BROTHER ONE YEAR LIMITED WARRANTY and EXCHANGE SERVICE (For USA Only)
- BROTHER MULTIFUNCTION CENTER/FACSIMILE MACHINE LIMITED WARRANTY (For Canada Only)
- Quick Reference Guide
- Table of Contents
- 1 Introduction
- 2 Assembly and Connections
- Packing List
- Choosing a Location
- Assembly
- Installing the Drum Unit Assembly (with Toner Cartridge)
- Setting Up the FAX/MFC
- Loading Paper
- Acceptable Paper
- Paper Capacity of Feeder
- Connecting an External Telephone
- Connecting an External Telephone Answering Device (TAD)
- Special Line Considerations
- Multi-Line Connections (PBX)
- Custom Features on a Your Phone Line
- 3 On-Screen Programming
- 4 Initial Setup
- Getting Started
- Setting Paper Size
- Setting Date and Time
- Setting Station ID
- Setting the Ring Volume
- Setting the Beeper Volume
- Setting the Speaker Volume
- Setting the Handset Volume
- Choosing the Handset Volume (For Volume Amplify)
- Setting Volume Amplify
- Memory Storage
- Turning On Automatic Daylight Savings Time
- Toner Save
- Sleep Mode
- Setting Tone/Pulse Dialing Mode (For Canada Only)
- Getting Started
- 5 Setup Receive
- 6 Setup Send
- 7 Auto Dial Numbers and Dialing Options
- 8 Telephone Services
- 9 Remote Fax Options
- 10 Printing Reports
- 11 Making Copies
- 12 Using Brother Machine as a Printer
- 13 Printer Driver Settings (For Windows® Only)
- 14 Using the Windows®-Based Brother MFL-Pro Control Center (For Windows® Only)
- 15 Scanner and Using ScanSoft™ PaperPort® and TextBridge® OCR
- Using ScanSoft™ PaperPort® and TextBridge®
- Viewing Items
- Organizing Your Items in Folders
- Links to Many Other Applications
- Using ScanSoft™ TextBridge® OCR (Converting Image Text to Text You Can Edit)
- Importing Items from Other Applications
- Exporting Items in Other Formats
- Accessing the Scanner
- Scanning a Document into Your PC
- Settings in the Scanner Window
- PreScanning an Image
- Using ScanSoft™ PaperPort® and TextBridge®
- 16 Setting Up and Using PC FAX (For Windows® Only)
- Introduction
- MFC Remote Setup
- PC FAX Sending (For Windows® Only)
- Setting Up Speed Dial
- The Address Book
- Setting Up a Member in the Address Book
- Setting Up a Group for Broadcasting
- Editing Member Information
- Deleting a Member or Group
- Exporting the Address Book
- Importing to the Address Book
- Setting Up a Cover Page
- Sending a File as a PC-FAX Using the Facsimile Style
- Sending a File as a PC-FAX Using the Simple Style
- 17 Using Automatic E-Mail Printing
- 18 Using the Brother MFC with a New Power Macintosh® G3, G4 or iMac™/iBook
- 19 Important Information
- 20 Troubleshooting and Routine Maintenance
- Glossary
- Specifications
- Index
- Remote Retrieval Access Card

18 - 4
USING THE BROTHER MFC WITH A NEW POWER MACINTOSH
®
G3, G4 OR IMAC™ /IBOOK
4
Click Send Fax.
The Send Fax dialog box appears:
The Send Fax dialog box has two list boxes. The left box shows all the
previously Stored Fax Numbers; the right box will show the Destination Fax
Numbers as you select them.
5
To address the fax, type a fax number in the Input Fax Number box.
—OR—
Select a name/number from the Stored Fax Numbers box, and then click
. Your recipient will appear in the Destination Fax Numbers box.
6
If you want to, you can add your new recipients to the Address Book at this time
by clicking New to open the Address Book dialog box. (See
Adding a New
Member
, page 18-5.)
—OR—
You can add a new group by clicking
Group
. (See
Adding a New Group
, page 18-6.)
7
If you are finished addressing your fax, click Send Fax. The Facsimile dialog
box will reappear.
Click OK to return to the Send Fax dialog box.
Note
You can select several stored numbers at once by using the Shift and Ctrl keys.
Note
To select and send only certain pages of the document, click OK to return to
the Print dialog box.
Note
If you click Send Fax without addressing your fax, the following error message
appears: