T-8420B TWIN NEEDLE LOCK STITCHER T-8450B TWIN NEEDLE SPLIT NEEDLE BAR LOCK STITCHER T-8720B TWIN NEEDLE LOCK STITCHER WITH LARGE HOOK T-8750B TWIN NEEDLE SPLIT NEEDLE BAR LOCK STITCHER WITH LARGE HOOK
Thank you very much for buying a BROTHER sewing machine. Before using your new machine, please read the safety instructions below and the explanations given in the instruction manual. With industrial sewing machines, it is normal to carry out work while positioned directly in front of moving parts such as the needle and thread take-up, and consequently there is always a danger of injury that can be caused by these parts.
2. Notes on safety CAUTION Environmental requirements Use the sewing machine in an area which is free from sources of strong electrical noise such as electrical line noise or static electric noise. Sources of strong electrical noise may cause problems with correct operation. Any fluctuations in the power supply voltage should be within ±10% of the rated voltage for the machine. Voltage fluctuations which are greater than this may cause problems with correct operation.
CAUTION Sewing This sewing machine should only be used by operators who have received the necessary training in safe use beforehand. Attach all safety devices before using the sewing machine. If the machine is used without these devices attached, injury may result. The sewing machine should not be used for any applications other than sewing. Do not touch any of the moving parts or press any objects against the machine while sewing, as this may result in personal injury or damage to the machine.
3.Warning labels The following warning labels appear on the sewing machine. Please follow the instructions on the labels at all times when using the machine. If the labels have been removed or are difficult to read, please contact your nearest Brother dealer. 1 2 Be sure to connect the ground. If the ground connection is not secure, you run a high risk of receiving a serious electric shock, and problems with correct operation may also occur.
CONTENTS 1. NAMES OF MAJOR PARTS................ 1 6. SEWING ............................................... 23 2. MACHINE SPECIFICATIONS .............. 2 3. TABLE AND MOTOR........................... 3 6-1. Sewing............................................................23 6-2. Backtacking ....................................................23 6-3. Sewing condensed stitches ............................24 4. INSTALLATION ................................... 4 7. THREAD TENSION .......................
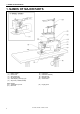
1. NAMES OF MAJOR PARTS 1.
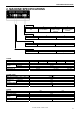
2. MACHINE SPECIFICATIONS 2. MACHINE SPECIFICATIONS F Use For foundation 3 For light-weight and medium- weight materials Lubrication type 0 Minimum lubrication Stitch function 2 Fixed needle bar For heavy-weight materials 3 Semi dry 5 Split needle bar 4 Standard hook Rotary hook 5 7 Large hook T-8420B Max. sewing speed Max.
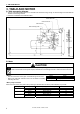
3. TABLE AND MOTOR 3. TABLE AND MOTOR A. Table processing diagram y The top of the table should be 40 mm in thickness and should be strong enough to hold the weight and with-stand the vibration of the sewing machine. y Drill holes as indicated in the illustration below. Cotton stand hole Ground wire hole Head rest hole Motor mounting holes 2958M B. Motor CAUTION All cords should be secured at least 25 mm away from any moving parts.
4. INSTALLATION 4. INSTALLATION CAUTION Machine installation should only be carried out by a qualified technician. Contact your Brother dealer or a qualified electrician for any electrical work that may need to be done. The sewing machine weighs approximately 43 kg. The installation should be carried out by two or more people. Do not connect the power cord until installation is complete. The machine may operate if the treadle is depressed by mistake, which could result in injury.
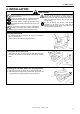
4. INSTALLATION 4-1. Installation 1. Oil pan (1) (2) (3) (4) Head cushions (left) [2 pcs] Head cushions (right) [2 pcs] Oil pan Oiler 2874M 2. Rubber cushions (1) Rubber cushions [2 pcs] (2) Nails [4 pcs] 3. Knee lifter complying bar (3) Knee lifter complying bar 2875M 4. Machine head (1) Hinges [2 pcs] (2) Machine head (3) Head rest NOTE: Tap the head rest (3) securely into the table hole.
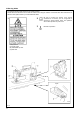
4. INSTALLATION 5. Knee lifter plate (1) Knee lifter plate (2) Bolt * Loosen the bolt (3) and the bolt (4), and move the knee lifter plate (1) to a position where it is easy to use. 2961M 1. Turn the machine pulley so that the feed dog is below the top of the needle plate. 2. Lower the presser foot (5) by using the lifting lever (4). 2962M 2881M 3. Loosen the nut (6). 4.
4. INSTALLATION 6. Ground wire (1) Ground wire (2) Screw Ground symbol Be sure to connect the accessory ground wire (1) to the motor. Align horizontally to the right and then tighten. < Minimum lubrication type> Use a suitable ground wire. Motor 2964M 7. Ground wire Use a suitable ground wire. (1) Ground wire (2) Screw Oil pan Ground symbol Motor 2965M 8.
4. INSTALLATION 2968M 10. Belt cover U (1) Belt cover U (2) Screws [4 pcs] Insert the projecting part underneath the machine pulley. 2969M 11.
4. INSTALLATION 12. Belt cover D lid 2971M (1) Belt cover D lid 2972M Pull belt cover D (2) forward to adjust so that there is no gap between belt cover U (3) and the belt cover D lid (1). 2973M Re-tighten the wood screws.
4. INSTALLATION 13. Alarm display (semi dry type) (1) Alarm display (2) Screws [2 pcs] (Use for tightening rear cover) 2975M (3) Screws [4 pcs: removed] (4) Connector After connecting the connector (4) to connector on the P.C.B. of the alarm display (1), return the alarm display (1) to its original position and then tighten the screws (3). Place the cord securely into the notch. Place the cable tie against the inside of the box. 2976M 14.
4. INSTALLATION 4-2. Lubrication CAUTION Do not connect the power cord until lubrication has been completed, otherwise the machine may operate if the treadle is depressed by mistake, which could result in injury. Be sure to wear protective goggles and gloves when handling the lubricating oil and grease, so that they do not get into your eyes or onto your skin, otherwise inflammation can result.
4. INSTALLATION ■Lubrication Apply 1 - 2 drops of oil to the places indicated by the arrows. * Do not apply oil for semi dry types.
4. INSTALLATION 4-3. Checking the machine pulley rotating direction CAUTION Do not touch any of the moving parts or press any objects against the machine while sewing, as this may result in personal injury or damage to the machine. 1. Insert the power cord plug into the wall outlet, and then turn on the power switch. 2. Depress the treadle slightly and check that the machine pulley starts to turn in the direction of the arrow (1).
5. PREPARATION BEFORE SEWING 5. PREPARATION BEFORE SEWING 5-1. Installing the needle CAUTION Turn off the power switch before installing the needle. The motor will keep turning even after the power is switched off as a result of the motor’s inertia. Wait until the motor stops fully before starting work. The machine may operate if the treadle is depressed by mistake, which could result in injury. 1. Turn the machine pulley to move the needle bar to its highest position. 2. Loosen the screws (1). 3.
5. PREPARATION BEFORE SEWING 5-2. Removing the bobbin CAUTION Turn off the power switch before removing the bobbin. The motor will keep turning even after the power is switched off as a result of the motor’s inertia. Wait until the motor stops fully before starting work. The machine may operate if the treadle is depressed by mistake, which could result in injury. 1. Open the slide plates (1) by moving them to the right and left. 2.
5. PREPARATION BEFORE SEWING 5-3. Winding the lower thread CAUTION Do not touch any of the moving parts or press any objects against the machine while winding the lower thread, as this may result in personal injury or damage to the machine. 1. Turn on the power switch. 2. Place the bobbin (1) onto the bobbin winder shaft (2). 3. Wind the thread several times around the bobbin (1) in the direction indicated by the arrow. * Check that the thread is not loose anywhere along the thread path. 4.
5. PREPARATION BEFORE SEWING 5-4. Installing the bobbin CAUTION Turn off the power switch before installing the bobbin. The motor will keep turning even after the power is switched off as a result of the motor’s inertia. Wait until the motor stops fully before starting work. The machine may operate if the treadle is depressed by mistake, which could result in injury. 2898M 1. Insert the bobbin (1) into the rotary hook (2) so that the winding direction is as shown in the illustration. 2.
5. PREPARATION BEFORE SEWING 1. Insert the bobbin (1) into the bobbin case (2) so that the winding direction is as shown in the illustration. 2. There are three types of cap (2) (, and ). Thread the thread by one of the following methods in accordance with the shape of the bobbin case (2) being used. 1) Pass the thread through slot (3) and under the thread tension spring (4). 2) Pass the thread through the thread hole (8) and pull out about 50 mm.
5. PREPARATION BEFORE SEWING 5-5. Threading the upper thread CAUTION Turn off the power switch before threading the upper thread. The motor will keep turning even after the power is switched off as a result of the motor’s inertia. Wait until the motor stops fully before starting work. The machine may operate if the treadle is depressed by mistake, which could result in injury. ・ Turn the machine pulley and raise the thread take-up (1) before threading the upper thread.
5. PREPARATION BEFORE SEWING 2984M Do not pass the thread through. Center Pass the thread through. If the tension discs are opened as follows, the thread will become easier to thread. ・ Press the tension release plate (2). ・ Operate the lifting lever or the knee lifter to raise the presser foot. The thread can be passed securely in between the tension discs.
5. PREPARATION BEFORE SEWING 5-6. Adjusting the stitch length 1. Unlock the stitch length dial (2) by turning the dial lock lever (1) to the right until a click is heard. 2. Turn the stitch length dial (2) clockwise or counterclockwise so that the desired stitch length is at the uppermost position on the dial. y The larger the number, the longer the stitch length will be. (The numbers on the dial are for use as a guide.
5. PREPARATION BEFORE SEWING 5-8. Corner sewing method (T-8450B, 8750B) NOTE: If using this machine in place of a single-needle machine, remove the needle which is not being used. In such cases, do not use the procedures given below to stop the unused needle bar from moving, otherwise damage to the machine may result. 5-8-1. To stop the needle bars (right and left) y Operate the stop lever after the needle has penetrated the material and has stopped moving.
6. SEWING 6. SEWING CAUTION Attach all safety devices before using the sewing machine. If the machine is used without these devices attached, injury may result. Turn off the power switch at the following times. The motor will keep turning even after the power is switched off as a result of the motor’s inertia. Wait until the motor stops fully before starting work. The machine may operate if the treadle is depressed by mistake, which could result in injury.
6. SEWING 6- 3. Sewing condensed stitches y If you press the reverse lever (1) while sewing is in progress, you can sew stitches (forward direction) with small stitch lengths. y Before carrying out sewing, set the stitch length for condensed stitches as follows. Sewing direction Condensed stitches 2987M 2988M Locked 1. Unlock the stitch length dial (3) by turning the dial lock lever (2) to the right. 2. Turn the stitch length dial (3) to the stitch length to be used for condensed stitches. 3.
7. THREAD TENSION 7. THREAD TENSION 7- 1. Adjusting the thread tension Good even stitches Upper thread Lower thread 0572M Upper thread tension too weak or lower thread tension too strong Increase the upper thread tension. Decrease the lower thread tension. Upper thread tension too strong or lower thread tension too weak Decrease the upper thread tension. Increase the lower thread tension.
7. THREAD TENSION 7- 2. Adjusting the presser foot pressure Correct stitches 0894M 0895M Upper thread Skipped stitches occur Increase the pressure. 0896M 0897M Uneven stitch length Stitches are puckered Decrease the pressure. The presser foot pressure should be as weak as possible, but strong enough so that the material does not slip. (Refer to “Adjusting screw height” in the table below as a guide to adjustment.) Becomes stronger 1. Loosen the adjusting nut (1). 2.
7. THREAD TENSION 7- 3. Adjusting the thread take-up amount 2928M The thread take-up amount is adjusted by how the thread is passed through the thread amount adjuster (1). standard thread amount For non-foundation specifications Do not pass the thread through the thread amount adjuster (1). Loosen the screw (2) and slide the thread amount adjuster (1) to the right-side position. Do not pass the thread through.
8. CLEANING 8. CLEANING CAUTION Turn off the power switch before carrying out cleaning. The motor will keep turning even after the power is switched off as a result of the motor’s inertia. Wait until the motor stops fully before starting work. The machine may operate if the treadle is depressed by mistake, which could result in injury.
8. CLEANING 1. If the oiler (1) has filled with oil, unscrew the oiler (1) and dispose of the oil inside it. 2. Screw the oiler (1) back into the oil pan. 3002M 8- 2. Lubricating via the oil cover (every 6 months) Pour lubricating oil into the oil cover (1) about once every six months. Pour lubricating oil into the oil cover (1) about as often as grease is applied.
8. CLEANING 8- 3. Applying grease - When the GREASE indicator illuminates (Semi dry type) If the GREASE indicator (1) illuminates and the buzzer sounds each time the treadle is depressed, it means that it is time to apply grease to the sewing machine. Apply grease while referring to the following page. 2994M Buzzer 2995M 1. Press the RESET switch (2) for approximately one second.
8. CLEANING NOTE: ・ Use only the grease specified by Brother. ・ Do not use the BZL-300 (SA2355-001) grease in the white tube with this sewing machine. Blue ・ Do not use the BZL-301 (SA2694-001) grease in the blue tube for any models except for those which are indicated with “Use only the grease specified by Brother”. Purchase the grease unit (SA2693-001) to use for applying grease. 2934M 1. Using the tube 2935M 2.
8. CLEANING 2996M Turn the machine pulley until the screw (1) can be seen. Use the tip of a screwdriver or similar to apply 5-10 mm beads of grease to the slide block slider (2). 4 places at top, bottom, left and right of the slide block (3) * Pour oil into the oil cover at the same time. (Refer to p.11.) 2939M Once the grease has been applied, follow the procedure below to reset the cumulative time between grease applications. 1.
9. ADJUSTING THE ROTARY HOOK LUBRICATION AMOUNT 9. ADJUSTING THE ROTARY HOOK LUBRICATION AMOUNT CAUTION Be careful not to touch your fingers or the lubrication amount check sheet against moving parts such as the rotary hook or the feed mechanism when checking the amount of oil supplied to the rotary hook, otherwise injury may result. Use the following procedure to check the amount of oil being supplied to the rotary hook when replacing the rotary hook or when changing the sewing speed.
10. TROUBLESHOOTING 10. TROUBLESHOOTING y Please check the following points before calling for repairs or service. y If the following remedies do not fix the problem, turn off the power switch and consult a qualified technician or the place of purchase. CAUTION Turn off the power switch and disconnect the power cord before carrying out troubleshooting. The motor will keep turning even after the power is switched off as a result of the motor’s inertia. Wait until the motor stops fully before starting work.
10. TROUBLESHOOTING Problem 4 Skipped stitches while sewing Possible cause occur 2945M Page y Is the needle tip bent? Is the needle tip blunt? If the needle tip is bent or broken, replace the needle. y Is the needle properly installed? If it is incorrect, install the needle correctly. y Is the machine properly threaded? If it is incorrect, thread the thread correctly. y Is the presser foot pressure too weak? Adjust the presser foot pressure.
10. TROUBLESHOOTING Problem 6 Possible cause Uneven seam 2948M 7 Large degree of puckering (excess tension) 2949M 8 Material slippage Page y Is the presser foot pressure too weak? Adjust the presser foot pressure. y Is the feed dog too low? Adjust the feed dog height. y Is the bobbin scratched? If the bobbin is damaged, smooth it with an oiled grindstone or replace it. y Is the V-belt tension too low? Adjust so that there is 10-14 mm of deflection in the V-belt when it is pushed with a finger.
10. TROUBLESHOOTING Problem 10 Possible cause Upper and lower threads are breaking. 0471M 11 Broken needles y Is the needle bent or is the needle tip broken? Replace the needle if it is bent or broken. y Is the needle properly installed? If it is incorrect, install the needle correctly. y Is the machine properly threaded? If it is incorrect, thread the thread correctly. y Is the oil tank filled with lubricating oil? If the level of lubricating oil is below the bottom reference line, add more oil.
INSTRUCTION MANUAL http://www.brother.com/ T-8420B, 8450B, 8720B, 8750B SA2762-401 2005.04.