
Printer Technical Instructions
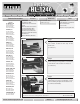

Step 11
Slide the drum axle from the drum. Using
a small flat blade screwdriver lift the clean-
ing brush contact to slide the drum axle
o
ut from the end of the drum unit.
(See Photo 9)
Photo 9
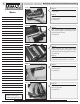
Step 12
Lift the drum out from the gear side.
(See Photo 10)
NOTE: The drum will come into four parts.
On the non gear side a white end cap
holds a tension spring against the drum
hub.
(See Photo 11)
On the gear side there is a black gear that
fits against the white gear.
(See Photo 12)
Photo 10
Photo 11
Photo 12
Resetting the Drum Counter
After replacing the drum unit, keep the
front cover open and press CLEAR.
T
he displa
y will sho
w
“Replace Drum?
1.Yes 2. No”; Press “1”. The display will
show “Accepted”. Close the front cover.
T
he c
ounter is reset!
N
eed help with a particular remanu-
facturing problem?
Call the Technical Resource Center from
8am - 5pm PST: 800 394.9900
Brother HL-1240 Drum Unit Technical Instructions 3
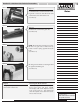
Step 13
Using dry compressed air or a vacuum
clean out the drum unit.
Notes