Quick Setup Guide Start Here (EU only) HL-3040CN Before you can use the printer, read this Quick Setup Guide for the correct setup and installation. To view the Quick Setup Guide in other languages, please visit http://solutions.brother.com/. IMPORTANT DO NOT connect the interface cable yet.
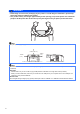
WARNING • Plastic bags are used in the packaging of your printer. To avoid danger of suffocation, please keep these bags away from babies and children. • This printer is heavy and weighs approximately 41.9 lb. (19.0 kg). To prevent injuries use at least two people to lift the printer. Be careful not to pinch your fingers when you put the printer back down. Note Keep the printer a gap roughly as shown in the illustration. 510mm (20.1 in.) 100mm (4 in.) 100mm (4 in.) 120mm (4.7 in.
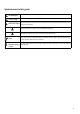
Symbols used in this guide WARNING WARNINGS tell you what to do to prevent possible personal injury. CAUTION CAUTIONS specify procedures you must follow or avoid to prevent possible minor injuries. IMPORTANT IMPORTANT specify procedures you must follow or avoid to prevent possible damage to the printer or other objects. Electrical Hazard icons alert you to a possible electrical shock. Hot Surface icons warn you not to touch printer parts that are hot.
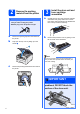
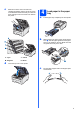
2 IMPORTANT Install the drum unit and toner cartridge assemblies 3 Remove the packing material from the printer a • Save all packing material and the carton in case you have to ship your printer. Unpack the four drum unit and toner cartridge assemblies and gently shake each of them from side to side several times to distribute the toner evenly inside the assembly. • DO NOT plug in the AC power cord yet. a b Remove the packing tape from the outside of the printer.
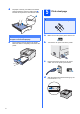
c Slide all four of the drum unit and toner cartridge assemblies into the printer as shown in the illustration. Make sure that you match the toner cartridge color to the same color label on the printer. a b C - Cyan Y - Yellow M - Magenta K - Black d 4 Load paper in the paper tray Pull the paper tray completely out of the printer. While pressing the green paper-guide release lever a, slide the paper guides to fit the paper size you are loading in the tray.
d 5 Put paper in the tray, and make sure that the paper is below the maximum paper mark a. The side to be printed on must be face down. Print a test page IMPORTANT DO NOT connect the interface cable yet. IMPORTANT a Make sure that the printer power switch is off. b Connect the AC power cord to the printer. Make sure the paper guides touch the sides of the paper so it will feed properly. e Put the paper tray firmly back in the printer. Make sure that it is completely inserted into the printer.
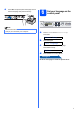
e 6 Press Go. The printer prints a test page. Check that the test page has printed correctly. Set your language on the control panel Note This function will not be available after the first print job you send from your computer. a b c d Press + or - to choose General Setup. Press OK. General Setup Press OK again. Local Language Press + or - to choose your language. Press OK to accept. English Press Cancel to exit from Menu. Now go to Go to the next page to install the printer driver.
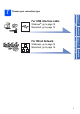
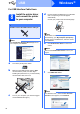
For USB interface cable 9 Macintosh Windows®, go to page 14 Macintosh, go to page 18 Windows® Wired Network For Wired Network Macintosh USB Windows®, go to page 10 Macintosh, go to page 12 Windows® 7 Choose your connection type
USB Windows® For USB Interface Cable Users 8 Install the printer driver and connect the printer to your computer d Put the supplied CD-ROM into your CD-ROM drive. The opening screen will appear automatically. Choose your printer model and the language. IMPORTANT DO NOT connect the USB interface cable yet. Note If the Brother screen does not appear automatically, go to My Computer (Computer), double-click the CD-ROM icon, and then doubleclick start.exe.
USB g When the License Agreement window appears, click Yes if you agree to the License Agreement. Windows® j Click Finish. Note • If you do not want to set your printer as Default printer, uncheck Set as Default Printer. Remove the label covering the USB interface connector. Finish The installation is now complete. Note i XML Paper Specification Printer Driver When this screen appears, make sure the printer power switch is on.
USB Macintosh For USB Interface Cable Users 8 a Connect the printer to your Macintosh and install the driver e Remove the label covering the USB interface connector. f b Double-click the HL3000 icon on your desktop. Double-click the Start Here icon. Follow the on-screen instructions. Click Install Printer Driver on the menu screen. Connect the USB cable to the USB connector marked with a symbol, and then connect the cable to your Macintosh.
USB i Macintosh Choose the printer you wish to connect, and then click OK. Finish The installation is now complete. 13 Macintosh When this screen appears, click OK.
Wired Network Windows® For Wired Network Interface Cable Users 8 TCP/IP For Peer-to-Peer network printer users 1 d Put the supplied CD-ROM into your CD-ROM drive. The opening screen will appear automatically. Choose your printer model and the language. TCP/IP Note a Router b Network printer If the Brother screen does not appear automatically, go to My Computer (Computer), double-click the CD-ROM icon, and then doubleclick start.exe.
Wired Network g When the License Agreement window appears, click Yes if you agree to the License Agreement. Windows® j Choose your printer, and then click Next. Note h Choose Brother Peer-to-Peer Network Printer, and then click Next. If your printer takes a long time (about 1 minute) to appear on the list, click Refresh. Click Finish. • If you want to disable the Status Monitor, uncheck Enable Status Monitor.
Wired Network 8 For shared network printer users Windows® c Click Install Printer Driver on the menu screen. Note Choose the Install Printer Driver icon for your region. TCP/IP a b c d Client computer Also known as “Server” or “Print server” TCP/IP or USB Printer d Click Network cable users. Note If you are going to connect to a shared printer on your network, we recommend that you ask your system administrator about the queue or share name for the printer prior to installation.
Wired Network f Choose Network Shared Printer, and then click Next. Windows® Note XML Paper Specification Printer Driver The XML Paper Specification Printer Driver is the most suitable driver when printing from the applications that use the XML Paper Specification documents. Please download the latest driver by accessing the Brother Solutions Center at http://solutions.brother.com/. g Choose your printer's queue, and then click OK. Click Finish.
Wired Network Macintosh For Wired Network Interface Cable Users 8 a Connect the printer to your Macintosh and install the driver e Connect the network interface cable to the LAN connector marked with a symbol and then connect it to a free port on your hub. f b c 18 Click Network cable users and follow the on-screen instructions. Then, restart your Macintosh. Make sure the printer power switch is on. Turn on your Macintosh. Put the supplied CDROM into your CD-ROM drive.
Wired Network Macintosh Note • If there is more than one of the same printer model connected on your network, the MAC Address (Ethernet Address) will be displayed after the model name. You can also confirm your IP Address by scrolling to the right. • You can find your printer’s MAC Address (Ethernet Address) and IP Address by printing out the Printer Settings Page. See Print the Printer Settings Page on page 22. i When this screen appears, click OK.
For Network Users BRAdmin Light utility (For Windows® users) The BRAdmin Light is a utility for initial setup of Brother network connected devices. It can also search for Brother products in a TCP/IP environment, view the status and configure basic network settings, such as IP Address. For more information on BRAdmin Light, visit us at http://solutions.brother.com/.
For Network Users BRAdmin Light utility (For Mac OS X users) The BRAdmin Light is a utility for initial setup of Brother network connected devices. It can also search for Brother products on your network, view the status and configure basic network settings, such as IP Address from a computer running Mac OS X 10.3.9 or greater. The BRAdmin Light software will be installed automatically when you install the printer driver. If you have already installed the printer driver, you don’t have to install it again.
For Network Users Web Based Management (web browser) Reset the network settings to the factory default The Brother print server is equipped with a web server that allows you to monitor its status or change some of its configuration settings, using HTTP (Hyper Text Transfer Protocol). To reset all network settings of the print server to its factory default, follow the steps below. a Note • The login name for the Administrator is ‘admin’ (case sensitive) and the default password is ‘access’.
Other Information Safety precautions To use the printer safely If you DO NOT follow these safety instructions, there is a possibility of a fire, electrical shock, burn or suffocation. Please keep these instructions for later reference and read them before attempting any maintenance. WARNING There are high voltage electrodes inside the printer. Before you clean the inside of the printer, make sure that you have turned off the power switch and unplugged the printer from the AC power outlet.
Other Information CAUTION Lightning and power surges can damage this product! We recommend that you use a quality surge protection device on the AC power outlet, or unplug the cords during a lightning storm. After you have just used the printer, some internal parts of the printer will be extremely hot. When you open the top or back cover (back output tray) of the printer, DO NOT touch the shaded parts shown in the illustration.
Other Information Regulations Federal Communications Commission (FCC) Declaration of Conformity (USA only) Responsible Party: Brother International Corporation 100 Somerset Corporate Boulevard Bridgewater, NJ 08807-0911 USA Telephone: (908) 704-1700 declares, that the products Product name: Color Printer HL-3040CN Model number: HL-30C comply with Part 15 of the FCC Rules.
Other Information Disconnect device This product must be installed near an AC power outlet that is easily accessible. In case of emergencies, you must disconnect the power cord from the AC power outlet to shut off power completely. EU Directive 2002/96/EC and EN50419 This equipment is marked with the above recycling symbol. It means that at the end of the life of the equipment you must dispose of it separately at an appropriate collection point and not place it in the normal domestic unsorted waste stream.
Other Information Shipment of the printer If for any reason you must ship your printer, carefully package the printer to avoid any damage during transit. We recommend that you save and use the original packaging. The printer should also be adequately insured with the carrier. b Fully open the top cover and take out all the drum unit and toner cartridge assemblies.
Other Information e Reinstall the belt unit back in the printer. i j f 28 Using two people, place the printer into the plastic bag. Put the printer and the Styrofoam pieces into the carton. Match the front side of the printer to the “FRONT” mark on the Styrofoam pieces. Put the Styrofoam piece for the drum unit and toner cartridge assemblies on the top of the printer. Reinstall the original packing material into the printer. g Close the top cover of the printer.
Other Information Supplied CD-ROM You can find a variety of information on the CD-ROM. Windows® Macintosh Install Printer Driver Install the printer driver. Install Other Drivers or Utilities Install optional drivers, utilities and Network management tools. Documentation View the Printer User’s Guide and Network User's Guide in HTML format. You can also view the manuals in PDF format by accessing the Brother Solutions Center.
Other Information Control panel 3 a Data LED On: Data is in the printer memory. Blinking: Receiving / processing data. Off: No remaining data in the memory. b Error LED Blinking: There is a problem with the printer. (Refer to the User's Guide for trouble shooting.) Off: There is no problem with the printer. c Menu buttons +: Scroll forward through menus and the available options. -: Scroll backward through menus and the available options. OK: Choose the control panel menu. Set the chosen menu and settings.
Options and Consumables Option The printer has the following optional accessory. You can expand the capabilities of the printer by adding this item. For more information about the compatible SO-DIMM Memory, visit us at http://solutions.brother.com/. For installing the SO-DIMM Memory, see Chapter 4 of the User's Guide on the CD-ROM. SO-DIMM Memory You can expand the memory by installing a (144-pin SO-DIMM) memory module.
Trademarks Brother and the Brother logo are registered trademarks and BRAdmin Light and BRAdmin Professional are trademarks of Brother Industries, Ltd. Microsoft, Windows, Windows Server and Internet Explorer are registered trademarks of Microsoft Corporation in the United States and/or other countries. Windows Vista is either a registered trademark or a trademark of Microsoft Corporation in the United States and/or other countries. Apple, Macintosh and Safari are trademarks of Apple Inc.