
User Manual

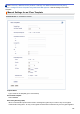


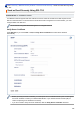
Table Of Contents
- Online User's Guide HL-5580D/HL-5585D/HL-5590DN/HL-5595DN
- Table of Contents
- Before You Use Your Brother Machine
- Introduction to Your Brother Machine
- Paper Handling
- Print
- Print from Your Computer (Windows®)
- Print a Document (Windows®)
- Print More Than One Page on a Single Sheet of Paper (N in 1) (Windows®)
- Print as a Poster (Windows®)
- Print on Both Sides of the Paper (Windows®)
- Print as a Booklet (Windows®)
- Secure Print (Windows®)
- Use a Macro from Your Computer (Windows®)
- Use a Preset Print Profile (Windows®)
- Change the Default Print Settings (Windows®)
- Print a Document Using the BR-Script3 Printer Driver (PostScript® 3™ Language Emulation) (Windows®)
- Monitor the Status of the Machine from Your Computer (Windows®)
- Print Settings (Windows®)
- Print from Your Computer (Macintosh)
- Print a Document (Mac)
- Print on Both Sides of the Paper (Mac)
- Print More Than One Page on a Single Sheet of Paper (N in 1) (Mac)
- Secure Print (Macintosh)
- Print a Document Using the BR-Script3 Printer Driver (PostScript® 3™ language emulation) (Macintosh)
- Monitor the Status of the Machine from Your Computer (Macintosh)
- Print Options (Macintosh)
- Print One Page Duplicates on Different Types of Paper
- Cancel a Print Job
- Test Print
- Print from Your Computer (Windows®)
- Network
- Security
- Lock the Machine Settings
- Network Security Features
- Before Using Network Security Features
- Secure Function Lock 3.0
- Manage Your Network Machine Securely Using SSL/TLS
- Introduction to SSL/TLS
- Certificates and Web Based Management
- Supported Security Certificate Features
- Create and Install a Certificate
- Manage Multiple Certificates
- Manage Your Network Machine Securely Using Web Based Management
- Manage Your Network Machine Securely Using BRAdmin Professional 3 (Windows®)
- Print Documents Securely Using SSL/TLS
- Manage Your Network Machine Securely Using IPsec
- Send an Email Securely
- Use IEEE 802.1x Authentication for a Wired or a Wireless Network
- Store Print Log to Network
- Mobile/Web Connect
- Troubleshooting
- Routine Maintenance
- Machine Settings
- Appendix
- Glossary

Home > Security > Network Security Features > Send an Email Securely > Configure Email Sending Using
Web Based Management
Configure Email Sending Using Web Based Management
Related Models: HL-5590DN/HL-5595DN
We recommend using Web Based Management to configure secured email sending with user authentication,
or email sending using SSL/TLS.
1. Start your web browser.
2. Type "http://machine's IP address" in your browser's address bar (where "machine's IP address" is the
machine's IP address).
For example:
http://192.168.1.2
• If you are using a Domain Name System or enable a NetBIOS name, you can type another name, such
as "SharedPrinter" instead of the IP address.
- For example:
http://SharedPrinter
If you enable a NetBIOS name, you can also use the node name.
- For example:
http://brnxxxxxxxxxxxx
The NetBIOS name can be found in the Network Configuration Report.
• For Macintosh, access Web Based Management by clicking the machine's icon on the Status Monitor
screen.
3. No password is required by default. Type a password if you have set one, and then click .
4. Click the Network tab.
5. Click Protocol in the left navigation bar.
6. In the SMTP field, click Advanced Settings and make sure the status of SMTP is Enabled.
7. Configure the SMTP settings.
• Confirm that the email settings are correct after configuration by sending a test email.
• If you do not know the SMTP server settings, contact your network administrator or Internet Service
Provider (ISP).
8. When finished, click Submit.
The Test Send E-mail Configuration dialog box appears.
9. Follow the instructions in the dialog box to test the current settings.
Related Information
• Send an Email Securely
153