
User Manual
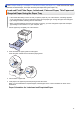
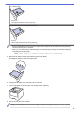


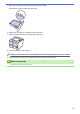
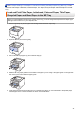
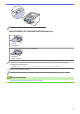

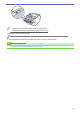
Table Of Contents
- Online User's Guide HL-5580D/HL-5585D/HL-5590DN/HL-5595DN
- Table of Contents
- Before You Use Your Brother Machine
- Introduction to Your Brother Machine
- Paper Handling
- Print
- Print from Your Computer (Windows®)
- Print a Document (Windows®)
- Print More Than One Page on a Single Sheet of Paper (N in 1) (Windows®)
- Print as a Poster (Windows®)
- Print on Both Sides of the Paper (Windows®)
- Print as a Booklet (Windows®)
- Secure Print (Windows®)
- Use a Macro from Your Computer (Windows®)
- Use a Preset Print Profile (Windows®)
- Change the Default Print Settings (Windows®)
- Print a Document Using the BR-Script3 Printer Driver (PostScript® 3™ Language Emulation) (Windows®)
- Monitor the Status of the Machine from Your Computer (Windows®)
- Print Settings (Windows®)
- Print from Your Computer (Macintosh)
- Print a Document (Mac)
- Print on Both Sides of the Paper (Mac)
- Print More Than One Page on a Single Sheet of Paper (N in 1) (Mac)
- Secure Print (Macintosh)
- Print a Document Using the BR-Script3 Printer Driver (PostScript® 3™ language emulation) (Macintosh)
- Monitor the Status of the Machine from Your Computer (Macintosh)
- Print Options (Macintosh)
- Print One Page Duplicates on Different Types of Paper
- Cancel a Print Job
- Test Print
- Print from Your Computer (Windows®)
- Network
- Security
- Lock the Machine Settings
- Network Security Features
- Before Using Network Security Features
- Secure Function Lock 3.0
- Manage Your Network Machine Securely Using SSL/TLS
- Introduction to SSL/TLS
- Certificates and Web Based Management
- Supported Security Certificate Features
- Create and Install a Certificate
- Manage Multiple Certificates
- Manage Your Network Machine Securely Using Web Based Management
- Manage Your Network Machine Securely Using BRAdmin Professional 3 (Windows®)
- Print Documents Securely Using SSL/TLS
- Manage Your Network Machine Securely Using IPsec
- Send an Email Securely
- Use IEEE 802.1x Authentication for a Wired or a Wireless Network
- Store Print Log to Network
- Mobile/Web Connect
- Troubleshooting
- Routine Maintenance
- Machine Settings
- Appendix
- Glossary

Home > Paper Handling > Load Paper > Load and Print Using the Paper Tray > Load and Print Plain Paper,
Letterhead, Coloured Paper, Thin Paper and Recycled Paper Using the Paper Tray
Load and Print Plain Paper, Letterhead, Coloured Paper, Thin Paper and
Recycled Paper Using the Paper Tray
• If the Check Size setting is set to On and you pull the paper tray out of the machine, a message appears
on the LCD asking if you want to change the paper size and paper type. Change the paper size and paper
type settings if needed, following the LCD instructions.
• When you load a different size and type of paper in the tray, you must change the Paper Size and Paper
Type settings in the machine or on your computer, also.
1. Pull the paper tray completely out of the machine.
2. Press and slide the paper guides to fit the paper.
Press the green release levers to slide the paper guides.
3. Fan the stack of paper well.
4. Load paper in the paper tray with the printing surface face down.
When you use Letterhead or Preprinted paper, load the paper in the correct orientation as shown in the
illustrations.
Paper Orientation for Letterhead and Preprinted Paper
17