
BRAdmin Professional 4 for Microsoft Azure User's Guide
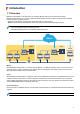
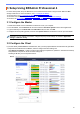

Table Of Contents

4
For each Azure profile, set up the Master first, then Client/Cloud Connection using the same Table and Blob
storage containers. For more information, see
3.1 Configure the Master.
To use the Client, see 3.1 Configure the Master and 3.2 Configure the Client.
To use Cloud Connection, see 3.1 Configure the Master and 3.3 Cloud Connection Settings.
To use both, see 3.1 Configure the Master, 3.2 Configure the Client and 3.3 Cloud Connection Settings.
3.1 Configure the Master
1. Download the latest version of BRAdmin Professional 4 onto your computer.
2. From the Master, click the Devices tab and then select the New Azure profile from the left navigation bar.
3. Type the SAS key into the Blob URI: and Table URI: fields, and then click OK.
4. Configure the Azure polling periods, and then click Upload. BRAdmin Professional 4 is set up as the Master.
Depending on your network environment, configure the proxy server settings as needed in Application
settings > Network > Proxy.
3.2 Configure the Client
If you have already installed BRAdmin Professional 4, then you have jumped ahead of the instructions we give below:
1. Export the Client INI file from the Master, and then configure the Client setting lock.
Click Export client INI file… button to create a Client setting lock password - (between 1-255 ASCII characters).
This password is required to unlock the Client setting lock.
Handling of INI files you have exported caution.
3 Setup Using BRAdmin Professional 4
Master