
User's Manual

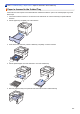


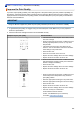
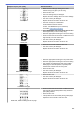
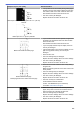
Table Of Contents
- Online User's Guide HL-L5000D/HL-L5100DN/HL-L5200DW/HL-L5200DWT/HL-L6200DW/HL-L6200DWT/HL-L6300DW
- Table of Contents
- Before You Use Your Brother Machine
- Introduction to Your Brother Machine
- Paper Handling
- Print
- Print from Your Computer (Windows®)
- Print a Document (Windows®)
- Print More Than One Page on a Single Sheet of Paper (N in 1) (Windows®)
- Print as a Poster (Windows®)
- Print on Both Sides of the Paper (Windows®)
- Print as a Booklet (Windows®)
- Secure Print (Windows®)
- Use a Macro from Your Computer (Windows®)
- Use a Preset Print Profile (Windows®)
- Change the Default Print Settings (Windows®)
- Print a Document Using the BR-Script3 Printer Driver (PostScript® 3™ Language Emulation) (Windows®)
- Monitor the Status of the Machine from Your Computer (Windows®)
- Print Settings (Windows®)
- Print from Your Computer (Macintosh)
- Print a Document (Macintosh)
- Print on Both Sides of the Paper (Macintosh)
- Print More Than One Page on a Single Sheet of Paper (N in 1) (Macintosh)
- Secure Print (Macintosh)
- Print a Document Using the BR-Script3 Printer Driver (PostScript® 3™ language emulation) (Macintosh)
- Monitor the Status of the Machine from Your Computer (Macintosh)
- Print Options (Macintosh)
- Print One Page Duplicates on Different Types of Paper
- Cancel a Print Job
- Test Print
- Print from Your Computer (Windows®)
- Network
- Get Started
- Network Management Software and Utilities
- Additional Methods of Configuring Your Brother Machine for a Wireless Network
- Before Configuring Your Brother Machine for a Wireless Network
- Configure Your Machine for a Wireless Network
- Configure Your Machine for a Wireless Network Using the One Push Method of Wi-Fi Protected Setup™ (WPS)
- Configure Your Machine for a Wireless Network Using the PIN Method of Wi-Fi Protected Setup™ (WPS)
- Configure Your Machine for a Wireless Network in Ad-Hoc Mode (For IEEE 802.11b/g/n)
- Configure Your Machine for a Wireless Network Using the Machine's Control Panel Setup Wizard
- Configure Your Machine for a Wireless Network When the SSID Is Not Broadcast
- Configure Your Machine for an Enterprise Wireless Network
- Use Wi-Fi Direct®
- Print from Your Mobile Device Using Wi-Fi Direct
- Configure Your Wi-Fi Direct Network
- Wi-Fi Direct Network Configuration Overview
- Configure Your Wi-Fi Direct Network Using the One-Push Method
- Configure Your Wi-Fi Direct Network Using the One-Push Method and Wi-Fi Protected Setup™ (WPS)
- Configure Your Wi-Fi Direct Network Using the PIN Method
- Configure Your Wi-Fi Direct Network Using the PIN Method of Wi-Fi Protected Setup™ (WPS)
- Configure Your Wi-Fi Direct Network Manually
- Advanced Network Features
- Technical Information for Advanced Users
- Security
- Lock the Machine Settings
- Network Security Features
- Before Using Network Security Features
- Secure Function Lock 3.0
- Use Active Directory® Authentication
- Use LDAP Authentication
- Manage Your Network Machine Securely Using SSL/TLS
- Introduction to SSL/TLS
- Certificates and Web Based Management
- Supported Security Certificate Features
- Create and Install a Certificate
- Manage Multiple Certificates
- Manage Your Network Machine Securely Using Web Based Management
- Manage Your Network Machine Securely Using BRAdmin Professional 3 (Windows®)
- Print Documents Securely Using SSL/TLS
- Manage Your Network Machine Securely Using IPsec
- Send an Email Securely
- Use IEEE 802.1x Authentication for a Wired or a Wireless Network
- Store Print Log to Network
- Mobile/Web Connect
- Troubleshooting
- Routine Maintenance
- Machine Settings
- Appendix
- Glossary

Examples of poor print quality Recommendation
Image skewed
• Make sure the paper or other print media is loaded
correctly in the paper tray and the guides are not too
tight or too loose against the paper stack.
• Set the paper guides correctly.
• The paper tray may be too full.
• Check the paper type and quality.
• Check for loose objects such as torn paper inside the
machine.
• If the problem only occurs during automatic 2-sided
printing, check for torn paper in the 2-sided tray. Verify
the 2-sided tray is inserted completely and the back
cover is closed completely.
Curled or wavy
• Check the paper type and quality. High temperatures
and high humidity will cause paper to curl.
• If you do not use the machine often, the paper may
have been in the paper tray too long. Turn over the
stack of paper in the paper tray. Also, fan the paper
stack, and then rotate the paper 180° in the paper
tray.
• Open the back cover (face up output tray) to let the
printed paper exit onto the face up output tray.
• Choose Reduce Paper Curl mode in the printer driver
when you do not use our recommended print media.
Wrinkles or creases
• Make sure paper is loaded correctly.
• Check the paper type and quality.
• Turn over the stack of paper in the tray or rotate the
paper 180° in the input tray.
Poor fixing
• Make sure the media type setting in the driver
matches the type of paper you are using.
• Choose Improve Toner Fixing mode in the printer
driver.
If this selection does not provide enough
improvement, change the printer driver setting in
Media Type to a thick setting. If you are printing an
envelope, choose Env. Thick in the media type
setting.
Envelope creases
• Make sure envelopes are printed with the back cover
(face up output tray) opened.
• Make sure envelopes are fed only from the MP tray.
Related Information
• Troubleshooting
• Test Print
• Clean the Drum Unit
265