
User's Manual
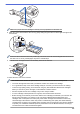


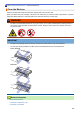
Table Of Contents
- Online User's Guide HL-L5000D/HL-L5100DN/HL-L5200DW/HL-L5200DWT/HL-L6200DW/HL-L6200DWT/HL-L6300DW
- Table of Contents
- Before You Use Your Brother Machine
- Introduction to Your Brother Machine
- Paper Handling
- Print
- Print from Your Computer (Windows®)
- Print a Document (Windows®)
- Print More Than One Page on a Single Sheet of Paper (N in 1) (Windows®)
- Print as a Poster (Windows®)
- Print on Both Sides of the Paper (Windows®)
- Print as a Booklet (Windows®)
- Secure Print (Windows®)
- Use a Macro from Your Computer (Windows®)
- Use a Preset Print Profile (Windows®)
- Change the Default Print Settings (Windows®)
- Print a Document Using the BR-Script3 Printer Driver (PostScript® 3™ Language Emulation) (Windows®)
- Monitor the Status of the Machine from Your Computer (Windows®)
- Print Settings (Windows®)
- Print from Your Computer (Macintosh)
- Print a Document (Macintosh)
- Print on Both Sides of the Paper (Macintosh)
- Print More Than One Page on a Single Sheet of Paper (N in 1) (Macintosh)
- Secure Print (Macintosh)
- Print a Document Using the BR-Script3 Printer Driver (PostScript® 3™ language emulation) (Macintosh)
- Monitor the Status of the Machine from Your Computer (Macintosh)
- Print Options (Macintosh)
- Print One Page Duplicates on Different Types of Paper
- Cancel a Print Job
- Test Print
- Print from Your Computer (Windows®)
- Network
- Get Started
- Network Management Software and Utilities
- Additional Methods of Configuring Your Brother Machine for a Wireless Network
- Before Configuring Your Brother Machine for a Wireless Network
- Configure Your Machine for a Wireless Network
- Configure Your Machine for a Wireless Network Using the One Push Method of Wi-Fi Protected Setup™ (WPS)
- Configure Your Machine for a Wireless Network Using the PIN Method of Wi-Fi Protected Setup™ (WPS)
- Configure Your Machine for a Wireless Network in Ad-Hoc Mode (For IEEE 802.11b/g/n)
- Configure Your Machine for a Wireless Network Using the Machine's Control Panel Setup Wizard
- Configure Your Machine for a Wireless Network When the SSID Is Not Broadcast
- Configure Your Machine for an Enterprise Wireless Network
- Use Wi-Fi Direct®
- Print from Your Mobile Device Using Wi-Fi Direct
- Configure Your Wi-Fi Direct Network
- Wi-Fi Direct Network Configuration Overview
- Configure Your Wi-Fi Direct Network Using the One-Push Method
- Configure Your Wi-Fi Direct Network Using the One-Push Method and Wi-Fi Protected Setup™ (WPS)
- Configure Your Wi-Fi Direct Network Using the PIN Method
- Configure Your Wi-Fi Direct Network Using the PIN Method of Wi-Fi Protected Setup™ (WPS)
- Configure Your Wi-Fi Direct Network Manually
- Advanced Network Features
- Technical Information for Advanced Users
- Security
- Lock the Machine Settings
- Network Security Features
- Before Using Network Security Features
- Secure Function Lock 3.0
- Use Active Directory® Authentication
- Use LDAP Authentication
- Manage Your Network Machine Securely Using SSL/TLS
- Introduction to SSL/TLS
- Certificates and Web Based Management
- Supported Security Certificate Features
- Create and Install a Certificate
- Manage Multiple Certificates
- Manage Your Network Machine Securely Using Web Based Management
- Manage Your Network Machine Securely Using BRAdmin Professional 3 (Windows®)
- Print Documents Securely Using SSL/TLS
- Manage Your Network Machine Securely Using IPsec
- Send an Email Securely
- Use IEEE 802.1x Authentication for a Wired or a Wireless Network
- Store Print Log to Network
- Mobile/Web Connect
- Troubleshooting
- Routine Maintenance
- Machine Settings
- Appendix
- Glossary

7. Clean the corona wire inside the drum unit by gently sliding the green tab from left to right and right to left
several times.
Be sure to return the tab to the Home position (a). The arrow on the tab must be aligned with the arrow on
the drum unit. If it is not, printed pages may have a vertical stripe.
8. Install the toner cartridge and drum unit assembly back into the machine.
9. Close the front cover of the machine.
After installing the new drum unit, you must reset the drum counter. See Related Information: Reset the
Drum Counter.
NOTE
• Drum wear and tear occurs due to use and rotation of the drum and interaction with paper, toner and
other materials in the paper path. In designing this product, Brother decided to use the number of
rotations of the drum as a reasonable determinant of the drum life. When a drum reaches the factory-
established rotation limit corresponding to the rated page yield, the product’s LCD will advise you to
replace the drum. The product will continue to function; however, print quality may not be optimal.
• If an unpacked drum unit is placed in direct sunlight (or room light for long periods of time), the unit may
be damaged.
• There are many factors that determine the actual drum life, such as the temperature, humidity, type of
paper, type of toner used and so on. Under ideal conditions, the average drum life is estimated at
approximately 30,000 pages based on 1 page per job and 50,000 pages based on 3 pages per job [A4/
letter simplex pages]. The number of pages may be affected due to a variety of factors including but not
limited to media type and media size.
Because we have no control over the many factors that determine the actual drum life, we cannot
guarantee a minimum number of pages that will be printed by your drum.
• For best performance, use only genuine Brother toner.
• The machine should be used only in a clean, dust-free environment with adequate ventilation.
Printing with a non-Brother drum unit may reduce not only the print quality but also the quality and life of
the machine itself. Warranty coverage does not apply to problems caused by the use of a non-Brother
drum unit.
Related Information
• Replace Supplies
292