
User's Manual

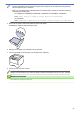


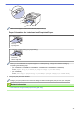


Table Of Contents
- Online User's Guide HL-L5000D/HL-L5100DN/HL-L5200DW/HL-L5200DWT/HL-L6200DW/HL-L6200DWT/HL-L6300DW
- Table of Contents
- Before You Use Your Brother Machine
- Introduction to Your Brother Machine
- Paper Handling
- Print
- Print from Your Computer (Windows®)
- Print a Document (Windows®)
- Print More Than One Page on a Single Sheet of Paper (N in 1) (Windows®)
- Print as a Poster (Windows®)
- Print on Both Sides of the Paper (Windows®)
- Print as a Booklet (Windows®)
- Secure Print (Windows®)
- Use a Macro from Your Computer (Windows®)
- Use a Preset Print Profile (Windows®)
- Change the Default Print Settings (Windows®)
- Print a Document Using the BR-Script3 Printer Driver (PostScript® 3™ Language Emulation) (Windows®)
- Monitor the Status of the Machine from Your Computer (Windows®)
- Print Settings (Windows®)
- Print from Your Computer (Macintosh)
- Print a Document (Macintosh)
- Print on Both Sides of the Paper (Macintosh)
- Print More Than One Page on a Single Sheet of Paper (N in 1) (Macintosh)
- Secure Print (Macintosh)
- Print a Document Using the BR-Script3 Printer Driver (PostScript® 3™ language emulation) (Macintosh)
- Monitor the Status of the Machine from Your Computer (Macintosh)
- Print Options (Macintosh)
- Print One Page Duplicates on Different Types of Paper
- Cancel a Print Job
- Test Print
- Print from Your Computer (Windows®)
- Network
- Get Started
- Network Management Software and Utilities
- Additional Methods of Configuring Your Brother Machine for a Wireless Network
- Before Configuring Your Brother Machine for a Wireless Network
- Configure Your Machine for a Wireless Network
- Configure Your Machine for a Wireless Network Using the One Push Method of Wi-Fi Protected Setup™ (WPS)
- Configure Your Machine for a Wireless Network Using the PIN Method of Wi-Fi Protected Setup™ (WPS)
- Configure Your Machine for a Wireless Network in Ad-Hoc Mode (For IEEE 802.11b/g/n)
- Configure Your Machine for a Wireless Network Using the Machine's Control Panel Setup Wizard
- Configure Your Machine for a Wireless Network When the SSID Is Not Broadcast
- Configure Your Machine for an Enterprise Wireless Network
- Use Wi-Fi Direct®
- Print from Your Mobile Device Using Wi-Fi Direct
- Configure Your Wi-Fi Direct Network
- Wi-Fi Direct Network Configuration Overview
- Configure Your Wi-Fi Direct Network Using the One-Push Method
- Configure Your Wi-Fi Direct Network Using the One-Push Method and Wi-Fi Protected Setup™ (WPS)
- Configure Your Wi-Fi Direct Network Using the PIN Method
- Configure Your Wi-Fi Direct Network Using the PIN Method of Wi-Fi Protected Setup™ (WPS)
- Configure Your Wi-Fi Direct Network Manually
- Advanced Network Features
- Technical Information for Advanced Users
- Security
- Lock the Machine Settings
- Network Security Features
- Before Using Network Security Features
- Secure Function Lock 3.0
- Use Active Directory® Authentication
- Use LDAP Authentication
- Manage Your Network Machine Securely Using SSL/TLS
- Introduction to SSL/TLS
- Certificates and Web Based Management
- Supported Security Certificate Features
- Create and Install a Certificate
- Manage Multiple Certificates
- Manage Your Network Machine Securely Using Web Based Management
- Manage Your Network Machine Securely Using BRAdmin Professional 3 (Windows®)
- Print Documents Securely Using SSL/TLS
- Manage Your Network Machine Securely Using IPsec
- Send an Email Securely
- Use IEEE 802.1x Authentication for a Wired or a Wireless Network
- Store Print Log to Network
- Mobile/Web Connect
- Troubleshooting
- Routine Maintenance
- Machine Settings
- Appendix
- Glossary

For Legal or Folio size paper, press the release button (1) in the bottom of the paper tray or the release
lever (2) in the back of the tray, and then pull out the back of the paper tray. (Legal and Folio size paper are
not available in some regions.)
For trays with a release button:
1
For trays with a release lever:
2
3. Fan the stack of paper well.
4. Load paper in the paper tray with the printing surface face down.
When you use Letterhead or Preprinted paper, load the paper in the correct orientation as shown in the
illustrations.
Paper Orientation for Letterhead and Preprinted Paper
For 1-sided printing
• face down
• top edge toward the front of the paper tray
For automatic 2-sided printing (long edge binding)
• face up
• bottom edge toward the front of the paper tray
26