
Quick Start Guide
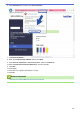


Table Of Contents
- Online User's Guide HL-L9430CDN/HL-L9470CDN
- Table of Contents
- Before You Use Your Machine
- Introduction to Your Machine
- Paper Handling
- Print
- Print from Your Computer (Windows)
- Print from Your Computer (Mac)
- Secure Print Using a USB Flash Drive
- Print Data Directly from a USB Flash Drive
- Print Duplicate Copies
- Cancel a Print Job
- Test Print
- Network
- Supported Basic Network Features
- Configure Network Settings
- Wireless Network Settings
- Use the Wireless Network
- Before Configuring Your Machine for a Wireless Network
- Configure Your Machine for a Wireless Network Using the Setup Wizard from Your Computer
- Configure Your Machine for a Wireless Network Using the Machine's Control Panel Setup Wizard
- Configure Your Machine for a Wireless Network Using the One Push Method of Wi-Fi Protected Setup™ (WPS)
- Configure Your Machine for a Wireless Network Using the PIN Method of Wi-Fi Protected Setup™ (WPS)
- Configure Your Machine for a Wireless Network When the SSID Is Not Broadcast
- Configure Your Machine for an Enterprise Wireless Network
- Use Wi-Fi Direct®
- Enable/Disable Wireless LAN
- Print the WLAN Report
- Use the Wireless Network
- Network Features
- Security
- Before Using Network Security Features
- Configure Certificates for Device Security
- Supported Security Certificate Features
- Step by Step Guide for Creating and Installing a Certificate
- Create a Self-signed Certificate
- Create CSR and Install a Certificate from a Certificate Authority (CA)
- Import and Export the Certificate and Private Key
- Import and Export a CA Certificate
- Manage Multiple Certificates
- Use SSL/TLS
- Use SNMPv3
- Use IPsec
- Use IEEE 802.1x Authentication for a Wired or a Wireless Network
- Use Active Directory Authentication
- Use LDAP Authentication
- Use Secure Function Lock 3.0
- Send an Email Securely
- Store Print Log to Network
- Lock the Machine Settings from the Control Panel
- Administrator
- Mobile/Web Connect
- Brother iPrint&Scan
- Troubleshooting
- Error and Maintenance Messages
- Error Messages When Using the Brother Web Connect Feature
- Paper Jams
- Printing Problems
- Improve the Print Quality
- Network Problems
- AirPrint Problems
- Other Problems
- Check the Machine Information
- Reset Functions
- Routine Maintenance
- Machine Settings
- Appendix

Home > Security > Use SSL/TLS > Print Documents Securely Using SSL/TLS > Print Documents Using
SSL/TLS
Print Documents Using SSL/TLS
To print documents securely with IPP protocol, use the IPPS protocol.
1. Start your web browser.
2. Type "https://machine's IP address" in your browser's address bar (where "machine's IP address" is the
machine's IP address).
For example:
https://192.168.1.2
If you are using a Domain Name System or enable a NetBIOS name, you can type another name, such as
"SharedPrinter" instead of the IP address.
For example:
https://SharedPrinter
If you enable a NetBIOS name, you can also use the node name.
For example:
https://brnxxxxxxxxxxxx
The NetBIOS name can be found in the Network Configuration Report.
3. If required, type the password in the Login field, and then click Login.
The default password to manage this machine’s settings is located on the back of the machine and marked
"Pwd".
4. Go to the navigation menu, and then click Network > Network > Protocol.
Start from
, if the navigation menu is not shown on the left side of the screen.
5. Make sure the IPP checkbox is selected.
If the IPP checkbox is not selected, select the IPP checkbox, and then click Submit.
Restart your machine to activate the configuration.
After the machine restarts, return to the machine's web page, type the password, go to the navigation
menu, and then click Network > Network > Protocol.
6. Click HTTP Server Settings.
7. Select the HTTPS(Port 443) checkbox in the IPP area, and then click Submit.
8. Restart your machine to activate the configuration.
Communication using IPPS cannot prevent unauthorised access to the print server.
Related Information
• Print Documents Securely Using SSL/TLS
129