
Quick Start Guide

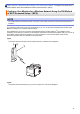
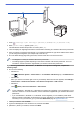

Table Of Contents
- Online User's Guide HL-L9430CDN/HL-L9470CDN
- Table of Contents
- Before You Use Your Machine
- Introduction to Your Machine
- Paper Handling
- Print
- Print from Your Computer (Windows)
- Print from Your Computer (Mac)
- Secure Print Using a USB Flash Drive
- Print Data Directly from a USB Flash Drive
- Print Duplicate Copies
- Cancel a Print Job
- Test Print
- Network
- Supported Basic Network Features
- Configure Network Settings
- Wireless Network Settings
- Use the Wireless Network
- Before Configuring Your Machine for a Wireless Network
- Configure Your Machine for a Wireless Network Using the Setup Wizard from Your Computer
- Configure Your Machine for a Wireless Network Using the Machine's Control Panel Setup Wizard
- Configure Your Machine for a Wireless Network Using the One Push Method of Wi-Fi Protected Setup™ (WPS)
- Configure Your Machine for a Wireless Network Using the PIN Method of Wi-Fi Protected Setup™ (WPS)
- Configure Your Machine for a Wireless Network When the SSID Is Not Broadcast
- Configure Your Machine for an Enterprise Wireless Network
- Use Wi-Fi Direct®
- Enable/Disable Wireless LAN
- Print the WLAN Report
- Use the Wireless Network
- Network Features
- Security
- Before Using Network Security Features
- Configure Certificates for Device Security
- Supported Security Certificate Features
- Step by Step Guide for Creating and Installing a Certificate
- Create a Self-signed Certificate
- Create CSR and Install a Certificate from a Certificate Authority (CA)
- Import and Export the Certificate and Private Key
- Import and Export a CA Certificate
- Manage Multiple Certificates
- Use SSL/TLS
- Use SNMPv3
- Use IPsec
- Use IEEE 802.1x Authentication for a Wired or a Wireless Network
- Use Active Directory Authentication
- Use LDAP Authentication
- Use Secure Function Lock 3.0
- Send an Email Securely
- Store Print Log to Network
- Lock the Machine Settings from the Control Panel
- Administrator
- Mobile/Web Connect
- Brother iPrint&Scan
- Troubleshooting
- Error and Maintenance Messages
- Error Messages When Using the Brother Web Connect Feature
- Paper Jams
- Printing Problems
- Improve the Print Quality
- Network Problems
- AirPrint Problems
- Other Problems
- Check the Machine Information
- Reset Functions
- Routine Maintenance
- Machine Settings
- Appendix

Home > Network > Wireless Network Settings > Use the Wireless Network > Configure Your Machine for a
Wireless Network Using the One Push Method of Wi-Fi Protected Setup
™
(WPS)
Configure Your Machine for a Wireless Network Using the One Push
Method of Wi-Fi Protected Setup
™
(WPS)
NOTE
For certain models, the wireless network connection can be used only when the optional Wireless Module is
installed.
If your wireless access point/router supports WPS (PBC: Push Button Configuration), you can use WPS from
your machine's control panel menu to configure your wireless network settings.
1. Press
[Settings] > [All Settings] > [Network] > [WLAN(Wi-Fi)] > [WPS/Push Button].
2. When [Enable WLAN?] appears, press [Yes].
This will start the wireless setup wizard. To cancel, press [No].
3. When the touchscreen displays [Start WPS on your wireless access point/router, then
press [OK].], press the WPS button on your wireless access point/router. Then press [OK] on your
machine. Your machine will automatically detect your wireless access point/router and try to connect to your
wireless network.
If your wireless device is connected successfully, the machine's LCD displays [Connected]. Press [OK].
You have completed the wireless network setup. To install the drivers and software necessary to use your
machine, go to your model's Downloads page at
support.brother.com.
Related Information
• Use the Wireless Network
Related Topics:
• Wireless LAN Report Error Codes
77